Introduction: Why Chemical Storage Matters in Your Craft Studio
For DIYers and crafters, creative expression often involves an array of materials—paints, adhesives, solvents, cleaning agents, and specialty finishes. These substances bring projects to life but can pose serious risks if improperly stored. Fumes, spills, and accidental mixing can threaten not only your health but also the longevity of your supplies and the safety of your workspace. Safe and efficient chemical storage is much more than a matter of compliance—it’s about creating a haven where creativity flourishes without compromise. This guide will empower you to assess your craft materials, understand hazards, implement best practices for storage and organization, and integrate safety protocols that protect both your projects and your well-being. Whether you’re a weekend hobbyist or running a small craft business from home, mastering chemical storage is essential for a productive, worry-free creative space.
Understanding the Chemicals in Your Craft Studio
Common Chemicals Used by Crafters
Crafters work with a surprising range of chemicals. Understanding what you have is the first step in safe storage. Common chemicals include:
- Paints and Dyes: Acrylics, oils, watercolors, fabric dyes, alcohol inks.
- Adhesives: Epoxy, cyanoacrylate (super glue), rubber cement, spray adhesives.
- Solvents: Mineral spirits, acetone, isopropyl alcohol, turpentine.
- Finishes and Varnishes: Polyurethane, shellac, lacquer.
- Cleaning Agents: Ammonia, bleach, degreasers.
Hazard Categories: What to Look For
Check product labels and Safety Data Sheets (SDS) for hazard symbols and warnings. Key hazard categories include:
- Flammable: Easily ignited by heat, sparks, or flames (e.g., spray paints, solvents).
- Toxic: Harmful if inhaled, ingested, or absorbed (e.g., some glues, dyes).
- Corrosive: Can damage skin or materials (e.g., cleaners, some adhesives).
- Reactive: May explode or produce dangerous gases if mixed (e.g., bleach + ammonia).
Knowing the hazards helps you plan storage to minimize risk.
Assessing and Inventorying Your Studio Chemicals
Step 1: Inventory and Categorize
Start by gathering all chemicals in one area. Record each item’s:
- Name and brand
- Type (paint, adhesive, solvent, etc.)
- Quantity and container size
- Hazard type (from label/SDS)
- Expiration or purchase date
Use a simple spreadsheet or notebook. This process helps you avoid storing forgotten, expired, or duplicate chemicals.
Step 2: Dispose of Expired or Unused Chemicals
Proper disposal of expired or little-used chemicals frees up space and reduces hazard. Check local hazardous waste guidelines—never pour chemicals down the drain or throw them in household trash. Many communities offer collection days or drop-off sites for paints, solvents, and other craft chemicals.
Choosing the Right Storage Location
Ventilation and Air Quality
Store chemicals in a well-ventilated area, away from direct sunlight and heat sources. If possible, place storage cabinets near a window, exhaust fan, or air purifier to reduce the buildup of fumes. Never store flammable chemicals near heaters, furnaces, or electrical panels.
Temperature and Humidity Control
Extreme temperatures can degrade chemicals and increase risks. Aim for a cool, dry environment (50–77°F/10–25°C). Avoid uninsulated garages or attics unless you can control temperature and humidity.
Securing from Children and Pets
Use lockable cabinets or containers to prevent accidental access. If your studio is in a shared household, clear labeling and secure storage are non-negotiable for safety.
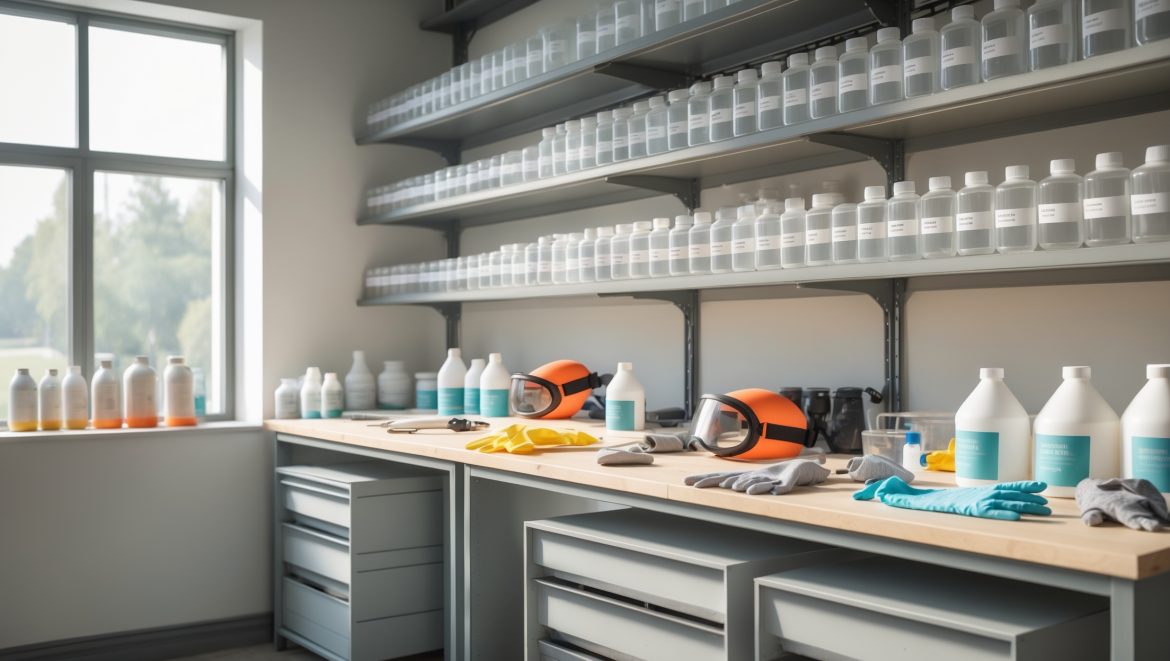
Best Practices for Storing Paints, Solvents, and Adhesives
General Storage Guidelines
- Keep chemicals in their original containers. Manufacturer labeling provides essential hazard and handling information.
- Seal containers tightly. Prevents evaporation, spills, and contamination.
- Label secondary containers. If you must transfer, use durable labels with the chemical name, hazard, and date transferred.
Paints and Dyes
- Store upright on shelves away from direct sunlight.
- For water-based paints, avoid freezing temperatures.
- Keep lids clean to ensure a tight seal and extend shelf life.
Solvents and Flammable Liquids
- Use dedicated metal or flame-resistant cabinets if possible.
- Store only the amount you need for short-term use; keep bulk supplies away from the main workspace.
- Separate flammable solvents from oxidizers and acids.
Adhesives and Specialty Chemicals
- Keep upright and tightly capped to prevent curing in the container.
- Check expiration dates—some adhesives lose strength or become hazardous as they age.
- Store temperature-sensitive adhesives (like epoxies) at recommended ranges.
Custom Storage Solutions for Craft Studios
DIY Storage Cabinets
Building your own storage lets you tailor solutions to your space and workflow. Consider:
- Sturdy metal or sealed wood cabinets with adjustable shelves
- Locking doors for security
- Interior trays or bins for organizing small containers
- Ventilation holes (with mesh covers) to prevent fume buildup
Portable Storage Caddies
For crafters who attend workshops or move between spaces, portable caddies with secure latches and foam inserts prevent spills and make organization easy.
Shelving and Secondary Containment
- Install shelves with raised lips to contain leaks.
- Use plastic trays or pans under containers to catch drips.
- Avoid storing chemicals directly above electrical outlets or heat sources.
Organizing for Efficiency: Labeling and Inventory
Labeling Strategies
- Use color-coded labels for hazard types (red for flammable, yellow for corrosive, etc.).
- Include purchase/expiration dates on labels.
- Post a legend or chart near your storage area to clarify color codes.
Maintaining an Up-to-Date Inventory
Review your chemical inventory every six months. Remove expired, damaged, or unneeded items and update your records. This helps prevent accidental mixing and ensures you’re aware of what’s on hand before purchasing more.
Emergency Preparedness: What Every Craft Studio Needs
Spill Response
- Keep an easily accessible spill kit near your storage area. Include absorbent pads, neutralizers (for acids/bases), disposable gloves, and waste bags.
- For larger spills, know the protocol: ventilate, evacuate, and call local authorities if required.
Fire Safety
- Install a Class B (for flammable liquids) fire extinguisher near the studio’s exit.
- Keep paper towels, rags, and flammable waste in metal cans with self-closing lids.
- Post emergency numbers and basic fire procedures where they’re visible.
First Aid and PPE
- Stock a basic first aid kit with eye wash, burn ointment, and bandages.
- Keep goggles, gloves, and a respirator or mask for handling hazardous substances.
Legal and Environmental Considerations
Compliance with Local Regulations
Many municipalities have rules about storing flammable or toxic substances, even in home studios. Check local fire codes and building regulations. Some chemicals may have volume limits or storage requirements (e.g., self-closing doors on flammable cabinets).
Environmental Best Practices
- Never dispose of chemicals in household waste or down drains.
- Collect and label chemical waste for proper disposal at hazardous waste facilities.
- Choose low-VOC or water-based alternatives when possible to reduce hazard and environmental impact.
Routine Maintenance and Inspections
Monthly Checklist
- Check containers for leaks, corrosion, or damage.
- Wipe down shelves and trays to remove residue.
- Confirm that safety equipment is accessible and functional.
Annual Deep Clean
- Empty cabinets and shelves, clean thoroughly, and reorganize.
- Update inventory records.
- Review emergency procedures and restock spill and first aid kits as needed.
Conclusion: Creating a Safe, Efficient, and Inspiring Craft Studio
Mastering chemical storage is a vital, ongoing aspect of running a creative and safe DIY craft studio. By understanding the materials you use, assessing hazards, and implementing tailored storage solutions, you protect not only your health but also the investment you’ve made in your craft supplies. Smart organization—through clear labeling, regular inventory, and thoughtful arrangement—streamlines your workflow and reduces waste. Emergency preparedness ensures you’re ready for the unexpected, while compliance with local regulations and environmental best practices keeps your studio a responsible part of your community.
Ultimately, safe and efficient chemical storage isn’t a one-time setup but a habit that supports your creative journey. Take time each season to review your systems, update your inventory, and refresh your safety knowledge. The peace of mind and freedom to create without worry are well worth the effort. Your studio should be a space where inspiration thrives, unburdened by preventable hazards. With these strategies, you’ll not only safeguard your projects and your health but also set a standard of professionalism and care that inspires others in the DIY and craft community.
Ready to level up your studio’s safety and efficiency? Implement these best practices today and enjoy a workspace where your creativity can truly shine.


If a spill happens with something like isopropyl alcohol or acetone, what are the immediate steps to make sure my workspace and family stay safe?
If you spill isopropyl alcohol or acetone, first ventilate the area by opening windows and using fans. Wear gloves to protect your skin. Absorb the spill with paper towels or rags, and dispose of them in a sealed bag. Clean the area with soap and water, and keep kids and pets away until it’s totally dry and odor-free.
Could you suggest affordable storage solutions for those of us running craft businesses from home, especially when space is really limited?
For small home studios, consider stackable plastic bins with secure lids, which fit easily on shelves or under tables. Wall-mounted racks or pegboards can also save space by keeping supplies off work surfaces. Label everything clearly and keep flammable or hazardous chemicals in a ventilated, childproof area, even if it’s a lockable metal toolbox.
With so many different chemicals like paints, adhesives, and solvents in one place, how do you organize them without accidentally storing reactive substances together? Any tips on grouping materials by hazard level?
To safely organize chemicals in your studio, keep materials separated by hazard class—store flammable items like solvents away from oxidizers and acids. Use clear labels and dedicate shelves or bins for each group. Refer to product labels or safety data sheets to identify hazards, and never mix unknown chemicals together. This approach helps prevent accidental reactions and keeps your space safer.
As someone who works with both acrylic and oil paints in the same space, is it safe to store all my paints together or should I separate them by type due to different chemical hazards?
It’s a good idea to separate acrylic and oil paints in your studio. Oil paints and their solvents (like turpentine) are more flammable and have different chemical hazards compared to water-based acrylics. Keeping them apart helps reduce the risk of cross-contamination and makes it easier to manage ventilation and spill response for each type.
If a crafter accidentally mixes reactive chemicals, what immediate steps should they take to minimize risks before professional help arrives?
If reactive chemicals are accidentally mixed, leave the area immediately to avoid exposure. Ventilate the space by opening windows or doors if it can be done safely. Do not try to neutralize or contain the spill unless you are trained. Alert others nearby and call emergency services for professional assistance. Avoid re-entering the area until it’s declared safe.
The article mentions referencing Safety Data Sheets for hazard information. Where can I reliably find those sheets for older or partially labeled chemical containers that I’ve accumulated over time?
If you’re missing Safety Data Sheets (SDS) for older or partially labeled chemical containers, try identifying the chemical’s name or manufacturer from any remaining label. Many manufacturers host SDS documents on their websites. For generic or common chemicals, reputable databases like those from OSHA or university safety departments can provide the correct SDS by searching the chemical name. Always compare physical properties to ensure you have the right sheet for your specific material.
When organizing chemicals like adhesives and solvents, how critical is it to separate flammable from toxic substances if space is limited in a home studio?
Separating flammable and toxic chemicals is important for both safety and health, but if space is tight, prioritize storing flammables away from heat sources and in well-ventilated areas. Keep toxic substances in clearly labeled, sealed containers. If you must store them together, use secondary containment like trays to prevent spills and always minimize the total quantity kept on hand.
If I accidentally mix two cleaning agents or adhesives that turn out to be reactive, what should I do immediately to keep myself and my workspace safe? I’d love some troubleshooting steps for this kind of situation.
If you accidentally mix reactive chemicals, step away immediately to avoid inhaling fumes. Ventilate the area by opening windows and doors if you can do so safely. Avoid touching the mixture. Evacuate others from the workspace and contact your local emergency services or poison control for guidance on proper cleanup or containment. Never try to neutralize or dispose of the mixture yourself unless you are certain it’s safe.