Introduction: Why Fire Safety Matters in Your DIY Craft Studio
Every creative project begins with inspiration, but maintaining a safe workspace is what keeps your passion sustainable. DIY craft studios, whether tucked into a spare room or sprawling in a dedicated shed, are often filled with materials and tools that can pose fire hazards—solvents, glues, fabrics, paper, paints, and electrical equipment. Many crafters underestimate the risk, assuming fire safety is only a concern for industrial spaces. In reality, the blend of flammable supplies, power tools, and sometimes overburdened electrical systems makes fire prevention a critical concern for every craft enthusiast.
This comprehensive guide is designed to help you safeguard your creative haven. We’ll cover the most common causes of craft studio fires, break down the essentials of prevention, explain how to select and maintain fire extinguishers, outline safe storage techniques for flammable materials, and walk you through creating an emergency preparedness plan. Whether you’re a hobbyist or running a small business from home, these practical, actionable steps will help you protect your studio, your art, and your peace of mind.
Common Fire Hazards in DIY Craft Studios
Chemical and Material Risks
Many crafting materials are surprisingly flammable. Take stock of what’s in your studio:
- Solvents & Cleaners: Alcohol, acetone, mineral spirits, and paint thinners ignite easily.
- Adhesives: Aerosol sprays, rubber cement, and some glues have high vapor contents.
- Fabrics & Fibers: Cotton, wool, and synthetic fibers can catch fire quickly if exposed to heat sources.
- Papers & Cardboard: Scrapbooking and origami supplies are highly combustible.
- Paints & Finishes: Oil-based paints and varnishes often contain flammable solvents.
Electrical Hazards
The convenience of multiple power tools and lighting can lead to:
- Overloaded outlets or power strips
- Damaged cords or exposed wiring
- Improperly grounded equipment
- Extension cords used as permanent wiring
Heat Sources
Common studio tools can ignite nearby materials if not managed properly:
- Hot glue guns
- Soldering irons
- Heat guns and embossing tools
- Space heaters
- Candles (for wax crafts or ambiance)
Fire Prevention Strategies for Craft Studios
Organizing for Safety
Reduce risks by keeping your workspace tidy and organized:
- Store flammable materials in metal or fire-resistant cabinets, away from heat sources and direct sunlight.
- Maintain clear walkways and uncluttered surfaces to prevent accidental spills or the spread of fire.
- Dispose of oily rags and solvent-soaked wipes in a metal container with a self-closing lid—never in regular trash bins.
Electrical Safety Best Practices
- Inspect cords and plugs regularly for fraying, cracking, or exposed wires. Replace immediately if damaged.
- Use surge-protected power strips and avoid daisy-chaining multiple strips together.
- Don’t overload outlets—check the amperage rating of your circuits and distribute tools accordingly.
- Unplug heat-producing equipment (like glue guns or irons) when not in use, even for short breaks.
Safe Use of Heat Tools
- Place heat-generating tools on non-flammable surfaces such as ceramic tiles or silicone mats.
- Keep a minimum of three feet of clearance around these tools—no papers, fabrics, or combustibles nearby.
- Install heat-resistant pads or trays under small appliances and tools.
- Never leave heat tools unattended while plugged in or operating.
Ventilation and Fume Control
Beyond health risks, fumes from solvents and finishes can accumulate and increase fire danger. Ensure:
- Windows or exhaust fans are used when working with volatile chemicals.
- Containers are sealed immediately after use.
- Fume hoods or localized extraction are in place for spray work.
Fire Detection and Alarm Systems
Choosing and Installing Smoke Detectors
Early detection is your best defense. Install smoke alarms in your studio, even if it’s part of your home. For optimal protection:
- Use photoelectric smoke detectors, which are less prone to false alarms from dust or fumes.
- Place detectors on the ceiling, at least 10 feet from cooking or heat-producing appliances.
- Test alarms monthly and replace batteries at least once a year.
- Replace the entire unit every 10 years or per manufacturer’s recommendation.
Supplementary Fire Detection
- Consider heat detectors for areas where dust or fumes might cause nuisance smoke alarms.
- For larger or detached studios, integrate alarms with your home system for whole-property alerts.
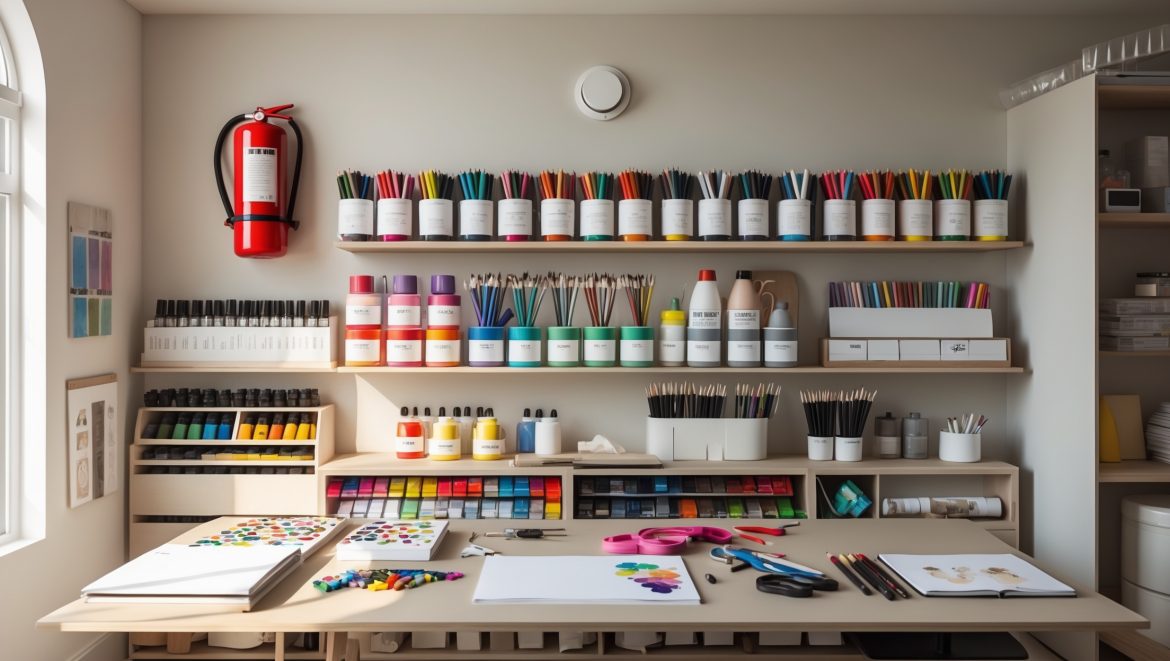
Fire Extinguishers: Selection, Placement, and Maintenance
Which Fire Extinguisher Is Right for Your Studio?
Not all extinguishers are created equal. The best choice for most craft studios is an ABC-rated dry chemical extinguisher, which covers:
- Class A: Ordinary combustibles (paper, wood, fabrics)
- Class B: Flammable liquids (solvents, paints)
- Class C: Electrical fires (tools, wiring)
If your craft involves metal powders (e.g., jewelry making, metal clay), consult a fire safety professional for specialized extinguishers.
Where to Place Extinguishers
- Mount extinguishers near the exit, not deep inside the room—so you don’t get trapped.
- Height should be easily accessible (no higher than 5 feet from the floor).
- Label locations clearly and keep the area unobstructed.
Inspection and Maintenance
- Check the pressure gauge monthly to ensure it’s fully charged.
- Look for signs of damage, corrosion, or tampering.
- Shake dry chemical extinguishers gently every few months to prevent powder from settling.
- Have extinguishers professionally serviced and recharged after any use, or at least every 6 years.
Safe Storage of Flammable Materials
Organizing Flammable Supplies
- Use metal safety cans for solvents and flammable liquids. Store them in a dedicated cabinet marked “Flammable.”
- Keep only the amount you need for active projects out; store bulk supplies in a separate, well-ventilated space if possible.
- Never store flammables near heat sources, windows, or direct sunlight.
- Ensure all containers are tightly sealed and labeled clearly.
Disposal of Hazardous Waste
- Collect used solvents, rags, and other chemical waste in metal containers, and dispose of them at your local hazardous waste facility.
- Do not pour chemicals down the drain or toss them in the regular trash.
Emergency Preparedness: Creating Your Craft Studio Fire Plan
Evacuation Plan
- Identify all exits from your studio—windows, doors, or alternate routes.
- Keep escape paths clear of clutter at all times.
- Create a map of your workspace with exit routes and extinguisher locations. Post it in a visible spot.
- Practice your escape plan periodically, especially if you work with others.
Important Contacts and Resources
- Post emergency phone numbers (fire department, poison control) by the exit.
- If your studio is separate from your home, ensure your address is visible and accessible for first responders.
- Keep a list of your most valuable equipment and materials for insurance and recovery purposes.
First Aid for Minor Burns and Injuries
- Stock a basic first aid kit with burn ointment, bandages, and sterile gauze.
- Learn how to treat minor burns (cool water, never ice) and cuts from tools or glass.
- Know when to seek medical attention for more serious injuries.
Fire Safety Training and Regular Drills
Educate Yourself and Others
- Take a short course or watch online tutorials on fire safety basics and extinguisher use.
- If you have family, employees, or studio-mates, ensure everyone knows the plan and extinguisher locations.
Practice Makes Perfect
- Hold a fire drill at least twice a year. Time your evacuation and review potential obstacles.
- Revisit and update your emergency plan as your studio layout or materials change.
Checklist: Fire Safety Essentials for DIY Craft Studios
- ABC-rated fire extinguisher, mounted and accessible
- Photoelectric smoke alarm, tested monthly
- Clear, clutter-free escape routes
- Metal safety cabinet for flammable materials
- Properly labeled and sealed chemical containers
- Regular inspection of cords, plugs, and outlets
- Heat tools stored on non-flammable surfaces
- Disposal cans for oily rags and hazardous waste
- First aid kit stocked and accessible
- Emergency plan and evacuation map posted
Conclusion: Protecting Your Creative Space and Peace of Mind
Your craft studio is more than four walls and a collection of tools—it’s the heart of your creative world. Investing a few hours to implement fire safety measures is not only about protecting your property, but about ensuring years of uninterrupted creativity. Fires can happen quickly and without warning, but with the right precautions, you can dramatically reduce your risk and respond effectively if an emergency does arise.
Start by surveying your workspace for risks. Organize your supplies, invest in quality alarms and extinguishers, and establish an emergency plan that everyone in your household or studio can follow. Make fire safety part of your regular studio routine, just like cleaning up after a project or sharpening your tools. Periodic checks and practice drills will build confidence and keep you prepared.
Remember, a safe studio is a productive studio. The time you spend on prevention is an investment in your art, your health, and your community. Don’t let a preventable accident disrupt your creative journey—take action now, and create with confidence, knowing your space is protected from fire hazards.


Can you recommend specific types of fire extinguishers that are safest to use around typical craft materials like paints, glues, and fabrics? I want to make sure I’m buying the right one for my small studio.
For a small craft studio with materials like paints, glues, and fabrics, an ABC-rated dry chemical fire extinguisher is a safe and versatile choice. It covers most common fire risks: ordinary combustibles (Class A), flammable liquids (Class B), and electrical equipment (Class C). Make sure the extinguisher is easy to access and regularly checked for proper function.
Could you clarify how often I should review and update my emergency preparedness plan, especially if I frequently switch out materials and tools in my craft studio?
It’s a good idea to review and update your emergency preparedness plan every six months, or anytime you introduce new materials or tools that could change your fire risks. Regular updates help ensure your plan stays relevant and everyone in your space knows the latest procedures.
What should I include in a fire emergency preparedness plan specific to a DIY craft studio? Are there particular evacuation or notification steps to consider if the studio is part of a larger home?
For a DIY craft studio, your fire emergency plan should list all exit routes, the locations of fire extinguishers, and safe spots for meeting outside. If your studio is part of a larger home, make sure everyone in the house is aware of the plan, has a designated escape path from the studio and main living areas, and knows how to alert others—either by shouting or using a central alarm—if there’s a fire.
If I mostly use water-based paints but occasionally work with oil-based ones, how should I separate and store those materials to minimize fire risk?
Water-based paints are generally non-flammable, so they can be stored together in a cool, dry area. For oil-based paints, keep them in their original containers with tight lids, stored in a separate, well-ventilated cabinet away from heat sources. Label the cabinet as flammable and avoid storing oil-based products near water-based supplies to reduce fire risk.
Could you clarify how often fire extinguishers in a home craft studio should be inspected or replaced? The article mentions maintaining extinguishers, but I’m unsure what schedule to follow and what signs indicate it’s time for a replacement.
Fire extinguishers in a home craft studio should be visually checked once a month to ensure they’re accessible, undamaged, and fully charged (check the pressure gauge). Have them professionally inspected once a year. Replace extinguishers immediately if you notice a missing pin, damaged hose, lost pressure, rust, or if they’re past their expiration date (usually 5-15 years depending on model and manufacturer instructions).
If my craft studio is in a detached shed, does your emergency preparedness plan advice change at all compared to an indoor home workspace, especially in terms of evacuation routes or smoke detectors?
With a detached shed, emergency preparedness should include making sure the path from the shed to a safe outdoor area is always clear and well-lit, since you’ll be exiting directly outside. You should still install smoke detectors in the shed, ideally with an interconnected system if possible, so alarms can be heard inside your home as well. Regularly practice your evacuation plan from the shed to ensure everyone knows the safest route.