Introduction: Power Tools in the Modern DIY Craft Studio
Power tools aren’t just for carpenters and home renovators—they’re now indispensable for today’s DIY crafters and creative entrepreneurs. Whether you’re a hobbyist or building a side business, the right power tools can dramatically expand the scope and quality of your work. From intricate wood carving to precise glass cutting, power tools save time, boost accuracy, and unlock new creative techniques. Yet, for beginners, the world of power tools can seem intimidating, filled with technical jargon, safety warnings, and daunting price tags. How do you know which tools are worth your investment? How do you set them up safely in a home-based craft studio? And what’s involved in keeping them running smoothly for years to come?
This comprehensive guide demystifies the process, walking you step-by-step through choosing your first set of essential power tools, creating a safe and functional studio setup, understanding key safety practices, and performing basic maintenance. You’ll also find practical advice on budgeting, space planning, and troubleshooting. By the end, you’ll be empowered to select, use, and care for power tools with confidence—maximizing your creative potential while minimizing risk and expense.
Why Invest in Power Tools for Your Craft Studio?
Unlocking New Creative Possibilities
Hand tools have their place, but power tools multiply what’s possible in a DIY craft studio. They allow for:
- Precision: Consistent cuts, holes, and finishes that hand tools can’t easily match.
- Efficiency: Complete repetitive or labor-intensive tasks in a fraction of the time.
- Materials Versatility: Work with wood, acrylic, metal, glass, and more—often with a single tool and the right accessories.
- Professional Results: Achieve smooth edges, clean joins, and decorative details worthy of boutique shops or craft fairs.
When Hand Tools Are Not Enough
Some craft projects—like furniture upcycling, jewelry making, or large-scale decor—are simply impractical without power assistance. Power tools bridge the gap, letting you tackle ambitious ideas with confidence.
Must-Have Power Tools for DIY Craft Studios
1. Rotary Tool (Dremel or Similar)
Perhaps the most versatile tool for crafters, a rotary tool can engrave, grind, sand, cut, polish, and carve. It’s compact and ideal for detail work on wood, glass, ceramics, metal, and even plastics. Look for variable speed models for greater control.
2. Cordless Drill/Driver
From assembling frames to installing hardware, a cordless drill/driver is a studio staple. Invest in a model with adjustable clutch settings and a good selection of drill and driver bits. Lithium-ion batteries offer long life and quick charging.
3. Jigsaw
Perfect for cutting curves and intricate shapes in wood, MDF, acrylic, and even thin metal sheets. Choose a model with tool-free blade changes and variable speed control for flexibility with different materials.
4. Hot Glue Gun (High & Low Temp)
While not a traditional “power tool,” a glue gun is essential for fast, strong bonding in mixed-media projects. Consider investing in both high- and low-temperature models for different materials.
5. Detail Sander
A palm or detail sander smooths edges, preps surfaces for finishing, and handles tight corners. A dust collection port is a plus for keeping your studio cleaner.
6. Scroll Saw (Optional, for Advanced Crafters)
If you plan on doing intricate fretwork, marquetry, or layered art, a scroll saw enables fine, precise cuts that hand saws can’t match. Start with a compact, bench-mounted model if space is limited.
7. Heat Gun
Useful for embossing, drying paint, bending plastic, removing adhesives, and more. Look for adjustable temperature settings and built-in safety features.
Choosing the Right Tools: Features, Brands, and Budgeting Tips
Essential Features for Craft Studio Tools
- Variable Speed: Allows you to adapt power to different materials and techniques.
- Ergonomics: Lightweight, well-balanced tools reduce fatigue during long crafting sessions.
- Compact Design: Space is at a premium in most home studios; choose tools that store easily.
- Accessory Compatibility: The ability to swap out bits, blades, or attachments expands each tool’s usefulness.
Top Brands for Reliability
- Dremel (rotary tools)
- DeWalt and Makita (drills, sanders, saws)
- Bosch (jigsaws, sanders)
- Ryobi (budget-friendly, wide selection)
- Wagner (heat guns)
Always check for a warranty, and read reviews from fellow crafters for insights on durability and after-sales support.
Budgeting for Your First Power Tool Setup
- Start with multi-purpose tools (rotary tool, drill/driver) before specialty items.
- Shop during seasonal sales or look for gently used tools from reputable sellers.
- Budget $250–$500 for a starter set of quality tools; avoid the cheapest off-brand options for safety and longevity.
- Factor in accessories such as bits, blades, sanding pads, and safety gear.
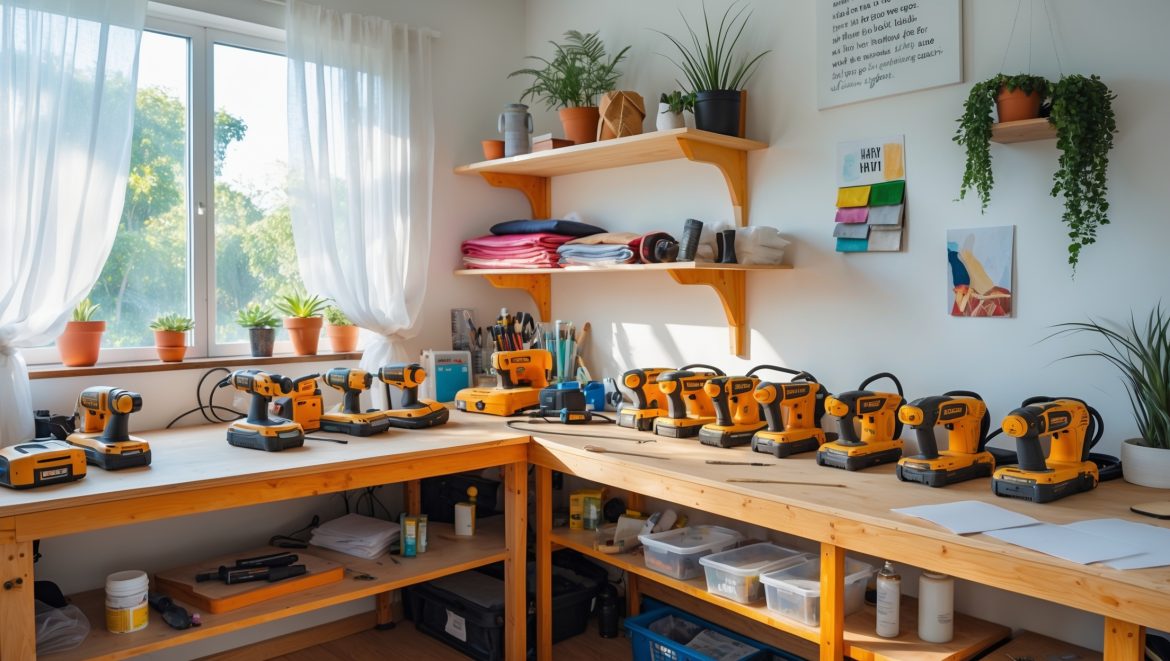
Setting Up Your Power Tool Workstation
Space Planning for Safety and Efficiency
Power tools require more than just bench space. Consider the following when planning your studio:
- Work Surface: A sturdy, level bench with enough clearance for large projects. Bolt-down tools (like scroll saws) for extra stability.
- Electrical Access: Outlets should be grounded and within easy reach. Avoid daisy-chaining extension cords; use a high-quality power strip with surge protection.
- Ventilation: Especially important when sanding, using adhesives, or working with plastics. Position your workstation near a window, or use a portable fan/extractor.
- Lighting: LED task lighting eliminates shadows and reduces eye strain.
- Tool Storage: Wall-mounted racks, pegboards, or drawer organizers keep tools secure and accessible.
- Material Flow: Designate zones for raw materials, active projects, and finished work to minimize clutter and confusion.
Noise & Vibration Considerations
Some power tools are noisy or produce vibrations that can disturb others. Use rubber mats under tools to dampen vibrations, and consider soundproofing measures if your studio is in a shared or residential space.
Safety Essentials: Protecting Yourself and Your Studio
Personal Protective Equipment (PPE)
- Safety Glasses: Always wear when cutting, sanding, or using rotary tools.
- Dust Mask or Respirator: Essential for sanding, cutting MDF, or using adhesives that produce fumes.
- Hearing Protection: Earplugs or earmuffs for prolonged use of loud tools like jigsaws or sanders.
- Gloves: Choose cut-resistant gloves when handling sharp blades or rough materials.
Safe Operating Practices
- Read the Manual: Each tool has unique safety instructions; read and retain the manual for reference.
- Inspect Before Use: Check for frayed cords, loose parts, or damaged blades before every session.
- Secure Your Materials: Use clamps or a vise to prevent movement while cutting or drilling.
- Work Sober: Avoid using power tools if you’re fatigued, distracted, or under the influence of medication or alcohol.
- Keep Workspace Clean: Clear away debris and flammable materials before starting any power tool.
- Unplug When Not in Use: Prevent accidental startups or electrical hazards.
Fire Safety
Keep a fire extinguisher rated for electrical and chemical fires within reach. Never leave hot tools (like glue guns or heat guns) unattended. Plan an exit route in case of emergencies.
Maintenance Best Practices for Power Tools
Routine Cleaning and Inspection
- After Each Use: Wipe down tools with a clean, dry cloth. Remove dust from vents and moving parts with a small brush or compressed air.
- Weekly: Inspect cords, plugs, and battery contacts. Look for wear, corrosion, or fraying.
- Monthly: Lubricate moving parts (as directed by the manual), check and replace worn accessories (blades, bits, pads).
Storage Solutions to Extend Tool Life
- Store power tools in a dry, dust-free environment.
- Keep battery-powered tools charged but avoid leaving them plugged in continuously.
- Use designated cases or padded drawers to protect delicate tools from knocks and drops.
Troubleshooting Common Issues
- Loss of Power: Check outlets, extension cords, and fuses before assuming tool failure.
- Overheating: Let tools cool between uses; clean vents regularly.
- Unusual Noises or Vibrations: Stop use immediately; inspect for loose parts or damaged accessories.
Expanding Your Power Tool Arsenal: When and What to Add Next
Assessing Your Craft Needs
Don’t rush to buy every tool at once. Revisit your creative goals after a few months of hands-on experience. Are you drawn to woodwork, jewelry, upcycling, or mixed media? Let your evolving interests guide future purchases.
Specialty Tools for Advanced Techniques
- Bench Grinder: For sharpening blades and shaping metal.
- Mini Table Saw: For precise straight cuts in wood and plastics.
- Laser Cutter: For engraving and complex patterning (requires special safety and ventilation).
- Compressor & Airbrush: For custom painting and finishing effects.
Always research safety implications and space requirements before adding more powerful or specialized equipment.
Budgeting and Cost Control: Power Tools Without Breaking the Bank
Smart Shopping Strategies
- Bundle Deals: Many brands offer starter kits that include several tools and accessories at a discount.
- Certified Refurbished: Factory-refurbished tools often come with warranties and significant savings.
- Swap Meets & Online Marketplaces: Local maker groups, craft forums, or platforms like Facebook Marketplace can yield high-quality, gently used tools.
- Renting: For rarely used specialty tools, consider renting from hardware stores or tool libraries.
When to Splurge vs. Save
- Invest in quality for tools you’ll use often (e.g., drill/driver, rotary tool).
- Save on accessories—generic sanding pads or bits can be just as effective as name brands for non-critical tasks.
- Avoid no-name or ultra-cheap power tools; they often lack safety features and durability.
Frequently Asked Questions about Power Tools in the Craft Studio
How can I reduce dust and debris from power tools?
Use tools with built-in dust collection or connect a small shop vac. Regularly clean your workspace and consider a portable air filter for sensitive projects.
Can I use industrial tools in a home craft studio?
Some industrial tools are too large or powerful for home use. Always consider safety, ventilation, and noise before introducing heavy-duty equipment. Compact, craft-oriented versions are available for most power tools.
What’s the best way to learn safe tool use?
Read manuals, watch reputable video tutorials, and practice with scrap materials before starting on finished projects. Many community makerspaces offer beginner classes.
Conclusion: Building a Safe, Creative, and Efficient Studio with Power Tools
Integrating power tools into your DIY craft studio is a transformative step that opens up a world of creative potential. The right tools are not just about convenience—they empower you to experiment, iterate, and achieve professional-quality results in less time and with less physical strain. By starting with a carefully chosen set of essentials, setting up your workspace with safety and efficiency in mind, and maintaining your tools diligently, you lay the foundation for years of inspired making.
Remember, every power tool comes with its own learning curve and safety considerations. Take the time to master each one, investing in personal protective equipment and developing good habits from day one. As your skills and interests grow, so too can your collection—always guided by your creative goals and practical studio needs. With thoughtful planning and ongoing care, your craft studio will become a hub of innovation, expression, and joy, where ideas take shape as beautifully and safely as possible. Happy crafting!


Could you clarify what kind of routine maintenance is needed for basic power tools like a jigsaw or rotary tool? Is it something a beginner can handle themselves, or should we bring them in for professional servicing?
Routine maintenance for basic power tools like jigsaws and rotary tools is definitely manageable for beginners. This usually includes cleaning dust and debris after use, checking and changing blades or bits, lightly oiling moving parts if recommended, and inspecting cords for damage. Most of this can be done at home, but if you notice unusual noises, overheating, or electrical issues, it’s best to consult a professional.
Can you give some advice on organizing a power tool setup in a smaller home studio, especially for someone with limited space to work with?
For a small home studio, consider using wall-mounted racks or pegboards to store tools vertically and free up workbench space. Opt for compact, multi-purpose tools when possible. Use stackable bins for accessories and label everything clearly. A foldable workbench or rolling cart can offer flexibility and make it easy to stow everything away when not in use.
Budgeting is a big concern for me—do you have any advice on where to save versus where to splurge when purchasing power tools for a craft studio?
When setting up your craft studio, prioritize spending on versatile, high-quality tools you’ll use often, like a reliable drill or a good soldering iron. You can save by starting with basic versions of specialty tools or buying gently used tools. Also, avoid buying large sets up front; buy individual tools as projects demand.
Could you elaborate on what basic maintenance routines are most important to keep power tools running smoothly in a craft studio setting?
To keep your power tools running smoothly, regularly clean them after use to remove dust and debris, check and tighten any loose screws or parts, lubricate moving components as recommended by the manufacturer, inspect cords and plugs for wear, and keep blades or bits sharp. Storing tools in a dry place also helps prevent rust and damage.
The article talks about efficiency and professional results using power tools, but for someone who mostly works with fabric and paper crafts, which power tools would actually be a worthwhile first investment?
For fabric and paper crafts, a rotary cutter with an electric cutting machine, like a Cricut or Silhouette, is a great first power tool investment. These tools make precise cuts quickly and easily. If you occasionally work with thicker materials, a small cordless drill can also be useful for assembling projects or adding embellishments.
If I’m mostly interested in projects like furniture upcycling and maybe a little jewelry making, which power tools would be the most versatile to start with in a small studio space?
For furniture upcycling, a cordless drill, an orbital sander, and a jigsaw are very versatile and compact—great for small spaces. For jewelry making, a rotary tool like a Dremel is handy for sanding, polishing, and cutting small pieces. These tools cover a wide range of beginner projects without taking up much room.
When it comes to setting up a safe and functional studio at home, what are the top safety practices beginners should prioritize, especially in small or shared spaces?
For small or shared home studios, it’s important to keep work areas tidy and free of clutter to prevent accidents. Always use protective gear like safety glasses and masks, and ensure good ventilation, especially when using power tools. Store tools securely out of reach of children or pets, and unplug equipment when not in use. Clear labeling and proper lighting also help keep your workspace safe and functional.