Introduction: Why Ventilation Matters in Your DIY Craft Studio
Every creative project brings with it not just excitement and satisfaction, but also a host of invisible byproducts—fumes from paints and adhesives, dust from sanding, heat from power tools, and airborne particles from textiles or wood. Proper ventilation is the unsung hero of a healthy and productive craft studio. Whether you’re an avid papercrafter, a jewelry maker, a model builder, or a textile artist, the air quality in your workspace directly impacts both your well-being and the quality of your creations. Without sufficient airflow, you risk exposure to irritants and even long-term health hazards, not to mention unpleasant odors and a stifling work environment. Despite its importance, ventilation is often misunderstood or overlooked in the excitement of planning a dream studio. This step-by-step guide will help you demystify ventilation, showing you how to assess your needs, select the right systems, and set up a reliable, safe, and effective airflow strategy—no matter the size or location of your creative haven.
Understanding the Basics of Craft Studio Ventilation
What Is Ventilation and Why Is It Essential?
Ventilation refers to the intentional movement of air into and out of a space. In a craft studio, this means replacing stale, contaminated air with fresh, clean air. Effective ventilation:
- Removes harmful fumes and airborne particles
- Controls humidity and temperature
- Prevents buildup of dust and allergens
- Reduces odors from paints, adhesives, and inks
- Improves overall comfort and focus
Types of Ventilation: Natural vs. Mechanical
- Natural Ventilation: Utilizes windows, doors, and vents to create airflow. Simple but dependent on weather and room layout.
- Mechanical Ventilation: Employs fans, ductwork, and filtration systems to actively move and clean air. Essential for studios using chemicals or generating lots of dust.
Step 1: Assessing Your Ventilation Needs
Identify Your Crafting Activities
Start by listing all the activities you regularly perform. Are you soldering jewelry, using spray adhesives, or painting with solvents? Each process produces different air contaminants. For example:
- Painting & Spraying: Generates volatile organic compounds (VOCs) and particulates.
- Woodworking & Sanding: Produces fine dust and wood particles.
- Textile Work: May release lint and fibers.
- Resin & Epoxy Use: Emits fumes that require active extraction.
Analyze Your Space
- Room dimensions (length, width, height)
- Number and size of windows/doors
- Existing airflow (drafts, HVAC, vents)
- Proximity to living spaces or neighbors
Use this information to determine the volume of air that needs to be exchanged per hour (measured as Air Changes per Hour, or ACH). For most craft studios, aim for at least 6–8 ACH; for heavy chemical use, target 10–12 ACH.
Step 2: Designing Your Ventilation System
Natural Ventilation Solutions
If your activities are low-fume and your climate permits, maximize natural airflow:
- Install operable windows on opposite walls for cross-ventilation.
- Use window fans to pull fresh air in and push stale air out.
- Consider vented skylights for vertical airflow in attic or loft studios.
- Leave doors open when possible, using door stops or magnetic holds.
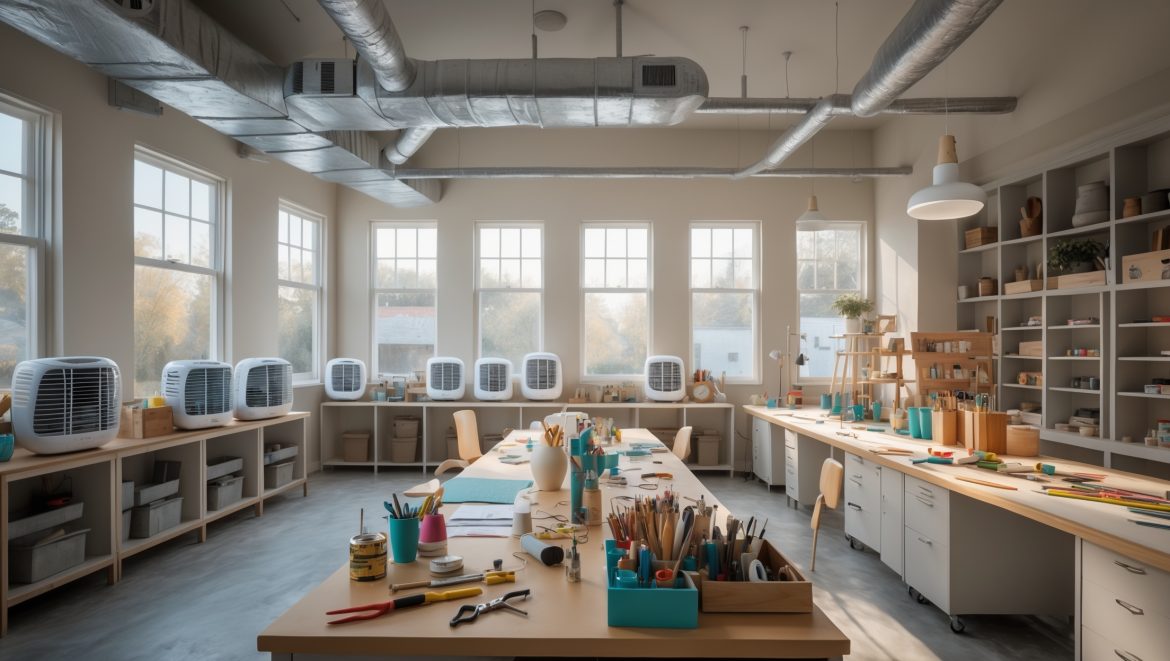
Mechanical Ventilation Options
For more demanding setups or poor natural airflow, mechanical ventilation is a must:
- Exhaust Fans: Wall- or ceiling-mounted, these pull contaminated air out. Choose fans rated for your room’s cubic footage.
- Inline Duct Fans: Great for windowless rooms. These connect to ducts that vent outside.
- Portable Air Purifiers: Use HEPA and activated carbon filters to capture particulates and neutralize odors, supplementing exhaust systems.
- Fume Extractors: Essential for soldering, resin, and spray work. These units have local hoods or arms to capture fumes at the source.
Step 3: Selecting Tools and Equipment
Essential Ventilation Tools
- Measuring tape and notepad (for calculating space and airflow requirements)
- Drill and appropriate bits (for mounting fans or ductwork)
- Jigsaw or reciprocating saw (if cutting vent openings)
- Caulking gun and sealant (for weatherproofing vent installs)
- Screwdrivers, level, and safety goggles
Choosing the Right Fans and Filters
- Exhaust Fans: Look for models with variable speeds, low noise ratings (<2 sones), and energy efficiency certifications.
- HEPA Air Purifiers: Choose units sized for your room and with replaceable filters. Consider models with activated carbon for odor control.
- Fume Extractors: Select those with flexible arms, replaceable filters, and sufficient CFM (cubic feet per minute) ratings for your activities.
Vent Covers and Ducting
- Exterior vent hoods with bug screens to keep pests out
- Flexible or rigid ductwork (preferably insulated for noise and condensation control)
- Adjustable interior vent covers for directing airflow
Step 4: Installing Your Craft Studio Ventilation System
Preparing the Workspace
- Clear a safe area for installation work.
- Turn off power to the installation area if working with electrical fans.
- Mark all cut lines and mounting points before making openings.
Installing Exhaust Fans
- Measure and mark the fan cutout location on an exterior wall or ceiling.
- Cut the opening using a jigsaw or reciprocating saw.
- Fit the fan housing into the opening, ensuring a snug fit.
- Secure the housing with screws and seal gaps with weatherproof caulking.
- Connect wiring (if necessary), following manufacturer instructions and local codes.
- Attach ductwork to channel air to the exterior vent hood.
- Test the fan to ensure proper operation.
Setting Up Air Purifiers and Fume Extractors
- Place purifiers near primary work areas and away from walls for optimal intake and output.
- Position fume extractor arms within 6–12 inches of the source (e.g., soldering station).
- Plug in and test devices, following all safety guidelines.
Maximizing Natural Ventilation
- Install adjustable window fans to create airflow direction as needed.
- Use door stops or magnetic catches to keep doors open during work sessions.
- Monitor outside weather and air quality to optimize window usage.
Step 5: Maintenance Best Practices
Regular Cleaning and Inspection
- Clean fan blades and vent covers every 2–3 months to prevent dust buildup.
- Inspect ductwork annually for blockages, leaks, or condensation.
- Wipe down air purifier intakes and replace filters per manufacturer schedule (typically every 6–12 months).
Seasonal Adjustments
- In colder months, consider insulated vent covers to prevent heat loss when not in use.
- Check vent seals before rainy seasons to avoid leaks.
- Adjust fan speeds and air purifier settings based on activity level and outdoor air quality.
Safety Tips for Effective Ventilation
- Never vent fumes into attics, crawl spaces, or garages—always direct exhaust outdoors.
- Ensure electrical work complies with local codes or consult a licensed electrician.
- Maintain clear pathways for airflow; avoid blocking vents with furniture or supplies.
- Use carbon monoxide detectors if you operate combustion tools or heaters in the studio.
- Label all switches and fans for easy operation during work sessions.
Troubleshooting Common Ventilation Issues
- Persistent Odors: Check for blocked or undersized vents. Increase fan CFM or add air purification.
- Condensation or Mold: Ensure proper venting to outdoors and seal all ductwork joints. Consider a dehumidifier.
- Excessive Noise: Use insulated ducting, rubber fan mounts, and lower fan speeds where possible.
- Drafts or Uncomfortable Temperatures: Balance intake and exhaust airflow. Add adjustable vent covers or supplementary heating/cooling as needed.
Cost Breakdown: Budgeting for Craft Studio Ventilation
Typical Expenses
- Basic window fan: $30–$80
- Wall or ceiling exhaust fan: $70–$200
- Air purifier (HEPA/carbon): $100–$350
- Fume extractor: $120–$400+
- Ductwork and vent covers: $40–$100
- Professional installation (optional): $200–$600
Many DIYers successfully install ventilation for under $300 using a mix of window fans and portable purifiers. Complex or high-fume setups may warrant professional help and a higher budget.
Upgrading and Expanding Your System
Smart Controls and Monitoring
- Wi-Fi-enabled fans and purifiers for remote control
- Air quality sensors to track particulates, VOCs, and humidity
- Automated timers to run ventilation only when needed, saving energy
Retrofitting Older Studios
- Use slim duct fans for tight spaces
- Add vented doors or transfer grilles to improve airflow between rooms
- Install portable extraction hoods for temporary high-fume activities
Conclusion: Breathe Easier, Create More
Ventilation is more than a technical detail—it’s a cornerstone of safe, comfortable, and sustainable creativity. By understanding your studio’s needs and following a deliberate, step-by-step setup process, you can banish fumes, dust, and discomfort for good. A well-ventilated studio not only protects your health but also preserves the integrity of your work, keeping paints true, adhesives reliable, and surfaces dust-free. Remember: the right system is the one that adapts to your space, activities, and budget. Schedule regular maintenance, stay alert to signs of poor air quality, and don’t hesitate to upgrade as your creative ambitions grow. Empowered with fresh air and a fresh perspective, you’ll find your craft studio becomes a true sanctuary—one where ideas (and you!) can breathe freely. Happy making!


What are some budget-friendly ways to improve airflow if installing a full mechanical ventilation system isn’t possible in a rental space?
You can boost airflow in a rental by using portable fans to create cross-ventilation, placing one near a window to draw fresh air in and another to push stale air out. Opening windows and doors when working, using door draft stoppers to direct airflow, and investing in an air purifier with a HEPA filter are also effective and renter-friendly solutions.
How can I tell if the ventilation strategy I’ve set up is actually effective in removing airborne particles and odors, or if I need to upgrade my setup?
To check if your ventilation is effective, pay attention to any lingering odors or visible dust after working—these are signs particles aren’t being removed efficiently. You can also use a particulate meter or indoor air quality monitor to measure pollutants. If readings are high or smells persist, you may need to improve airflow or upgrade your system.
How often should I check or replace filters if I go with a mechanical ventilation system, especially if I’m using adhesives and sprays every week?
If you’re using adhesives and sprays weekly, it’s best to check your ventilation filters every month for clogging or residue buildup. Most mechanical system filters should be replaced every 2–3 months, but heavy use may require more frequent changes. Always follow the manufacturer’s recommendations and change filters sooner if you notice reduced airflow or strong odors.
I’m planning my first studio at home and I use a lot of spray paints and glue. How do I tell when natural ventilation isn’t enough and I should switch to mechanical options like fans or filters?
If you notice lingering odors, visible fumes, or start experiencing headaches or irritation after working, those are signs that natural ventilation may not be sufficient. Also, if your workspace feels stuffy even with windows open, it’s time to consider adding exhaust fans or air filtration systems to ensure your studio air stays safe and clear.
Once I identify my main sources of fumes and dust, what are the first steps you suggest for upgrading ventilation without major renovations?
Once you’ve pinpointed the main sources of fumes and dust, start by adding portable air purifiers with HEPA filters, and use window fans to pull contaminated air outside if possible. You can also improve airflow by keeping doors and windows open while you work, and consider using localized exhaust solutions like a vent hood or flexible ducting over particularly messy areas. These upgrades can make a big difference without any major construction.
Do you have any recommendations for budget-friendly fans or filtration systems that are still safe for small craft spaces?
For small craft spaces, consider box fans with HEPA filters attached as a budget-friendly option. Portable air purifiers with true HEPA filters are also effective and often reasonably priced. Ensure any fan or system you choose is rated for the room size and always follow manufacturer safety guidelines for proper ventilation.
How do you balance keeping your studio warm in the winter while still making sure you have enough fresh air coming in? I do a lot of crafting when it’s cold out and don’t want to freeze.
To keep your studio warm while ensuring enough fresh air, try using trickle vents or slightly opening a window for short intervals during crafting. You can also use a heat recovery ventilator, which brings in fresh air while retaining warmth. Wearing layers and using space heaters near your workspace can also help you stay comfortable without sacrificing ventilation.
Are there any budget-friendly ways to improve ventilation in a rented room where I can’t install permanent ductwork or major systems?
Absolutely, there are several effective, budget-friendly options for renters. You can use portable air purifiers with HEPA filters to improve air quality. Box fans placed near open windows can help move air in and out of the room. Consider using a window fan to create cross-ventilation, and always keep doors open when working to allow for better airflow. None of these require permanent installation.
The article says ventilation helps control dust and fumes, but are there warning signs to watch out for that indicate my current setup isn’t effective enough, especially if I use a lot of wood and glue?
If your ventilation isn’t effective, you may notice lingering odors from glue, frequent dusty surfaces even after cleaning, or experience symptoms like headaches, eye irritation, or coughing while working. Visible dust clouds during sanding or slow dissipation of fumes are also warning signs. If any of these occur, it’s a good idea to upgrade your ventilation setup.
What are the signs that my current setup isn’t ventilating enough, especially during the summer when opening windows might let in too much humidity or heat?
Some signs of inadequate ventilation in your craft studio include lingering odors, visible dust or fumes, feeling lightheaded or stuffy, condensation on windows, or a noticeable increase in temperature or humidity. If you notice these issues, consider using exhaust fans, air purifiers, or portable ventilation solutions to improve air quality without making the room uncomfortably humid or hot.
When it comes to setting up mechanical ventilation in a home craft studio, how do you determine the right size or capacity of a fan or filtration system for the space? Is there a calculation you recommend for average DIYers?
To determine the right fan or filtration system size, measure your studio’s volume (length × width × height in feet) and multiply by the recommended air changes per hour (typically 6–10 for craft studios). Divide this number by 60 to get the required cubic feet per minute (CFM) for your fan. This ensures effective air exchange for safety and comfort.
How do I know if my natural ventilation is actually doing enough to clear out fumes and dust, or if I need to upgrade to a mechanical system?
To check if your natural ventilation is sufficient, pay attention to lingering odors, visible dust, or any symptoms like headaches or irritation while you work. If fumes or dust don’t clear quickly, or if you notice buildup on surfaces, your current setup may not be enough. In that case, upgrading to a mechanical system could help ensure better air quality and safety.
How do you determine how strong or powerful a fan should be when setting up mechanical ventilation in a small craft room? Are there specific measurements or calculations to follow?
To determine the right fan strength for your craft room, calculate the room’s volume (length x width x height in feet) and aim for 6 to 10 air changes per hour. Multiply the room volume by the number of air changes you want, then divide by 60 to get the minimum required fan CFM (cubic feet per minute).
What kind of ventilation setup would you recommend for someone renting an apartment, where installing ductwork or major fans might not be allowed?
For renters, a portable air purifier with HEPA and activated carbon filters is a great option since it requires no installation. You can also use window fans that fit without modification or crack a window open while working. Always choose ventilation solutions that are easy to remove and don’t damage the property.