Introduction: Why Workflow Zones Are the Secret to a Productive Craft Studio
Every DIY crafter knows the frustration of a cluttered, chaotic workspace. Scissors disappear just when you need them. Paintbrushes jumble with pliers. Project materials migrate from one end of the room to the other. The result? Wasted time, lost inspiration, and a crafting session that feels more like a scavenger hunt. But what if you could design your craft studio to work with you, not against you? Enter the transformative power of workflow zones.
Workflow zoning—dividing your studio into distinct areas according to the stages of your creative process—offers a practical, sustainable solution to tool chaos. It’s not just about making your space look tidy. It’s about streamlining every step, from brainstorming and prep to finishing touches and cleanup. Well-organized workflow zones save you time, reduce stress, and even make your projects more enjoyable. In this in-depth guide, you’ll learn how to map your creative process, identify your essential tools, and build custom DIY zones that fit your space and crafting habits. Whether you’re setting up a new studio or overhauling an existing one, these strategies will help you reclaim your workspace and supercharge your creativity.
Understanding Workflow Zoning: The Foundation of Efficient Craft Spaces
What Are Workflow Zones?
Workflow zones are specific areas within your craft studio, each dedicated to a distinct phase of your creative process. Instead of scattering supplies and tools randomly, you assign each zone a clear purpose—preparation, cutting, assembly, finishing, and so on. This method mirrors the way professional workshops and art studios operate, maximizing productivity and minimizing disruption.
Benefits of Workflow Zones
- Reduced Distraction: Know exactly where to find what you need, eliminating frustrating searches.
- Efficient Movement: Logical layout means fewer unnecessary steps between tasks.
- Cleaner Workspaces: Easier to tidy up when each item has a designated home.
- Project Flow: You can work on multiple projects without tools and materials overlapping.
- Better Safety: Hazardous tools and materials are kept in appropriate zones, away from general traffic.
Step 1: Mapping Your Personal Crafting Workflow
Analyze Your Process
Every crafter’s process is unique. Before reorganizing your studio, spend a few days noting the steps you take during a typical project. Where do you sketch or plan? Where do you cut, glue, paint, or sew? Where do you store finished pieces? Jot down the tools and materials you use at each stage.
Identify Your Primary Project Types
Do you focus on papercrafts, textile arts, woodworking, jewelry, or a mix? Each discipline may require different zones. For example, a jewelry maker needs a dedicated soldering and finishing area, while a papercrafter may need a clean space for adhesives and stamping.
List Essential Tools and Supplies for Each Stage
Create an inventory of your go-to items for each workflow phase. This helps you plan what storage and surfaces each zone requires.
Step 2: Designing Your DIY Workflow Zones
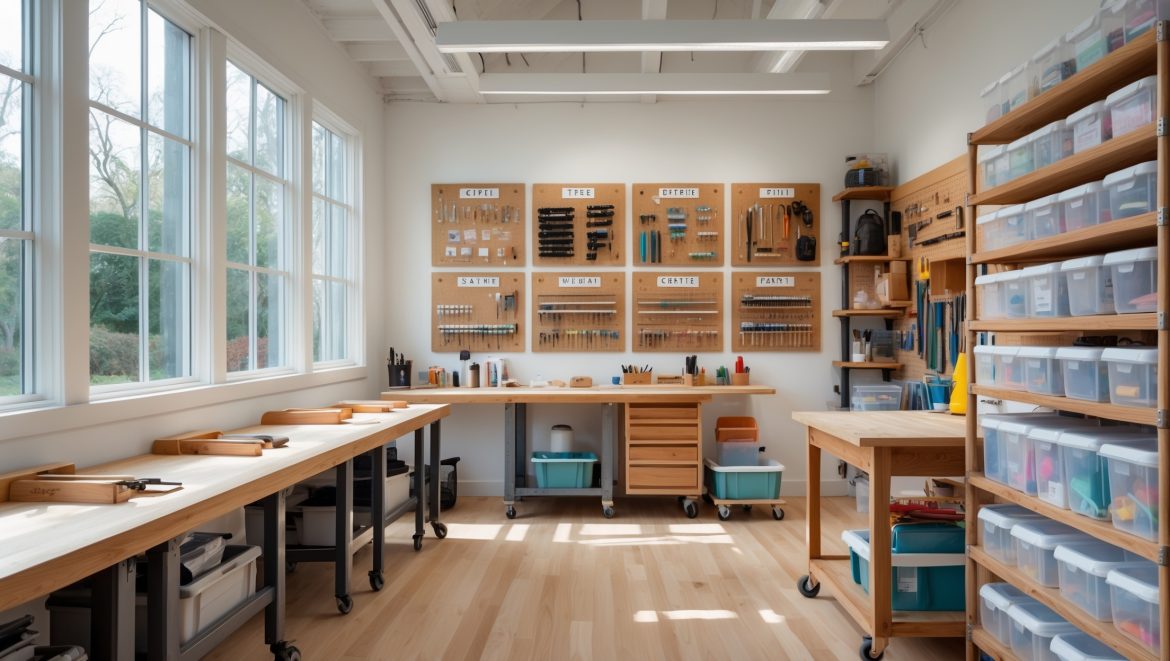
Common Workflow Zones for Craft Studios
- Planning & Inspiration Zone: For sketching, mood boards, and idea generation. Includes notebooks, tablets, reference books, and inspiration boards.
- Preparation Zone: Houses raw materials, measuring tools, and cutting mats. Ideal for laying out fabrics, papers, or wood before cutting.
- Cutting & Shaping Zone: Equipped with cutting tools (scissors, rotary cutters, saws), safety gear, and sturdy surfaces.
- Assembly & Construction Zone: For gluing, stitching, soldering, or assembling components. Needs clamps, adhesives, and a clear workspace.
- Finishing Zone: For painting, sanding, varnishing, or adding final decorative touches. Ventilation and easy-to-clean surfaces are key.
- Photography & Display Zone: Optional but useful for photographing finished work for portfolios or online stores.
- Cleanup & Storage Zone: Sinks, trash, recycling, and storage for tools and materials not in use.
Mapping Zones to Your Space
Measure your studio and sketch a floor plan. Use painter’s tape to mock out potential zones on the floor and walls. Prioritize frequently used zones by placing them near your main workbench or central workspace. Less-used zones (like photography or deep storage) can be placed along the periphery.
Step 3: DIY Storage Solutions for Each Zone
Planning & Inspiration Zone
- Pegboards for Inspiration: Hang clippings, swatches, and sketches on a dedicated pegboard or corkboard.
- Shelving for Reference Materials: Floating shelves hold books, color wheels, or storage bins for sketching tools.
- Portable Caddies: Use a rolling cart for pens, markers, and tablets that can move between zones.
Preparation Zone
- Clear Bins: Transparent storage for raw materials lets you see what’s available at a glance.
- Wall-Mounted Racks: Store rulers, measuring tapes, and cutting mats vertically to save space.
- Flat File Drawers: Great for storing large sheets of paper, fabric, or patterns flat and unwrinkled.
Cutting & Shaping Zone
- Magnetic Tool Strips: Keep metal tools like scissors, pliers, and blades within easy reach but safely out of the way.
- Fold-Down Work Surfaces: Maximize space with wall-mounted, foldable tables for cutting or shaping tasks.
- Dedicated Blade Storage: Use labeled containers or drawer inserts to separate different blade types and sizes.
Assembly & Construction Zone
- Modular Storage Cubes: Stackable cubes let you customize tool and supply storage based on project needs.
- Drawer Dividers: Prevent adhesives, fasteners, and small parts from mixing together.
- Clamps Rack: Wall or pegboard-mounted racks keep clamps organized and accessible.
Finishing Zone
- Drying Racks: Create DIY drying racks for paint, glue, or varnish finishes using wire shelving or repurposed dish racks.
- Ventilated Cabinets: Store paints and solvents in ventilated cabinets or lockboxes, away from heat sources.
- Wipeable Surfaces: Cover work tables with acrylic or laminate for easy cleaning.
Photography & Display Zone
- Backdrop Storage: Use wall hooks or tubes for storing rolled backdrops or foam boards.
- Portable Lighting: Compact LED lights can be moved and adjusted as needed.
- Display Shelves: Showcase finished pieces for inspiration and documentation.
Cleanup & Storage Zone
- Rolling Bins: Use rolling bins for trash and recycling to easily move around as you tidy up.
- Wall-Mounted Tool Organizers: Hang brooms, dustpans, and cleaning sprays where you’ll need them most.
- Deep Storage: Overhead shelves or under-bench tubs for rarely used items.
Step 4: Optimizing Zone Layout for Your Studio Size
Small Spaces: Making Every Inch Count
If your studio is a converted nook or a corner of a spare room, use vertical space relentlessly. Pegboards, wall shelves, and over-door organizers can multiply your storage. Opt for furniture and storage on wheels so you can reconfigure zones as needed. Use collapsible or stackable containers to minimize clutter. Multi-purpose work surfaces can serve as both cutting and assembly areas, with storage underneath.
Medium to Large Studios: Dedicated Work Areas
With more real estate, you can create permanent zones for each workflow stage. Position noisy or messy zones (like sanding or painting) near windows or ventilation sources. Keep planning and finishing areas away from dust and debris. Invest in sturdy, purpose-built workbenches for each core activity. Add a comfortable chair or stool in the planning zone to encourage brainstorming and creativity.
Step 5: Labeling and Maintaining Your Zones
Clear Labeling Systems
Use consistent, visible labeling for bins, drawers, and shelves. Chalkboard labels or printed tags make it easy to update storage as your needs change. Color-coding helps visually distinguish between project types or tool categories.
Zone Maintenance Routines
- End-of-Day Reset: Spend five minutes returning tools and supplies to their proper zones after each session.
- Weekly Zone Audit: Review each zone for out-of-place items, missing tools, or empty supplies. Restock as needed.
- Seasonal Deep Clean: Rotate seldom-used materials, check for expired adhesives or paints, and reorganize based on current projects.
Advanced Tips: Adapting Zones for Multiple Crafters & Mixed Media Studios
Shared Studios
If you share your space with another crafter, establish personal toolkits and shared supply zones. Use color-coded bins or baskets for individual projects. Consider a central “community zone” for shared equipment, and set clear guidelines for returning communal tools.
Mixed Media & Multifunction Studios
For studios that support several types of crafts (e.g., sewing, painting, woodworking), modular storage and mobile workstations are invaluable. Dedicate base-level storage for each discipline and use rolling carts or portable toolboxes to supplement as needed. Keep hazardous or specialty tools locked or out of reach if children have access to the studio.
Common Mistakes to Avoid in Studio Organization
- Overcrowding Zones: Avoid cramming too many supplies into one area. This leads to clutter and lost tools.
- Neglecting Workflow: Organize based on how you create, not on how you think things should look.
- Infrequent Maintenance: Skipping regular tidying or restocking leads to chaos over time.
- Ignoring Ergonomics: Place frequently used tools within arm’s reach to prevent strain.
- Underutilizing Vertical Space: Don’t let walls go to waste—every inch counts in a creative studio.
Case Study: A Real-Life Workflow Zone Makeover
Before: Jane, a mixed-media artist, struggled with a single large worktable overflowing with tools, paints, and fabrics. Projects stalled while she searched for lost supplies.
After: Jane mapped her creative process and identified five workflow zones: planning, cutting, assembly, finishing, and cleanup. She used pegboards for tools, rolling carts for mobile supplies, and clear bins for materials. Now, each project moves smoothly from start to finish, and her studio stays organized with minimal effort.
Conclusion: Unleash Your Creativity with Purposeful Organization
Crafting should be a joyful, fulfilling pursuit—not a constant battle against clutter. By embracing workflow zoning, you transform your craft studio from a source of frustration into a sanctuary for creativity. With each tool and material in its thoughtfully designed place, your projects flow effortlessly from one stage to the next. No more lost scissors or misplaced glue. No more wasted time searching for that perfect shade of paint.
The benefits go beyond mere tidiness. Workflow zoning makes your creative process more intuitive, less stressful, and ultimately more productive. You’ll find yourself completing projects faster, experimenting more boldly, and enjoying the journey as much as the result. Plus, your studio becomes easier to share, maintain, and adapt as your interests evolve.
Whether you craft in a converted closet or a spacious basement, these strategies scale to fit your unique needs. Start by mapping your workflow, designing custom zones, and investing in smart DIY storage solutions. Commit to simple daily and weekly routines to keep everything in order. Over time, your organized studio will not only support your art—it will inspire it.
Ready to take the next step? Grab a sketchbook, analyze your process, and start building the craft studio you’ve always dreamed of—one purposeful zone at a time.


I’m trying to organize a small craft space and like the idea of workflow zones, but what’s the best way to handle tools or supplies I use for multiple types of projects? Should I duplicate them in each zone or have a central spot?
For tools and supplies you use across different projects, it’s usually best to keep them in a central, easily accessible spot rather than duplicating them in each zone. This saves space and helps prevent clutter in small craft areas. You might use a rolling cart or a wall-mounted organizer close to your main workspace so you can grab what you need quickly, no matter which zone you’re working in.
Can you give an example of what a cleanup zone might include to make the end-of-project process smoother? I often find cleanup is where I lose motivation, so any specific strategies would help.
A cleanup zone can really help streamline the process. Consider including labeled bins for sorting scraps, a small vacuum or handheld brush for dust, a hook for aprons, and a caddy with wipes and basic cleaning sprays. Having a checklist posted nearby can remind you of each step, making cleanup feel less overwhelming and more routine.
After establishing workflow zones, how much time does it typically take before you notice a real difference in productivity and stress levels? Is there an adjustment period while getting used to the new setup?
You’ll usually notice some improvement in productivity and a drop in stress within the first week or two after setting up your workflow zones. However, there is often an adjustment period—expect a few days to get used to the new organization and fine-tune placements as you work. Most people feel the full benefits after a couple of weeks.
How much time should I expect to spend reorganizing my studio into workflow zones, and is it better to do it all at once or gradually?
The time needed depends on your studio size and how much organizing is required, but many people spend a weekend or several short sessions. If you prefer less disruption, reorganizing gradually—one zone at a time—can be easier to manage. If you like instant results and can dedicate the time, doing it all at once might feel more satisfying.
Can you give some ideas for budget-friendly ways to set up these workflow zones? I’m a college student and don’t have much money to spend on fancy storage solutions.
Absolutely! You can use cardboard boxes, shoe boxes, or even repurpose food containers as storage bins for your tools and materials. Hanging items on the wall with cheap hooks or a simple pegboard also saves space. Use jars, cans, or old mugs to organize small items like brushes or pens. Label everything clearly so you always know where things are.
If you’re overhauling an existing craft space into workflow zones, how much time should you expect it to take before you really notice an improvement in productivity and less clutter?
You can usually start noticing improvements in productivity and reduced clutter within a week or two after reorganizing your craft space into workflow zones. The initial setup might take a few days, depending on the size of your space and how much you reorganize, but once your tools and materials are grouped by activity, the benefits become clear pretty quickly.
How would you adapt these workflow zones if your studio is tiny or you share your crafting area with another hobby or workspace? I’d love to know how flexible the system can be.
The workflow zones are very flexible and can be scaled down for small or shared spaces. Try using portable organizers or rolling carts to separate crafting tools, making it easy to switch between hobbies or clear space when needed. Multi-purpose storage, vertical shelving, and using foldable tables can help keep each activity organized without taking up extra room.
Could you share some budget-friendly tips for building these workflow zones without investing in expensive organizers or storage solutions?
You can create effective workflow zones on a budget using items you already have, like jars, shoeboxes, or repurposed containers. Cardboard boxes can be covered with fabric or paper for a neater look. Pegboards made from inexpensive materials or even a simple tension rod can help organize tools. Label each zone with handmade tags to keep things clear. This way, you get organized without costly purchases.
For someone with young kids around, do you have advice on keeping sharp tools safe and still maintaining the efficiency of these workflow zones?
To keep sharp tools safe with young kids around, consider installing lockable drawers or cabinets within each workflow zone. Use wall-mounted magnetic strips or pegboards placed higher than a child can reach. This way, your tools stay accessible for you but out of little hands, maintaining both safety and efficiency in your studio setup.
How do you suggest mapping out workflow zones if your creative process is a bit unpredictable and you tend to jump between different types of projects in one session?
If your process is fluid and you switch between projects, try setting up flexible zones based on broad activities rather than strict project types. For example, create areas for prep, assembly, finishing, and clean-up. Keep versatile tools and supplies within easy reach in each zone, so you can adapt as your workflow shifts.
I like the idea of mapping workflow zones based on your creative process. Do you have any tips for adapting this system if your projects involve multiple types of crafts with very different tools and steps?
When working with multiple crafts, try creating flexible zones that can be easily reconfigured. Use mobile carts, labeled bins, or pegboards to keep tools for each craft separate but accessible. You could also set up a main workspace and rotate out specific toolkits depending on the project you’re working on that day or week.
I get the idea of workflow zones, but how do you keep those zones organized when you have kids or customers coming in and out of your studio? Any tips for keeping things tidy between different users?
To keep zones organized with kids or customers around, use labeled bins or trays for supplies, making it easy for everyone to put things back in the right spot. Clear signage helps remind users where items belong. Having a quick end-of-day tidy-up routine also goes a long way in maintaining order between different users.
When setting up separate workflow zones in a smaller craft space, do you have suggestions for dealing with overlap between areas like prep and finishing, especially if you work on multiple types of projects?
In a smaller craft space, flexible storage solutions like rolling carts or stackable bins work well for zones that overlap, such as prep and finishing. Try using portable organizers for shared tools and materials, and label them so you can easily move what you need between areas depending on your current project.
When you overhaul an existing studio into workflow zones, what’s a realistic timeframe to get everything set up without shutting down business for too long?
Transitioning to workflow zones can usually be done over a weekend or in about 2-3 days if you plan ahead and break the process into stages. Try organizing one area at a time, moving equipment and supplies during off-hours, so you can keep essential operations running and minimize downtime.
What budget-friendly storage solutions do you recommend for someone just getting started with organizing their craft studio into workflow zones?
For a budget-friendly start, try using clear plastic bins and drawer units from discount stores to sort supplies by zone. Repurpose jars, shoe boxes, and even muffin tins for smaller items. Pegboards are inexpensive and versatile for wall storage. Label everything clearly to help keep your workflow zones organized and easy to use.
Can you give examples of what kinds of tools or supplies should go in each zone, especially for someone who does a little bit of everything—sewing, painting, and paper crafts?
Certainly! For a sewing zone, keep items like fabric, thread, scissors, pins, and measuring tape handy. In the painting zone, organize brushes, paints, palettes, water jars, and canvases. For paper crafts, store cardstock, patterned papers, glue, cutting tools, stamps, and embellishments. This way, each zone has what you need within easy reach.