Introduction: Why Lighting Safety Matters in Your DIY Craft Studio
Lighting is the silent partner of every successful DIY, craft, or creative project. The right illumination reduces eye strain, enhances color accuracy, and makes even the smallest details visible. But while most crafters obsess over brightness and ambiance, the safety aspects of studio lighting are often overlooked—and that can have serious consequences. Poorly installed fixtures, overloaded circuits, or misplaced lamps can lead to costly damage, or worse, fires. In a space filled with flammable materials like paper, fabric, and solvents, a single spark can spell disaster. This post is your comprehensive guide to lighting safety in the craft studio: we’ll cover electrical wiring basics, smart placement strategies, fixture selection, and crucial fire risk prevention. By the end, you’ll have actionable steps and a clear safety checklist to ensure that your creative haven is as secure as it is inspiring.
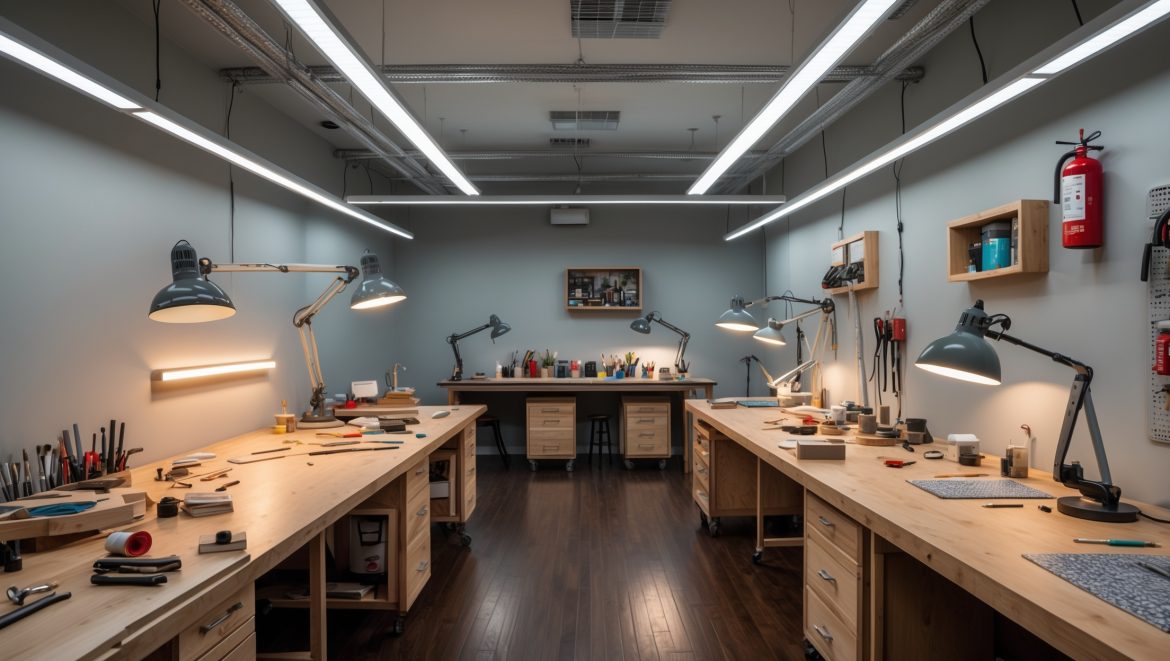
Understanding Lighting Types and Their Safety Implications
Ambient, Task, and Accent Lighting: What’s the Difference?
Before diving into wiring and placement, it’s important to understand the three main types of lighting in any creative workspace:
- Ambient Lighting: The general, overhead light that fills the room. Often achieved with ceiling fixtures or large LED panels.
- Task Lighting: Focused, bright illumination for specific work areas—think desk lamps, clamp lights, or under-cabinet strips.
- Accent Lighting: Decorative or mood lighting, such as fairy lights or LED strips along shelves.
Each type has unique safety considerations, from heat output to wiring complexity.
Heat Output and Fixture Materials
Some lighting—especially older incandescent bulbs and halogen lamps—can become dangerously hot, increasing fire risk. Opt for LED fixtures wherever possible. LEDs emit far less heat, use less energy, and are generally safer for close-proximity workspaces.
Electrical Wiring: Safe Practices for DIYers
Know Your Limits: When to Call a Professional
If your lighting project involves installing new circuits, running wires through walls, or modifying existing electrical infrastructure, always consult a licensed electrician. However, swapping out fixtures, adding plug-in lamps, or using extension cords within reason can usually be handled by competent DIYers. When in doubt, err on the side of caution.
Understanding Circuit Capacity and Load
Most home craft studios rely on standard 15-amp or 20-amp circuits. Overloading these circuits—by plugging in too many high-wattage lighting fixtures—can cause breakers to trip or, in worst cases, wires to overheat. Calculate your total lighting load before adding new fixtures:
- Add up the wattage of all lights on a circuit.
- Divide the total by the voltage (typically 120V in North America) to get amps.
- Stay at or below 80% of the circuit’s maximum rating for safety (e.g., a 15-amp circuit should not exceed 12 amps of continuous load).
Extension Cords and Power Strips: Use With Care
Extension cords are for temporary use only. Never daisy-chain multiple cords or overload power strips. Select cords rated for the wattage of your lighting, and check regularly for wear or damage. For permanent setups, install additional outlets instead.
Proper Grounding and GFCI Protection
All outlets in craft studios—especially those near sinks or wet areas—should be equipped with Ground Fault Circuit Interrupters (GFCIs). These devices shut off power instantly if a fault is detected, reducing the risk of electric shock or fire.
Securing and Protecting Wiring
Loose or exposed wiring is a tripping hazard and a fire risk. Use conduit or wire channels to route wires neatly along walls or under workbenches. Keep cables off the floor and away from areas where they might be pinched, cut, or exposed to moisture.
Fixture Selection: Choosing Safe Lighting for Creative Spaces
LED vs. Fluorescent vs. Incandescent Fixtures
LED: The safest and most energy-efficient choice. They run cool, last for years, and are available in a wide range of shapes and color temperatures.
Fluorescent: Common in older studios, but contain small amounts of mercury. Handle and dispose of tubes carefully. Ballasts can fail and overheat.
Incandescent/Halogen: High fire risk due to heat. Avoid using them near fabrics, paper, or other flammables.
Fixture Ratings: Damp/Wet Locations
If you have a craft sink or work with water-based media, select fixtures rated for “damp” or “wet” locations. These are sealed against moisture and reduce the risk of electrical shorts.
Enclosed and Shielded Fixtures
Choose fixtures with enclosed bulbs and shatterproof covers, especially in studios where glass breakage would be hazardous. This prevents accidents and protects your eyes from glare.
Lighting Placement: Maximizing Safety and Efficiency
Safe Distance from Flammable Materials
Leave at least 18 inches between lighting fixtures and shelves, fabric bins, paper stacks, or any other combustible material. Task lamps should be adjustable but not so close that heat builds up on your work surface.
Mounting Fixtures Securely
Ceiling lights and wall sconces must be mounted to studs or with appropriate anchors. Check that all mounting hardware is rated for the fixture’s weight. Loose fixtures can fall and cause injury or spark fires if wires are damaged.
Managing Glare and Shadows
Strategic placement prevents harsh glare and deep shadows, which can cause eye strain or mistakes with sharp tools. Use diffusers, frosted bulbs, or indirect lighting to create an even, safe workspace.
Cord Management for Portable Lighting
If using portable lamps or clamp lights, keep cords tidy with clips or cable organizers. Avoid running cords across walkways or beneath rolling chairs to prevent trips and damage.
Fire Risk Prevention: Critical Steps for Every Studio
The Dangers of Overheating
Most craft studio fires start when lighting fixtures overheat. Avoid covering lamps with fabric, paper, or decorative shades not rated for the fixture. Regularly dust lamps and bulbs—accumulated lint and debris can ignite.
Smoke Alarms and Fire Extinguishers
Install a smoke alarm in or just outside your studio space. Test it monthly and replace batteries annually. Keep a fire extinguisher (Class ABC) within easy reach, and make sure you understand how to use it.
Routine Inspections and Maintenance
- Check all lighting fixtures for signs of wear, discoloration, or flickering lights (which can signal electrical issues).
- Replace frayed cords, cracked plugs, or loose switches immediately.
- Schedule an annual inspection for your studio’s electrical system if you make significant changes or notice persistent problems.
Special Considerations: Crafting with Solvents, Paints, and Heat Tools
Ventilation and Lighting
Many crafts involve flammable solvents or paints. Use explosion-proof lighting fixtures (sealed and spark-resistant) if you routinely work with volatile chemicals. Always ventilate your space adequately to dissipate fumes and heat.
Combining Lighting with Heat Tools
Keep heat guns, glue guns, and soldering irons far from lamp cords or fixtures. Never leave these tools unattended when lights are on. Consider a master switch to shut off all power when you leave the studio.
Emergency Preparedness: What to Do If Something Goes Wrong
Know Your Cut-Offs
Label circuit breakers and know which one controls your studio. In the event of an electrical short or fire, being able to shut off power quickly can prevent catastrophe.
Plan an Evacuation Route
Ensure exits are clear and not blocked by furniture, storage, or cords. Practice a quick exit in case of fire, and brief family members or studio partners on emergency procedures.
Lighting Safety Checklist for Your DIY Craft Studio
- All lighting fixtures are LED or rated for low heat output.
- No overloaded circuits; total load stays within 80% of circuit capacity.
- Extension cords and power strips used only temporarily; all permanent lighting hardwired or plugged into wall outlets.
- All outlets in damp areas are GFCI-protected.
- Wires neatly routed, protected, and off the floor.
- Fixtures mounted securely; no loose or wobbly lights.
- No fixtures within 18 inches of flammable materials.
- All bulbs and covers are intact and not cracked.
- Smoke alarm and fire extinguisher present and maintained.
- Regular inspection schedule in place for all lighting and electrical components.
Conclusion: Illuminate Safely, Create Fearlessly
Lighting is more than just a matter of aesthetics in your DIY craft studio—it’s a cornerstone of both creative productivity and personal safety. By understanding wiring basics, choosing the right fixtures, and respecting the nuances of placement and fire prevention, you’ll protect your space, your supplies, and your peace of mind. Remember, safety isn’t a single decision but an ongoing process of vigilance and care. Make a habit of routine inspections, keep your studio organized, and never ignore flickering lights, odd smells, or overheating fixtures. The time you invest in setting up safe lighting pays off with years of worry-free crafting and countless finished projects. Whether you’re a weekend hobbyist or a full-time creative professional, let your workspace be a place where inspiration thrives—not where hazards linger. Illuminate wisely, and let your creativity shine as brightly as your studio.


Switching to LED fixtures sounds safer, but are there any specific ratings or certifications I should look for to make sure the LEDs I buy are truly safe for a craft studio?
When choosing LED fixtures for your craft studio, look for certifications like UL (Underwriters Laboratories), ETL, or CSA, which indicate the product has been tested for safety. Also, check for fixtures rated for indoor use and ensure they have proper heat dissipation features to reduce fire risk in enclosed spaces.
I noticed the article mentions the danger of overloaded circuits in a craft studio. How can I figure out if my current setup is drawing too much power, and are there affordable ways to check this without hiring an electrician?
To check if your craft studio setup is overloading circuits, add up the wattage of all lights and devices on the same circuit and compare it to the circuit’s capacity, usually labeled on your breaker (typically 15 or 20 amps). Affordable plug-in electricity usage meters can help you measure how much power specific devices draw. If circuits trip or breakers feel hot, that’s a warning sign to reduce your load.