Introduction: Why Hand Tools Matter in Every DIY Craft Studio
Whether you’re a seasoned maker or a creative beginner, the right hand tools are the heartbeat of any successful DIY craft studio. While trends come and go—think digital cutting machines or 3D printers—hand tools remain the timeless foundation for everything from intricate paper art to textile masterpieces. Yet, walk into any craft store and the sheer variety of hand tools can overwhelm: rotary cutters, micro-tip scissors, bone folders, awls, needle-nose pliers, and more. Which ones are essential? Which are specialty? Most importantly, how do you choose the right tool for your projects, and how do you keep your tools in top shape for years of creative productivity? This guide dives deep into the must-have hand tools for serious DIY crafters, offering detailed insights on selection, practical maintenance, safe use, and clever storage. Whether you’re outfitting a new studio or refining your current toolkit, you’ll discover expert advice and actionable tips that elevate your crafting experience and results.
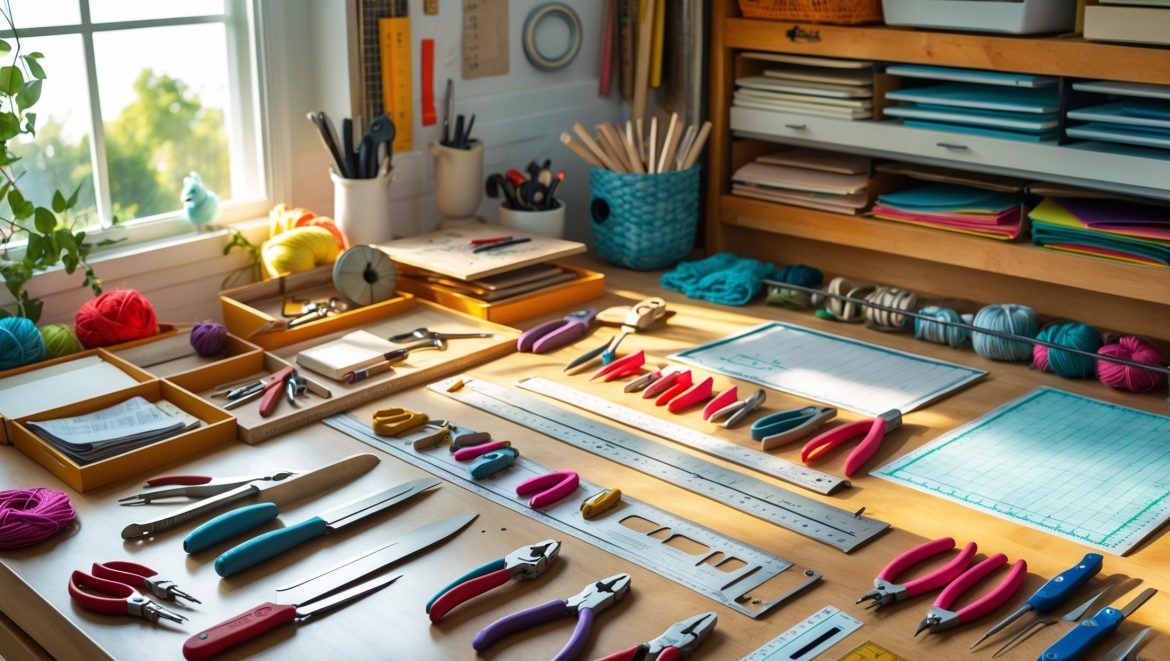
1. Understanding the Core Categories of Craft Hand Tools
Every craft discipline—be it paper, fabric, jewelry, wood, or mixed media—relies on a unique blend of hand tools. However, most essential tools fall into the following core categories:
- Cutting Tools: For precise material separation (scissors, knives, rotary cutters)
- Measuring & Marking Tools: For accuracy and layout (rulers, measuring tapes, marking pencils)
- Shaping & Forming Tools: For bending, sculpting, or forming materials (pliers, bone folders, embossing tools)
- Fastening & Assembly Tools: For joining components (pliers, clamps, awls, tweezers)
- Surface Preparation Tools: For finishing and prepping surfaces (sanding blocks, burnishers)
Recognizing these categories helps you methodically build a toolkit that suits your craft and avoids unnecessary purchases.
2. Cutting Tools: Choosing the Right Edge for the Job
2.1 Precision Scissors
Not all scissors are created equal. Invest in several pairs tailored for specific uses:
- General Craft Scissors: All-purpose, mid-sized blades for paper, felt, and light fabric.
- Detail Scissors: Small, sharp tips for intricate cuts in paper, embroidery threads, or appliqué.
- Fabric Shears: Long blades designed exclusively for fabric to prevent fraying and ensure clean cuts. Never use fabric shears on paper—it dulls the blades.
- Pinking Shears: Zigzag blades that minimize fraying edges on fabric and can add decorative touches to paper crafts.
2.2 Craft Knives and Blades
Precision knives (such as X-Acto or scalpel-style) are indispensable for paper crafting, stencils, and model making. Tips for choosing and using:
- Look for knives with ergonomic, non-slip handles.
- Stock up on replaceable blades—sharpness is critical for clean cuts and safety.
- Use self-healing cutting mats to protect surfaces and extend blade life.
2.3 Rotary Cutters
Popular among quilters and fabric crafters, rotary cutters allow for straight, clean cuts through multiple fabric layers. Select the blade size based on project scale (28mm for small curves, 45mm for general use).
3. Measuring and Marking: The Foundation of Accuracy
3.1 Rulers and Measuring Tapes
A rigid, clear acrylic ruler (at least 12″) is a staple for paper and fabric crafts. For larger projects, a metal carpenter’s ruler or a flexible tailor’s tape is invaluable. Consider rulers with both imperial and metric markings for versatility.
3.2 Squares and Angle Guides
For bookbinding, box-making, and woodworking, a metal square ensures perfectly right angles. Quilters benefit from triangle rulers and templates for precise patchwork layouts.
3.3 Marking Tools
- Pencils: Opt for mechanical pencils for fine lines; keep a soft eraser on hand for corrections.
- Fabric Markers: Washable or disappearing ink pens are essential for textiles.
- Chalk: Tailor’s chalk or chalk wheels glide smoothly on fabric and brush off easily.
- Awls: Create tiny, precise holes for stitching or assembly without damaging the material.
4. Shaping and Forming: Tools to Transform Your Materials
4.1 Pliers for Jewelry and Mixed Media
Different pliers serve specific functions in jewelry, wirework, and mixed media crafts:
- Chain-Nose Pliers: For gripping and bending wire, opening and closing jump rings.
- Round-Nose Pliers: For forming loops and curves in wire or metal findings.
- Flat-Nose Pliers: For holding components steady without marring the surface.
- Cutting Pliers: For snipping wire and headpins cleanly.
4.2 Bone Folders and Burnishers
Bone folders are invaluable for paper crafts, bookbinding, and origami—enabling crisp folds, smooth creases, and precise scoring. Burnishers (often agate-tipped) are ideal for smoothing surfaces or transferring rub-on designs.
4.3 Embossing and Sculpting Tools
Ball-ended styluses, clay modeling tools, and embossing pens allow you to add dimension to paper, metal, clay, or leather. Choose sizes based on your material and desired effect.
5. Fastening and Assembly: Small Tools, Big Impact
5.1 Tweezers and Clamps
Tweezers (pointed and flat) are essential for handling tiny embellishments, beads, or stickers. Mini clamps or clothespins hold glued components together while they dry, ensuring precise assembly.
5.2 Awls and Hole Punches
Beyond marking, awls create starter holes for sewing, binding, or brad insertion. Hole punches (from single-hole to decorative shapes) are a must for paper crafts, leatherwork, and mixed media projects.
6. Surface Preparation and Finishing Tools
6.1 Sanding Blocks and Files
For wood, polymer clay, or metal crafts, a range of sanding blocks and needle files will smooth rough edges and prep surfaces for painting or finishing. Opt for fine, medium, and coarse grits for maximum versatility.
6.2 Brushes and Applicators
Small, high-quality brushes are vital for dusting off debris, applying adhesives, or adding finishes. Silicone-tipped applicators are excellent for spreading glue evenly.
7. Specialty Hand Tools for Niche Crafts
7.1 Textile and Fiber Arts
- Seam Rippers: Precise removal of stitches and threads.
- Thread Snips: Quick, clean cuts for embroidery or sewing.
- Needle Threaders and Thimbles: Make hand sewing more efficient and comfortable.
7.2 Bookbinding and Paper Arts
- Corner Rounders: Soften sharp edges on covers or cards.
- Scoring Boards: Ensure even, repeatable folds for boxes and cards.
7.3 Leatherworking
- Edge Bevelers: Trim and round leather edges for a professional finish.
- Stitching Groovers: Create channels for stitching that protect thread from wear.
8. Selecting Quality Tools: What to Look For
- Material: Prefer stainless steel or high-carbon steel for blades and pliers—these resist rust and maintain sharpness.
- Ergonomics: Look for cushioned, non-slip grips and balanced weight, particularly if you craft for long periods.
- Replaceable Parts: Tools with replaceable blades or tips extend the lifespan of your investment.
- Brand Reputation: Trusted brands may cost more upfront but often offer better precision and durability.
Test tools in-store if possible, or read in-depth reviews from crafters in your field.
9. Maintenance: Keeping Your Hand Tools in Top Shape
9.1 Cleaning and Sharpening
- Wipe blades and metal parts after each use to prevent adhesive and residue buildup.
- Sharpen scissors and knives regularly with the appropriate sharpener or have them professionally serviced.
- Oil pivot points of pliers and shears occasionally to prevent stiffness.
9.2 Storage Solutions
Organized storage protects both your tools and your fingers. Consider:
- Magnetic tool strips for easy visibility and access.
- Drawer organizers or divided trays for small, sharp items.
- Clear lidded boxes for specialty tools—label each compartment for quick identification.
- Portable tool rolls or caddies if you craft in multiple locations.
9.3 Safety Practices
- Always retract or sheath blades when not in use.
- Keep sharp tools out of reach of children and pets.
- Inspect tools for damage; replace or repair worn parts promptly to avoid accidents.
10. Building Your Toolkit on a Budget
- Start with the basics: one quality item from each essential category.
- Upgrade as you identify specific needs—avoid buying bulk sets with tools you’ll never use.
- Watch for sales, secondhand deals, or local tool swaps. High-end tools often last longer and perform better, making them a wise investment over time.
- DIY tool maintenance (such as sharpening or cleaning) extends the life of your gear and saves money in the long run.
Conclusion: Empowering Your Craft with the Right Tools
Every great DIY project begins and ends with the right hand tools. While it’s tempting to chase the latest gadgets, a thoughtfully curated toolkit will serve you faithfully across countless projects and creative seasons. Start by identifying your core crafting interests, then invest in high-quality essentials—scissors that slice effortlessly, knives that glide through paper, pliers that grip and bend without slipping. Don’t underestimate the value of maintenance: a little routine cleaning and sharpening means your tools are always ready for your next burst of inspiration. Organize your tools so that they’re accessible and protected, reducing frustration and accidental injuries. As your skills grow, add specialty tools that match your evolving interests, but remember—crafting excellence isn’t about having the most tools, but the right ones for you. With a well-chosen, well-cared-for set of hand tools, you’ll unlock deeper creativity, complete projects with professional polish, and find lasting joy in every cut, fold, and finish. Let your toolkit be a source of pride and possibility, empowering you to craft boldly, beautifully, and safely for years to come.


When outfitting a new craft studio on a tight budget, which essential hand tools would you prioritize first from the core categories you listed, and are there any affordable brands you suggest starting with?
For a new craft studio on a budget, start with the basics: sharp utility knives, precision scissors, a quality ruler, basic pliers, needle nose tweezers, and a small hammer. For affordability and reliability, brands like Fiskars (for cutting tools) and Stanley (for utility knives and pliers) are good choices. These essentials will cover most beginner projects without a big investment.
I’m just getting started with setting up a small craft space at home and feel a bit overwhelmed by the hand tool options. Could you give more examples of what counts as essential versus specialty tools for someone who mainly does fabric and paper crafts?
For fabric and paper crafts, essential tools include sharp fabric and paper scissors, a rotary cutter, self-healing cutting mat, ruler, pins or clips, seam ripper, measuring tape, and a glue stick. Specialty tools would be things like pinking shears, fabric punches, embossing tools, or advanced paper trimmers. Starting with the basics will cover most projects, and you can add specialty tools as you explore new techniques.
I do mostly textile and paper crafts, but I’m tempted by some wood and jewelry projects too. How much overlap is there in essential tools between these disciplines, or should I plan on getting separate sets for each?
There is definitely some overlap in basic tools like rulers, measuring tapes, and utility knives, which are useful across textile, paper, wood, and jewelry crafts. However, each discipline also relies on specialized tools—woodworking might require chisels and saws, while jewelry making uses pliers and files. You can start with the essentials you already have and add specialty tools as your projects demand.
What is the best method for keeping hand tools sharp and in good condition, especially if I’m working with both fabric and paper frequently?
To keep your hand tools sharp and in top shape when working with both fabric and paper, clean them after each use to prevent residue buildup, and use separate scissors or blades for fabric and paper to avoid dulling. Regularly hone blades with a sharpening tool and store them in a dry place to prevent rust.
Are there specific brands or features you’d recommend to consider when purchasing essential measuring and marking tools for accuracy, especially for beginners setting up a new studio on a tight budget?
When starting out on a budget, look for measuring and marking tools with clear, easy-to-read markings and sturdy construction. Brands like Stanley, Swanson, and Milwaukee are known for good quality at reasonable prices. For beginners, a reliable metal ruler, a tape measure with a locking feature, and a basic carpenter’s square are great starting points. Accuracy and durability are key, so avoid tools with flimsy plastic parts.
When it comes to maintenance, are there any specific tips for sharpening or cleaning different types of hand tools, especially those used for both fabric and paper crafts?
For sharpening scissors and rotary cutters, use a dedicated sharpening tool or stone, and always follow the original bevel. For cleaning, wipe blades after each use with a soft cloth; for sticky residue, use a little rubbing alcohol. Avoid soaking tools with wooden handles, and oil pivot points regularly to keep everything moving smoothly. This keeps your tools in top shape for both fabric and paper projects.
I see the article stresses keeping hand tools in top shape for long-term productivity. Could you elaborate on your recommended maintenance routines for different categories like cutting versus shaping tools?
For cutting tools like scissors and knives, regular sharpening and cleaning after each use help maintain their edge. For shaping tools such as files and rasps, brushing away debris and occasionally oiling metal parts prevents rust and buildup. Store all tools in a dry place, and periodically check handles for splinters or cracks to ensure safety and longevity.
For someone outfitting a new craft studio on a tight budget, which cutting tool would you prioritize first—rotary cutter, micro-tip scissors, or craft knife—and why?
If you need to prioritize just one cutting tool for a new craft studio on a tight budget, micro-tip scissors are the most versatile choice. They handle a wide range of materials and offer precision for both detailed and general cuts. While rotary cutters and craft knives are great, micro-tip scissors will cover more everyday crafting needs starting out.
The article suggests that every craft discipline has a unique blend of tools. Are there recommendations for multipurpose tools that work well across different types of crafts, especially for those who enjoy mixed media projects?
Yes, the article highlights a few versatile tools ideal for mixed media and various crafts. Utility knives, self-healing cutting mats, precision rulers, and needle-nose pliers are excellent multipurpose tools. Additionally, strong adhesive options like double-sided tape and glue guns are useful across disciplines. These basics can help you handle everything from paper to light wood and fabric projects.
For someone looking to upgrade their DIY craft studio, is there an ideal order in which to acquire these essential hand tools, or should I focus on tools most relevant to specific projects I’ll be doing in the near future?
It’s usually best to prioritize tools based on the specific projects you plan to tackle soon. This ensures you’re investing in hand tools you’ll actually use right away. Once your core needs are covered, you can gradually add other essentials from the guide to complete your collection over time.