Introduction: Power Tools as Craft Studio Game-Changers
For passionate DIYers and crafters, there comes a point when hand tools alone can’t keep up with your creative ambitions. Whether you’re making intricate wooden ornaments, upcycling furniture, or prototyping mixed-media art, power tools offer efficiency, precision, and possibilities you simply can’t achieve by hand. But with so many tools on the market—and safety always a top priority—knowing which power tools belong in your craft studio, how to set them up for safe and efficient use, and how to maintain them is crucial.
This guide takes you from the basics of choosing the right power tools for your creative projects, through practical setup strategies, to safety protocols every DIY crafter should follow. You’ll learn how to match tools to your craft, create a functional workspace, perform essential maintenance, and avoid common pitfalls that can hinder your crafting journey. Whether you’re setting up your first dedicated studio or looking to level up your existing space, this in-depth resource will help you make smart, safe, and creative use of power tools—without overwhelm or costly mistakes.
Power Tools Every DIY Craft Studio Needs
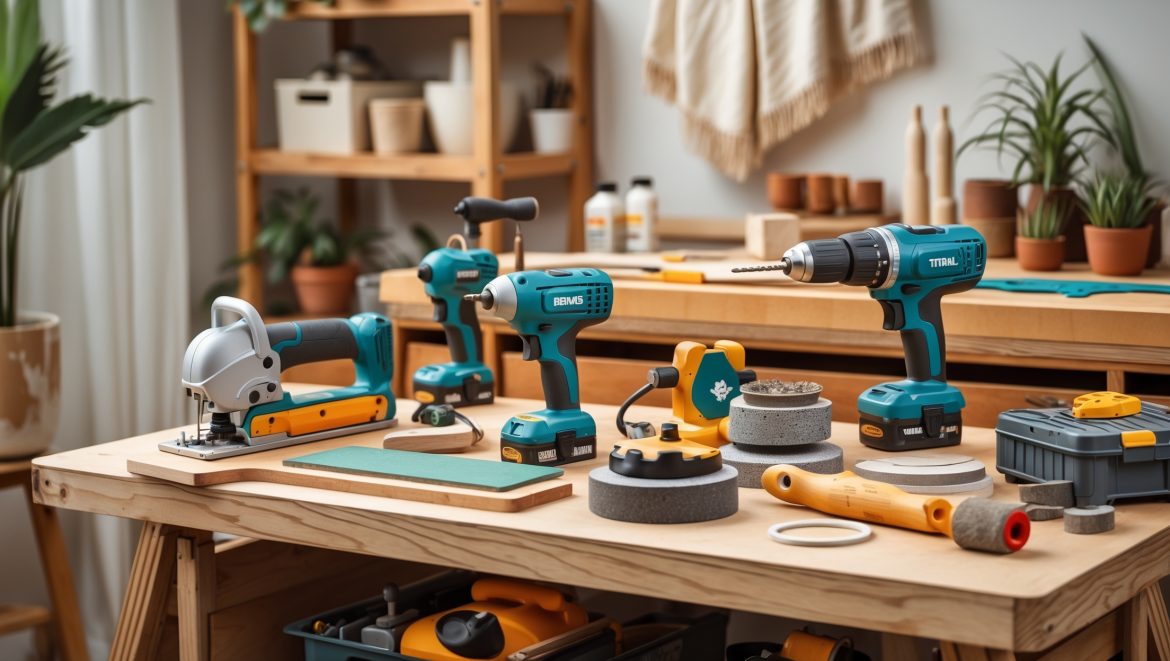
1. Cordless Drill/Driver
The cordless drill is the workhorse of any craft studio. From assembling furniture to drilling holes for jewelry or adding hardware to handmade boxes, this tool is essential for speed and accuracy. Look for a variable speed model with adjustable torque settings, and invest in a set of quality drill and driver bits suitable for wood, metal, and plastics.
2. Rotary Tool (Dremel-Style)
Rotary tools are the Swiss Army knives of the crafting world, perfect for sanding, engraving, carving, polishing, and cutting. Choose a model with variable speeds and a wide range of attachments. This tool excels in detailed work, like finishing edges, creating custom stencils, or embellishing surfaces.
3. Jigsaw
For cutting curves and shapes in wood, acrylic, or even thin metal, a jigsaw is invaluable. Opt for a compact, lightweight model with tool-free blade changes. A jigsaw enables you to make custom frames, ornaments, or signboards with ease and accuracy.
4. Finishing Sander
Sanding by hand is tedious. A finishing sander (palm or orbital) saves time and produces smooth, professional results on wood, painted surfaces, and even polymer clay. Look for dust extraction features to keep your workspace clean.
5. Hot Glue Gun (High & Low Temp)
While technically not a power tool in the traditional sense, a high-quality glue gun is indispensable for fast, strong bonds in crafting. Consider both high-temp (for wood and heavier materials) and low-temp (for delicate items) models.
6. Optional: Scroll Saw, Mini Table Saw, or Laser Cutter
If your projects involve regular precision cutting—think custom wooden puzzles, intricate paper art, or acrylic shapes—consider investing in a scroll saw, mini table saw, or, for advanced makers, a desktop laser cutter. These tools expand your creative possibilities but require careful setup and safety considerations.
Selecting the Right Tools for Your Projects
Assess Your Primary Craft Types
- Woodworking: Prioritize a cordless drill, jigsaw, sander, and optionally a scroll or table saw.
- Mixed Media: Rotary tool, hot glue gun, and drill cover most needs. Add a heat gun for embossing or resin crafts.
- Jewelry-making: Focus on a rotary tool (for polishing/cutting), small drill, and mini sander. A bench vise can be a useful addition.
- Paper Crafts: Rotary tool with cutting wheels, hot glue gun, and possibly a small desktop laser cutter for intricate cuts.
Budgeting for Power Tools
Quality matters more than quantity. Start with multi-use tools (drill, rotary tool) and add specialized tools as your needs grow. Factor in the cost of accessories—bits, blades, sanding pads, and safety gear—as these are essential for safe and effective use.
Corded vs. Cordless
Cordless tools offer portability and convenience, especially in small or multi-use spaces. However, corded models often provide more consistent power and are preferable for stationary setups or heavy-duty use. Consider your studio’s size, layout, and typical project duration.
Setting Up Your Craft Studio for Power Tool Use
Creating Dedicated Work Zones
Organization boosts both safety and creativity. Establish zones for cutting, sanding, assembly, and finishing. Use sturdy tables or benches for tool operation. Ensure you have adequate space for material handling and tool maneuvering—at least 3′ x 3′ for major power tools.
Electrical Planning and Outlets
- Ample Outlets: Install grounded outlets near your main workbench to avoid running extension cords across walkways.
- Surge Protection: Use surge-protected power strips for plug-in tools, especially if running multiple tools or chargers simultaneously.
- Lighting: Position task lighting directly over work zones. LED work lights reduce eye strain and improve detail work.
Dust and Fume Management
- Dust Extraction: Connect sanders and saws to a shop vacuum with a HEPA filter. Small-space studios can use portable air purifiers near cutting and sanding zones.
- Ventilation: For tools that generate fumes (hot glue guns, heat guns), use a window fan or install a small exhaust fan in your studio.
Tool Storage and Accessibility
- Wall-Mounted Racks: Hang drills, rotary tools, and accessories for easy access and to keep benchtops clear.
- Drawer Organizers: Store small bits, blades, and sanding pads in labeled drawers or bins.
- Mobile Carts: Use rolling carts for tools you use in multiple zones, like glue guns or rotary tools.
Safe Operation: Power Tool Best Practices for DIY Crafters
Personal Protective Equipment (PPE)
- Safety Glasses or Goggles: Always wear when cutting, drilling, or sanding.
- Dust Mask or Respirator: Essential for sanding, sawing, or using chemicals/adhesives.
- Hearing Protection: Use earplugs or earmuffs with louder tools like saws and sanders.
- Gloves (when appropriate): Only use snug-fitting gloves—never loose—for handling rough materials, but never while operating spinning tools (risk of entanglement).
Workspace Safety Checks
- Keep all cords untangled and away from cutting areas.
- Clamp materials securely before cutting or drilling.
- Ensure good lighting and a clear, non-slip floor.
- Unplug tools before changing blades, bits, or performing maintenance.
Tool-Specific Safety Tips
- Drills: Start at a low speed, keep hands away from the bit, and use a depth stop for repetitive drilling.
- Rotary Tools: Use the correct attachment and speed for the material. Let the tool do the work—don’t force it.
- Jigsaws: Use sharp blades, secure your material firmly, and allow the blade to reach full speed before contact.
- Sanders: Move in even strokes; don’t press down hard. Clean dust frequently to avoid clogging and fire risks.
- Hot Glue Guns: Place on a heatproof mat, unplug when not in use, and never leave unattended while hot.
Power Tool Maintenance for Long-Term Reliability
Cleaning and Care
- Wipe down tools after each use to remove dust and debris.
- Use compressed air to clear vents and moving parts—especially on sanders and rotary tools.
- Inspect cords for wear and replace if frayed.
- Lubricate moving parts as directed in the tool manual.
Blade and Bit Maintenance
- Replace dull or damaged blades and bits promptly; working with sharp tools is safer and prevents motor strain.
- Store blades and bits in dry, organized containers to prevent rust and damage.
Battery Care for Cordless Tools
- Charge batteries fully before first use, and don’t leave them on the charger for prolonged periods.
- Store in a cool, dry place. Avoid extreme temperatures, which shorten battery life.
Annual Safety and Function Check
- Once a year, perform a thorough inspection: check electrical components, tighten screws, and ensure all safety guards are functional.
- Test all tools on scrap material before starting major projects after a break in use.
Expanding Your Power Tool Arsenal: When and How
Signs You’re Ready for More Advanced Tools
- You regularly find your current tools limit your project scope (e.g., need finer cuts, faster sanding, or higher precision).
- Your projects have grown in complexity or scale, such as moving from small crafts to furniture or large installations.
- You’ve mastered safe use and maintenance of your existing tools.
Research and Try Before You Buy
Visit local makerspaces or hardware stores to test tools. Read reviews and seek advice from other crafters in online communities. Consider renting or borrowing tools for one-off projects before committing to a purchase.
Invest in Quality, Not Quantity
As you expand, opt for reputable brands and tools with strong warranties. A single well-made tool will serve your studio longer and more safely than several cheap alternatives.
Common Mistakes to Avoid with Power Tools in Craft Studios
- Skipping safety gear “just for a quick job.” Even quick tasks can cause accidents.
- Buying too many specialized tools before mastering basics.
- Using dull blades or bits, which can cause slips and poor results.
- Ignoring dust control, leading to unsafe air and messy workspaces.
- Improper storage—leaving tools plugged in, in damp areas, or piled together.
- Forgetting regular maintenance, reducing lifespan and safety.
Conclusion: Empowering Your Creative Process with Power Tools
The right power tools take your craft studio from a hobbyist’s corner to a professional, inspiring workspace. By carefully selecting tools that match your projects, setting up a safe and efficient environment, and maintaining your equipment, you’re investing in your creative future. Power tools not only speed up your workflow but also open new avenues for design and expression—allowing you to tackle ambitious projects with confidence.
Remember, mastering power tools is a journey. Start with core essentials, focus on safe practices, and let your needs and skills guide your expansion. Prioritize quality over quantity, and don’t hesitate to seek out community advice or try new tools in shared spaces before making major purchases. With attention to safety, setup, and care, your tools will serve as loyal partners in every creative challenge you take on.
Above all, enjoy the process! The hum of a well-tuned drill or the clean curve of a jigsaw cut can be as rewarding as the finished piece. A thoughtfully equipped and organized craft studio isn’t just practical—it’s the foundation for a lifetime of creative joy. Empower yourself with knowledge, precision, and care, and watch your DIY dreams come to life one project at a time.


I’m just starting to build out my first craft studio and get overwhelmed by all the different drill and driver bit types out there. Do you have tips on how to pick a basic but useful starter set for typical DIY craft projects?
For a beginner’s craft studio, a basic set should include a mix of Phillips and flathead screwdriver bits, a few sizes of drill bits for wood and plastic, and a couple of hex (Allen) bits. Look for sets labeled as ‘multi-purpose’ or ‘general use’—these usually cover most craft needs without extra specialty bits you might never use.
I’m worried about maintenance since I’ve never owned power tools before. Could you share some basic maintenance tips or a checklist for making sure my tools stay in good working order and safe to use?
Keeping your power tools in good condition is straightforward with a few habits. After each use, wipe tools clean and store them in a dry place. Regularly check cords for damage, make sure moving parts are lubricated if required, and tighten any loose screws. Always inspect blades or bits for wear and replace them as needed. Finally, follow your tool’s manual for specific care instructions.
When choosing a cordless drill for a home craft studio, do you recommend sticking with a 12V model for smaller projects, or is it worth upgrading to an 18V if I might occasionally work with thicker materials or furniture?
If your main focus is smaller craft projects, a 12V cordless drill is lightweight and easy to handle, making it a good choice. However, if you think you’ll sometimes tackle thicker materials or furniture, an 18V drill offers more power and versatility for those tougher tasks. Choosing an 18V model gives you more flexibility without being excessively bulky for craft use.
Could you clarify what kind of essential maintenance routines the guide recommends for keeping rotary tools and jigsaws in top condition, especially if they’re used frequently with a variety of materials?
The guide suggests cleaning both rotary tools and jigsaws after each use, especially if switching between materials. For rotary tools, regularly check and replace worn-out bits, and lubricate moving parts if recommended by the manufacturer. For jigsaws, keep the blade and vents free of dust, inspect the blade for dullness or damage, and check the cord and switches for wear.