Introduction
Every creative project starts with the right materials—but in the world of DIY, crafts, and creative living, some supplies require more than just a spot on your shelf. Paint thinners, solvents, adhesives, dyes, and even certain cleaning agents can pose risks if not handled and stored correctly. If you’re serious about crafting—whether you’re a weekend hobbyist or building a thriving handmade business—understanding how to safely organize and store hazardous materials is essential. Not only does it protect your health and safety, but it also safeguards your workspace, the quality of your creations, and sometimes even your insurance or legal compliance. This comprehensive guide takes you step by step through the best practices for identifying hazardous materials, setting up safe storage, creating effective organization systems, and maintaining a healthy, productive studio environment. Let’s turn your craft studio into a place where creativity flourishes—and safety comes standard.
Understanding Hazardous Materials in DIY Crafting
What Qualifies as Hazardous?
Hazardous materials are substances that can pose a risk to health, property, or the environment. In a DIY craft studio, this can include:
- Solvents and Thinners: Used for paint, ink, and cleaning; often flammable and toxic.
- Adhesives: Certain glues (like epoxy or cyanoacrylate) emit fumes or are combustible.
- Paints and Finishes: Oil-based paints, varnishes, and sprays contain volatile organic compounds (VOCs).
- Dyes and Pigments: Some contain heavy metals or caustic chemicals.
- Cleaning Agents: Industrial cleaners, alcohols, or bleach can be reactive or harmful.
- Acids and Alkalis: Used in etching, jewelry-making, and some textile crafts.
Health and Safety Risks
Improper storage can result in:
- Harmful fumes accumulating in your workspace
- Unintentional mixing of incompatible chemicals
- Accidental spills leading to skin burns or respiratory irritation
- Fire hazards from flammable substances
- Risk of poisoning children or pets
Understanding what you have—and what risks those materials present—is the first step towards a safer studio.
Taking Inventory: Identify and Classify
Step 1: List Every Potentially Hazardous Item
Start by pulling out every chemical, paint, adhesive, and cleaning product from your studio. Check under sinks, in drawers, and on shelves. Make a detailed list, including:
- Product name
- Brand/manufacturer
- Type (e.g., solvent, acid, flammable liquid)
- Quantity/volume
- Expiration date (if available)
Step 2: Read Labels and Safety Data Sheets (SDS)
Consult product labels for hazard symbols (flammable, corrosive, toxic, etc.) and safety instructions. For detailed guidance, look up each product’s Safety Data Sheet (SDS)—usually available online. Key info includes:
- Storage requirements
- Proper disposal
- First aid measures
- Incompatibilities (e.g., never store acids and bases together)
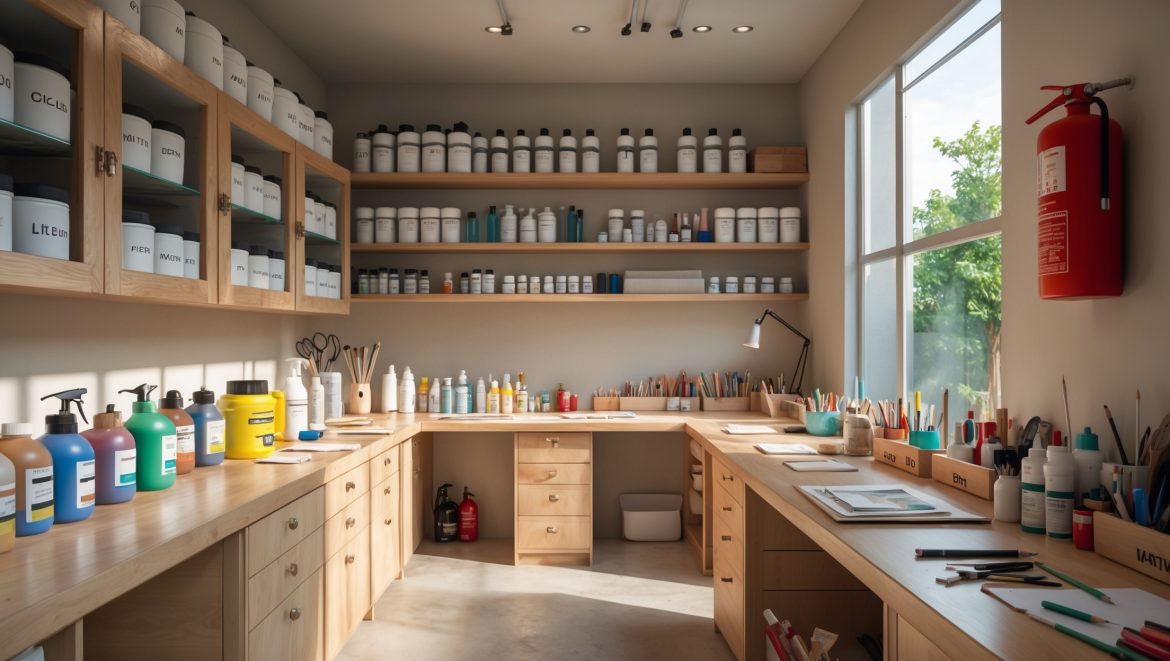
Designing Safe Storage Solutions
Choosing the Right Storage Area
Designate a specific area for hazardous materials—never scatter them throughout your studio. Ideal characteristics:
- Ventilated: Near a window or exhaust fan to disperse fumes
- Cool and Dry: Away from heat sources and direct sunlight
- Accessible—but Secure: Easy for you to reach, but out of reach of children and pets
Types of Storage Units
- Metal Cabinets: Fire-resistant and lockable for flammable liquids and solvents.
- Plastic Bins: For less hazardous materials, but always use chemical-resistant plastics.
- Wall-Mounted Racks: Keep smaller containers off the work surface, but ensure they’re secure.
- Secondary Containment: Store all liquids on trays or in bins to catch spills or leaks.
Label Everything
Clearly label every container with its contents and hazard type. Use waterproof labels and clear handwriting or printed labels. Never store hazardous materials in food or drink containers.
Segregate Incompatible Substances
Store acids, bases, oxidizers, and flammables separately. Use dividers or separate cabinets if necessary. Common incompatibilities include:
- Acids vs. bases
- Bleach (chlorine) vs. ammonia (toxic gas risk)
- Flammable liquids vs. oxidizers
Practical Organization Systems
Zone Your Storage
Divide your hazardous materials storage into clearly defined zones, such as:
- Flammables (e.g., solvents, alcohol-based products)
- Corrosives (e.g., acids, alkalis)
- Toxics (e.g., certain dyes, resin hardeners)
- General chemicals (cleaners, less dangerous adhesives)
Use Inventory Management Tools
Consider maintaining a digital or physical inventory. Apps like Airtable, Notion, or even a simple spreadsheet can help you track what you have, expiration dates, and usage rates. This reduces overstocking and ensures you dispose of outdated products safely.
Rotate Stock
Practice “first in, first out” (FIFO) to minimize expired materials. Place newer supplies behind older ones so you use up older stock first.
Color Coding and Signage
Use colored bins, labels, or tape to visually distinguish hazard types. For example, red for flammables, yellow for corrosives, blue for toxics. Hang a simple key or signage to remind you (and anyone else using your studio) of the system.
Ventilation and Environmental Controls
Air Quality
Even with secure storage, fumes can escape. Ensure your storage area is near a window, exhaust fan, or dedicated air purifier with a VOC filter. Open windows when using chemicals, and never store hazardous materials in unventilated closets.
Humidity and Temperature
High humidity can corrode containers or degrade certain chemicals. Use a dehumidifier if needed and choose storage areas with stable, moderate temperatures (ideally under 77°F/25°C). Avoid storing materials near radiators, heaters, or direct sunlight.
Spill Response and Emergency Preparedness
Spill Kits
Equip your studio with a basic spill kit, including:
- Absorbent pads or granules (for chemical spills)
- Nitrile gloves and safety goggles
- Disposable aprons
- Small dustpan and brush
- Plastic bags for contaminated waste
Fire Extinguisher
Keep a Class B (for flammable liquids) or multipurpose (ABC) fire extinguisher near your hazardous storage area. Check the pressure gauge regularly and ensure you know how to use it.
First Aid Kit
Stock a first aid kit with supplies for chemical burns, eye washes, and basic wound care. Know the location and how to use eyewash stations if you work with acids or alkalis.
Emergency Contacts
Post emergency numbers (poison control, local fire department) near your storage area and in your phone.
Safe Handling Practices and Routine Maintenance
Always Use PPE
Wear gloves, goggles, and, if needed, a respirator when handling hazardous materials—especially during transfer, mixing, or cleanup.
Inspect Containers Regularly
Check for leaks, corrosion, bulging, or cracked lids at least once a month. Dispose of any damaged containers using your local hazardous waste protocols.
Clean Spills Immediately
Don’t let small spills accumulate. Clean up right away using appropriate materials from your spill kit, and ventilate the area thoroughly.
Dispose of Waste Properly
Never pour chemicals down the drain unless specifically permitted. Store chemical waste in a labeled, sealed container and take it to a hazardous waste facility as recommended by your local authorities.
Legal Compliance and Insurance
Check Local Regulations
Some areas restrict the amount or type of hazardous material you can store at home or in a small studio. Look up city, county, or state guidelines for safe limits and storage requirements.
Insurance Considerations
Improper storage of hazardous materials may void your studio or business insurance in case of an incident. Document your storage systems, take photos, and keep receipts for safety equipment. Notify your insurer if you regularly keep significant quantities of chemicals or flammables on-site.
Sample Storage Setup: A Real-World Example
Let’s walk through how a typical DIY crafter could set up a safe storage area in a spare room studio:
- Install a metal, lockable cabinet with vented doors, anchored to the wall for stability.
- Place a plastic tray inside each shelf to contain leaks or spills.
- Sort materials by hazard type, using color-coded bins and clear labels.
- Keep a spill kit and fire extinguisher mounted on the wall next to the cabinet.
- Store an inventory sheet inside the cabinet door for quick reference.
- Open a nearby window and run a small exhaust fan when using chemicals.
This setup keeps dangerous substances secure, organized, and accessible—without sacrificing your creative workflow or workspace aesthetics.
Conclusion
Your craft studio is a sanctuary for creativity—but it should also be a sanctuary for safety. By understanding which materials are hazardous, taking a thoughtful inventory, and setting up robust storage systems, you protect not just your health but the integrity of your creative practice. Proper ventilation, clear labeling, emergency preparedness, and regular maintenance will help you avoid accidents and maintain peace of mind. Remember, the effort you invest in safe storage isn’t just about compliance or tidiness: it’s about preserving your ability to create, uninterrupted and undistracted by avoidable risks. Prioritizing safety doesn’t stifle your creativity—it sustains it, ensuring that your studio remains a place of inspiration and joy for years to come. Review your storage setup today, make the improvements you need, and keep crafting confidently, knowing you’ve taken every step to safeguard your workspace, your art, and yourself.


You mentioned insurance and legal compliance—are there any typical regulations or requirements I should know about when storing hazardous materials in a home-based craft studio?
Yes, there are some key regulations to consider. Many local governments require that hazardous materials be stored in clearly labeled, sealed containers and kept away from children and pets. Ventilation is often required for flammable or volatile substances. You may also be limited in the total quantity you can store at home. Check your city ordinances and your homeowner’s insurance policy for any specific requirements or limitations.
If a spill does happen with things like paint thinner or caustic dyes, what are the first steps you take before cleaning up and how do you minimize the risk of harm to yourself and your workspace?
If a spill occurs, immediately ventilate the area by opening windows or using fans, and put on protective gloves and a mask. Keep people and pets away from the spill. Check the product label for specific cleanup instructions. Use absorbent materials like kitty litter to contain the spill, and avoid using water unless the product label says it’s safe. Always dispose of cleanup materials according to local hazardous waste guidelines.
You mentioned that some adhesives like epoxy or cyanoacrylate are hazardous because of the fumes or combustibility. Do you have tips for how to ventilate a small craft studio if adding windows or expensive ventilation systems isn’t realistic?
If you can’t install windows or a full ventilation system, try using a portable fan to direct fumes away from your work area toward an open doorway. Work with adhesives in short sessions, keep containers tightly closed, and store them in airtight bins when not in use. Using a respirator mask rated for chemical fumes can also add extra protection in a small space.
You mentioned that mixing incompatible chemicals can be dangerous. Are there any common combinations of craft materials that should never be stored together, and how can I identify them when organizing my supplies?
Yes, some common craft materials should never be stored together. For example, strong acids (like etching solutions) and bases (such as ammonia) can react dangerously if they leak or mix. Also, keep flammable items like solvents away from oxidizers like hydrogen peroxide. Always check labels for hazard symbols and warnings, and group materials by their hazard type—using separate, clearly labeled containers or cabinets for each group.
If my craft studio is in a basement with limited ventilation, what are some practical steps I can take to reduce the buildup of fumes from oil-based paints and other VOC-heavy materials?
If your basement studio has limited ventilation, try using portable air purifiers with activated carbon filters to help capture fumes. Work near open windows or doors if possible, and use fans to direct air outside. Always keep containers tightly sealed when not in use and store VOC-heavy materials in airtight cabinets designed for chemicals.
Could you share some practical tips for identifying which specific craft materials in a typical hobbyist’s collection would be considered hazardous and need special storage, especially for those who might not immediately recognize solvents or adhesives as risky?
To spot hazardous items in your craft supplies, look for warning labels like flammable, toxic, corrosive, or irritant—these are often on paints, solvents, adhesives, spray cans, and certain dyes. If a product has a strong odor, evaporates quickly, or requires ventilation, it likely needs special storage. Always read product instructions and keep anything with hazard warnings in a secure, ventilated area away from heat and children.
I noticed you mentioned legal compliance and insurance—what are some basic storage practices that would satisfy most US business insurance policies when it comes to hazardous materials?
Most US business insurance policies expect hazardous materials to be stored in clearly labeled, sealed containers, away from heat and sunlight, and separated according to type (for example, flammables apart from corrosives). Use ventilated cabinets if possible, keep an inventory, and ensure you have accessible safety data sheets for each material.
If I only have a small budget to improve my craft storage, which safety upgrades should be my top priority to minimize health risks with solvents and thinners?
With a small budget, focus first on proper ventilation, such as using a portable fan near an open window to disperse fumes. Next, get airtight containers for storing solvents and thinners, and clearly label each container. If possible, dedicate a closed cabinet or sealed plastic bin to separate hazardous materials from your main work area.
You mention legal compliance and insurance—are there specific regulations or guidelines in the US that craft studio owners should be aware of when storing hazardous materials like industrial cleaners or spray paints?
Yes, in the US, local fire codes, OSHA regulations, and EPA guidelines all apply to the storage of hazardous materials, even in small craft studios. You may need to label containers properly, use approved storage cabinets for flammable items like spray paints, and store chemicals away from heat sources. Always check your state and city requirements, as they can be stricter than federal rules.
I use a variety of adhesives and dyes in my crafts. Do you have any suggestions for labeling or categorizing them to prevent accidental use of the wrong chemical, especially when some contain heavy metals or caustic ingredients?
Label each container clearly with the product name, main ingredients, and hazard warnings, using waterproof labels. Consider color-coding adhesives, dyes, and any items containing heavy metals or caustic substances. Store them in separate bins or shelves, and keep a simple inventory list so you always know exactly what you have and where it is.
If I use both acids for jewelry making and cleaning agents like bleach in my studio, what steps should I take to ensure they don’t accidentally come into contact or react with each other?
To keep acids and bleach safely apart, store them in separate, clearly labeled containers and place them on different shelves or in different cabinets—ideally in opposite parts of your studio. Make sure both storage areas are well ventilated, and never share tools or cloths between the two without thoroughly cleaning them first.
If certain cleaning agents or thinners are only used once in a while, is it better to store them in a separate room instead of the main craft studio, or do special cabinets provide enough protection?
If your craft studio has a properly rated, ventilated storage cabinet specifically designed for hazardous materials, that should provide enough protection even for infrequently used cleaning agents or thinners. However, if space allows and you want to further minimize risk, storing them in a separate, well-ventilated room is an extra precaution.