Introduction: The Overlooked Risk of Noise in DIY Craft Studios
When we think about safety in a DIY craft studio, most minds jump to sharp tools, hazardous chemicals, or fire hazards. But there’s a sneaky risk that often goes unnoticed: noise. Whether you’re a woodworker running a table saw, a jewelry maker using a rotary tool, or a textile artist with a heavy-duty sewing machine, noise exposure is a real—and underestimated—danger. Chronic exposure to high noise levels can cause irreversible hearing loss, tinnitus (ringing in the ears), and even increased stress and fatigue, which can impact your creative flow and long-term health.
Many crafters set up DIY studios in garages, basements, or spare rooms, often with little thought given to acoustics or noise control. Yet, the cumulative effect of running loud machines, hammering, or sanding can easily exceed safe daily exposure limits. And unlike a cut or burn, hearing damage is usually gradual and painless—until it’s too late.
This in-depth guide explores the hidden hazards of noise in your creative workspace. We’ll break down sources of noise in craft studios, explain how to measure and understand their impact, and provide step-by-step strategies to protect your hearing and create a quieter, more productive environment. Whether you’re a seasoned maker or just setting up your first studio, this post will help you make informed choices for your health and creativity.
Understanding Noise Hazards in the DIY Craft Studio
What Constitutes Harmful Noise?
Sound is measured in decibels (dB), and the risk to your hearing increases dramatically as levels rise. According to occupational health guidelines, prolonged exposure to noise above 85 dB can cause hearing loss. For reference:
- Normal conversation: ~60 dB
- Sewing machine: 60–80 dB
- Rotary tool (Dremel): 80–100 dB
- Electric sander: 85–105 dB
- Table saw: 90–110 dB
- Hammering metal: 95–120 dB
Unlike some industrial environments, crafters often spend hours in close proximity to these sources. Even moderate noise, if constant, can result in cumulative damage.
Types of Hearing Damage
Hearing loss from noise exposure is typically permanent. It may start as subtle difficulty hearing high-pitched sounds or following conversations in noisy environments, progressing to more significant impairment. Other issues include:
- Tinnitus: Persistent ringing or buzzing in the ears.
- Hyperacusis: Heightened sensitivity to everyday sounds.
- Noise-induced stress: Physical symptoms like headaches, fatigue, and decreased concentration.
Identifying Noise Sources in Your Studio
Equipment and Tools
Common noise culprits include:
- Power tools: saws, drills, sanders, grinders, rotary tools
- Industrial sewing machines and sergers
- Air compressors and pneumatic tools
- Metalworking hammers and anvils
- Shop vacuums and dust extractors
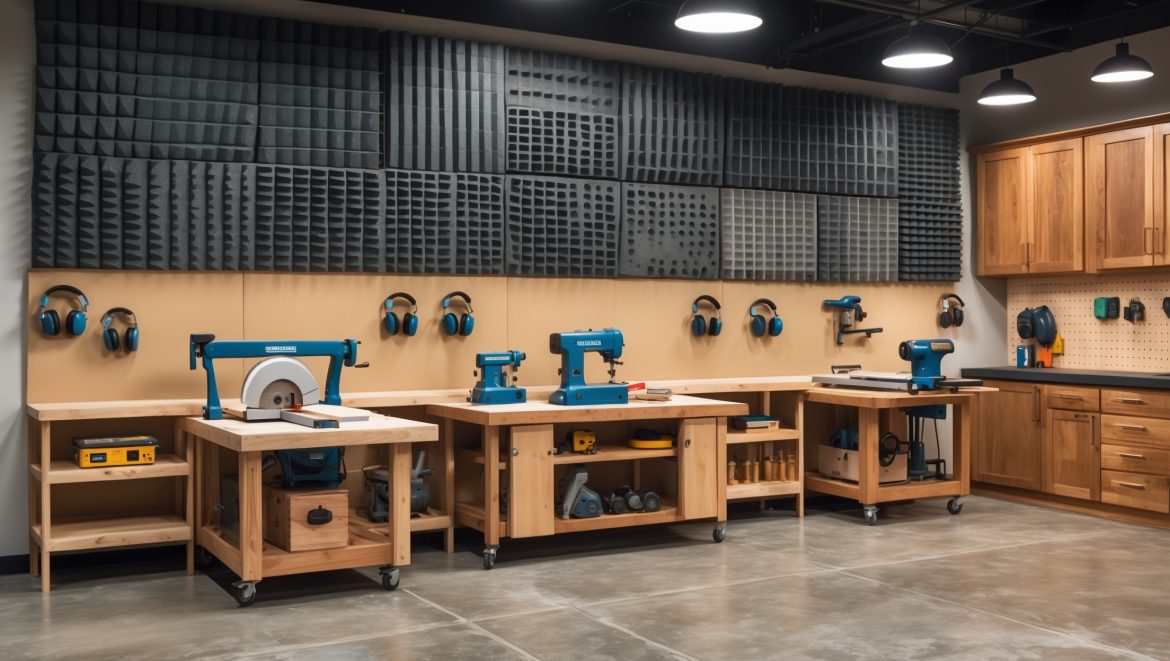
Studio Design and Materials
Studio acoustics can amplify noise. Hard surfaces like concrete floors, bare walls, and glass windows reflect sound, while cluttered or insulated spaces can dampen it. Small, enclosed rooms often trap sound, increasing exposure.
Measuring and Assessing Noise Levels
DIY Noise Assessment
To understand your risk, measure the noise in your studio:
- Download a decibel meter app on your smartphone (such as NIOSH Sound Level Meter for iOS).
- Measure noise at your ear level while using each tool.
- Record duration and frequency of exposure for each activity.
If readings regularly exceed 85 dB during typical sessions, you need to take protective action.
Professional Assessment
For more accuracy, you can purchase a dedicated sound level meter or hire an occupational health consultant for a one-time studio evaluation—especially if you’re operating at a semi-professional or commercial scale.
Strategies to Reduce Noise Exposure
1. Engineering Controls: Making Your Studio Quieter
- Choose Quieter Tools: Research low-noise models when buying new equipment. Many manufacturers list decibel ratings.
- Install Anti-Vibration Pads: Place under machines to reduce transmitted noise.
- Maintain Tools: Well-lubricated, sharp tools are quieter. Replace worn bearings and belts.
- Acoustic Treatments: Add sound-absorbing materials to walls and ceilings. Options include:
- Acoustic foam panels
- Heavy curtains or moving blankets
- Carpet tiles or rubber mats on floors
- Bookshelves or fabric storage as sound baffles
2. Administrative Controls: Changing How You Work
- Limit Exposure: Break up noisy tasks and schedule quiet activities between them.
- Alternate Noisy and Quiet Tools: Reduce continuous exposure by switching between tasks.
- Restrict Access: Keep others, especially children, out of the studio during loud operations.
- Post Noise Hazard Signs: Remind yourself and visitors to protect their hearing.
3. Personal Protective Equipment (PPE): Safeguarding Your Ears
- Earmuffs: Provide 20–30 dB of noise reduction. Choose comfortable, adjustable models and clean them regularly.
- Foam Earplugs: Cheap and disposable, they offer excellent protection if inserted correctly.
- Reusable Silicone Earplugs: More durable and comfortable for extended use.
- Custom-Molded Earplugs: Best protection and comfort, but higher initial cost.
- Double Protection: For extremely loud tools, use both earplugs and earmuffs.
Always keep hearing protection in a visible, accessible spot near your work areas.
Soundproofing and Acoustic Improvements
DIY Soundproofing Projects
- Seal Gaps: Use weatherstripping around doors and windows to prevent sound leaks.
- Mass-Loaded Vinyl: Add to walls or ceilings for a heavy, effective sound barrier.
- Build Removable Sound Panels: Create frames filled with mineral wool or dense fiberglass, wrapped in fabric, and hang on walls.
- Soft Furnishings: Rugs, curtains, and upholstered furniture absorb ambient noise.
- Isolate Noisy Machines: Place loud equipment on vibration-dampening platforms away from walls.
Budget-Friendly Tips
- Hang thick blankets or moving pads over doors and windows.
- Use egg cartons or cardboard for basic sound diffusion (not as effective for absorption, but better than bare walls).
- Repurpose old mattresses or foam cushions as impromptu sound traps.
Studio Workflow: Integrating Noise Awareness into Your Routine
Pre-Work Routine
- Check if the task requires hearing protection.
- Put on earmuffs or earplugs before starting noisy equipment.
- Let household members or neighbors know about planned noisy work, especially if you share walls.
During Work
- Take regular breaks from noise—step outside or work on a quiet project.
- Monitor your comfort: if you have to raise your voice to be heard by someone three feet away, it’s too loud.
- Stay alert for signs of hearing fatigue: ringing in the ears, muffled sounds, or discomfort.
Post-Work Routine
- Turn off all machines and store them securely.
- Clean and inspect your hearing protection.
- Record any unusually loud events or issues for future reference.
Special Considerations: Shared Spaces and Neighbors
If your studio is in an apartment, townhouse, or shared home, soundproofing isn’t just about your own protection—it’s also about respecting others. Consider:
- Limiting noisy work to reasonable hours.
- Inviting feedback from neighbors about noise levels.
- Using portable sound barriers (DIY or purchased) to block sound from traveling through doors or thin walls.
- Choosing quieter hand tools or manual alternatives when possible.
Long-Term Hearing Health: Monitoring and Maintenance
Personal Hearing Checks
Periodically assess your hearing. If you notice difficulty following conversations, persistent ringing, or a sense of “fullness” in your ears after working, it’s time to reevaluate your noise control measures.
Professional Hearing Tests
Schedule a baseline hearing test with an audiologist, especially if you craft regularly with loud tools. Repeat every few years, or sooner if you notice changes. Early detection is key to preventing further loss.
Myths and Misconceptions About Noise in Craft Studios
- “My tools aren’t as loud as industrial equipment, so I’m safe.”
Even moderate, repeated exposure can cause damage over time. - “If I don’t feel pain, it isn’t hurting me.”
Noise-induced hearing loss is painless and cumulative. - “Earplugs are uncomfortable and unnecessary for short tasks.”
Today’s hearing protection is lightweight and comfortable. Even short bursts of extreme noise can be harmful. - “Soundproofing is too expensive and complicated.”
Many effective solutions are DIY-friendly and affordable.
Conclusion: Protecting Your Hearing—And Your Creative Future
Noise hazards in DIY craft studios are too often ignored—but the consequences are real and lasting. Unlike a nicked finger or a spilled bottle of paint, hearing loss is invisible, irreversible, and can profoundly impact your quality of life and your creative pursuits. The good news is that with a few thoughtful changes, you can dramatically reduce your risk.
Start by identifying the loudest equipment in your studio and measuring typical noise levels. Invest in quality hearing protection and use it consistently, even for short or infrequent tasks. Upgrade your workspace with sound-absorbing materials and consider simple, cost-effective soundproofing projects to protect not only your ears but also your relationships with neighbors and family. Routinely inspect and maintain your tools—not just for performance, but for noise output as well.
Most importantly, make noise awareness a regular part of your creative routine. Post reminders, schedule hearing checks, and share knowledge with fellow makers to foster a culture of safety and sustainability in the crafting community. Your hearing is a vital creative tool—cherish and protect it as you would your favorite brush, blade, or machine. By taking proactive steps today, you’ll ensure that your studio remains a vibrant, inspiring, and healthy space for years to come.


You mentioned that prolonged exposure to noise above 85 dB is risky, but how accurate do those common decibel ratings for craft tools tend to be in a home studio setting? Should I get a meter to check my own space?
Common decibel ratings for craft tools are usually measured in controlled environments, so actual noise levels in your home studio could differ depending on room size, surfaces, and how you use the tools. Using a decibel meter in your workspace is a smart idea to get an accurate reading and make sure you’re staying within safe limits.
If my studio is in a basement and the noise echoes, are there specific acoustic treatments you suggest for reducing overall dB levels without major renovations?
For a basement studio with echo issues, try adding thick rugs or carpets on the floor, hanging heavy curtains, and placing soft furnishings like fabric-covered panels or foam tiles on the walls. You can also use bookshelves filled with books to help absorb sound. These methods reduce noise and echo without needing major renovations.
How long can you safely use loud equipment like a table saw or hammering metal before you need to take a break? Is there a rule of thumb for balancing creative sessions and hearing health?
Generally, sounds above 85 decibels can start damaging hearing after about 8 hours of exposure, but many craft tools exceed this level. For very loud equipment like table saws or metal hammering, it’s safest to limit exposure to sessions of 15–30 minutes and take breaks. Always use proper hearing protection, and try to alternate noisy and quieter activities to protect your ears during creative work.
The guide mentions that hearing loss from craft noise is usually gradual. How often should someone who regularly uses loud tools in their studio get their hearing checked?
If you frequently use loud tools in your craft studio, it’s wise to have your hearing checked at least once a year. This helps catch any gradual changes early. If you notice ringing in your ears or have trouble hearing conversations, consider scheduling a checkup sooner.