Introduction: Beyond the Basics—Discovering Hidden Tool Gems
If you’ve spent any time setting up a DIY craft studio, you probably already own the essentials: a sturdy work surface, reliable hand tools, good lighting, and dedicated storage. But once the basics are handled, what truly sets a creative workspace apart isn’t just what everyone has—it’s the uncommon tools and clever gear choices that unlock new levels of efficiency, precision, and creative freedom. These are the unsung heroes of a well-equipped studio, often overlooked by beginners and even by seasoned makers. Integrating specialty tools and lesser-known gadgets can transform not just what you make, but how you make it. This guide dives deep into the world of these hidden gems—uncommon tools that deliver outsized impact for DIY crafters. Whether you’re a papercrafter, jewelry maker, woodworker, fiber artist, or a creative dabbler, you’ll find practical inspiration and specific recommendations to elevate your workflow, organize your space, and even spark new project ideas. Let’s explore the overlooked, the ingenious, and the surprisingly affordable tools that can help you craft smarter, not harder.
Why Uncommon Tools Matter in a DIY Craft Studio
Unlocking Workflow Efficiency
While basic tools get the job done, uncommon or specialty tools often fill the gaps—solving persistent problems, reducing repetitive strain, or freeing up time for the fun parts of crafting. Efficient workflows mean more creating and less frustration. From precision cutters to ingenious clamps, these tools help you work faster and smarter.
Expanding Creative Possibilities
Some tools open up techniques or project types you wouldn’t attempt otherwise. The right embossing heat gun, for example, can make professional finishes accessible to any papercrafter. A specialty doweling jig can inspire advanced woodworking joins. By expanding your toolkit, you expand your creative reach.
Reducing Waste and Mistakes
Many hidden-gem tools are designed to help you measure more accurately, cut more cleanly, or avoid common errors. This not only saves money on materials but also reduces the frustration of starting over or patching mistakes.
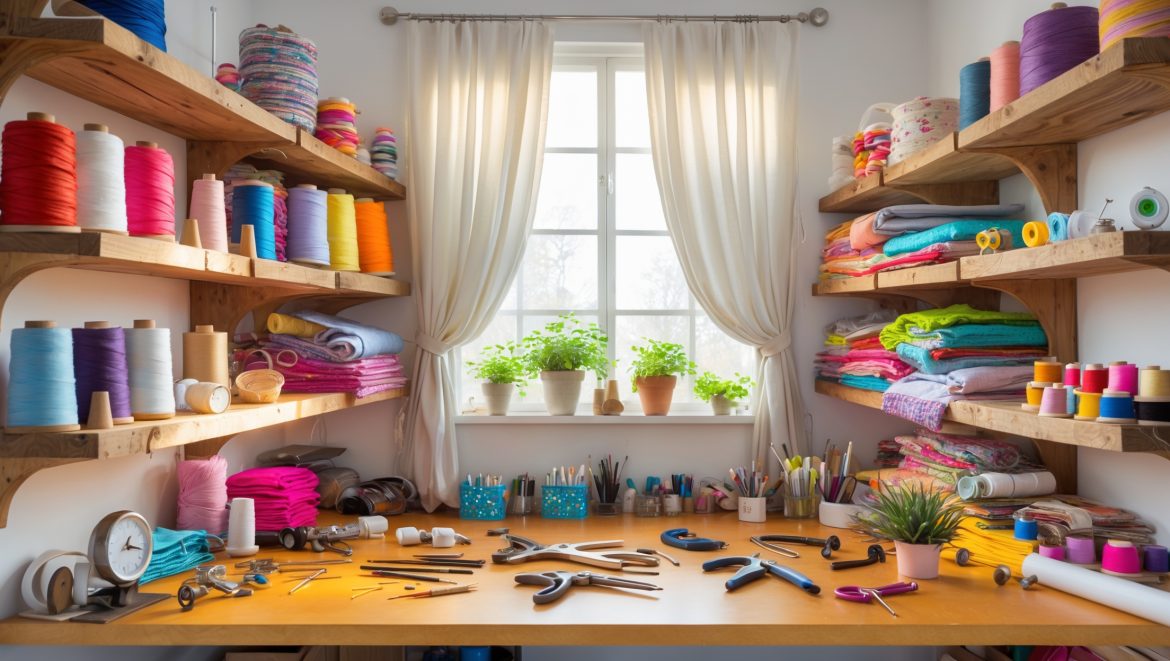
Hidden Gem Tools for Every Creative Studio
Precision Measurement Tools
- Digital Calipers: Essential for jewelry makers, model builders, and woodworkers, digital calipers take guesswork out of measuring small components or inner diameters. Their accuracy far exceeds standard rulers, making them invaluable for precision-fit projects.
- Rolling Ruler: A transparent ruler mounted on rollers, perfect for drawing parallel lines, measuring curved surfaces, or transferring patterns onto paper, fabric, or even wood. Once you try one, it’s hard to go back.
- Center-Finding Ruler: This clever ruler makes finding the exact center of any workpiece effortless—ideal for symmetrical layouts, button placement, or perfectly centered drill holes.
Specialty Cutting Tools
- Precision Flush Cutters: Unlike standard wire cutters, these provide a perfectly flat cut with zero pinch—ideal for jewelry, electronics, or any small-scale cutting.
- Mini Rotary Trimmer: For papercrafters, a mini rotary trimmer offers accuracy and speed when cutting card stock, photos, or vinyl. Look for models with interchangeable blades for wavy or perforated cuts.
- Japanese Pull Saw (Dozuki): This fine-toothed saw is a revelation for woodworkers and model builders. Its ultra-thin blade makes clean, accurate cuts with minimal effort.
Holding, Clamping, and Support Gadgets
- Third Hand Tool: Originally developed for soldering, this tool features adjustable arms and alligator clips to securely hold workpieces at any angle. Crafters use it for gluing, painting, or detailed assembly work.
- Corner Clamps: Perfect for making boxes, frames, or any project requiring 90-degree joins. These clamps hold pieces in perfect alignment while glue dries or fasteners are applied.
- Magnetic Parts Tray: Keep tiny screws, beads, or findings from rolling off your bench. A magnetic tray holds anything ferrous, so you’ll never lose crucial components mid-project.
Surface Protection and Cleanup Helpers
- Silicone Work Mat: Heat-resistant, non-stick, and easy to clean, these mats are ideal for hot glue, resin, or paint projects. Dried glue and spills peel right off, protecting your work surface.
- Mini Desktop Vacuum: A USB-rechargeable handheld vacuum quickly cleans up paper scraps, glitter, or sawdust—keeping your workspace tidy without dragging out a full-size vacuum.
- Bench Brush: A soft-bristled bench brush gently sweeps dust and debris off delicate projects or tools, reducing scratches and keeping surfaces clean.
Organization and Storage Innovations
- Stackable Parts Bins with Clear Drawers: These modular bins make it easy to sort and access small parts, beads, or fasteners. The clear fronts let you find what you need at a glance.
- Magnetic Tool Holder Strips: Mount these strips above your bench to keep metal tools visible and within reach—no more rummaging through drawers.
- Label Maker: Proper labeling transforms chaotic storage into a streamlined system. Use a label maker for drawers, bins, and even cables or charger cords.
Specialized Finishing Tools
- Micro-Mesh Sanding Pads: These ultra-fine abrasive pads are perfect for polishing resin, acrylic, or wood finishes to a glassy sheen—with minimal risk of over-sanding or gouging.
- Miniature Hand Planes: For woodworkers and model makers, small hand planes allow for precise smoothing and shaping of edges or tight corners.
- Embossing Heat Tool: Not just for stamps! Use this for quick-drying paint, heat-shrinking plastics, or even softening adhesives during assembly.
Choosing the Right Hidden Gem Tools for Your Studio
Assess Your Crafting Style and Pain Points
Start by reflecting on your most frequent frustrations or bottlenecks. Do you lose small parts? Struggle with perfectly square joints? Find sanding tedious? Target tools that directly address your workflow’s weak spots.
Research and Try Before You Buy
Watch video reviews or ask fellow crafters for recommendations before purchasing. If possible, test tools at local maker spaces or craft stores. Some hidden gems are highly personal—what works wonders for one crafter may feel awkward to another.
Prioritize Quality Over Quantity
It’s better to own a few well-made specialty tools than a drawer full of cheap gadgets. Look for solid construction, replaceable parts, and brands with strong reputations in your craft niche.
Budgeting for Specialty Tools
Many hidden-gem tools are surprisingly affordable, with prices ranging from $5–$50. Consider allocating a small portion of your annual craft budget to upgrading or adding one new specialty tool every few months. Over time, these investments pay off in productivity and enjoyment.
Case Study: Real-Life Studio Transformations
From Frustration to Flow—A Papercrafter’s Upgrade
Sarah, a passionate cardmaker, struggled with jagged paper edges and misaligned layers. After adding a mini rotary trimmer and a set of magnetic alignment guides, she cut her assembly time in half and dramatically improved the quality of her finished cards. “I didn’t realize how much time I was wasting fixing mistakes,” she shares. “Now, my workflow just… flows.”
Small Shop, Big Impact—A Woodworker’s Story
Jake, working in a compact garage studio, added a Japanese pull saw and a set of corner clamps to his basic tool kit. The result? Perfect miters and joinery on boxes, frames, and even small furniture. “I used to dread anything that needed perfect corners. Now I look forward to those projects,” he says.
Jewelry Maker’s Secret Weapons
Priya, a home-based jewelry designer, credits digital calipers and precision flush cutters for her professional-looking results. “I used to eyeball measurements and snip wires with whatever was handy. Once I upgraded, my pieces looked—and sold—so much better.”
Maintenance and Care for Specialized Studio Tools
Routine Cleaning
Many specialty tools require gentle cleaning after each use. Wipe blades with a soft, dry cloth or use isopropyl alcohol for sticky residue. Keep moving parts free of dust and debris.
Proper Storage
Store delicate tools in padded cases or dedicated drawers to prevent nicks and misalignment. Use silica gel packs to deter rust in humid climates—especially for metal tools.
Sharpening and Adjustment
Keep blades sharp and moving parts lubricated according to manufacturer instructions. Schedule periodic tool checks to ensure everything remains in working order. Replace worn-out accessories or parts promptly.
Safety Considerations for Uncommon Tools
- Always read instructions before using a new tool. Unfamiliar mechanisms can behave unexpectedly.
- Use cut-resistant gloves when working with sharp specialty blades or flush cutters.
- Wear eye protection for any tool that could produce flying debris, including rotary trimmers and hand planes.
- Keep heat tools (embossers, glue guns) on heat-resistant surfaces, and never leave plugged in unattended.
- Regularly inspect tools for wear or damage to handles, blades, or electrical cords.
Where to Find and Source Hidden Gem Tools
- Specialty Craft Stores: Local shops often stock tools tailored to their customer base and may let you test before buying.
- Online Marketplaces: Sites like Etsy, Amazon, and niche tool retailers offer a vast selection. Check ratings and reviews for quality assurance.
- Maker Communities: Online forums and maker spaces are excellent sources for tool recommendations and even tool swaps.
- Secondhand Shops and Estate Sales: Sometimes, vintage tools outperform modern versions. Look for solid construction and unique designs.
Conclusion: Elevate Your Craft with Thoughtful Tool Choices
Building a creative studio that truly supports your vision is about more than accumulating the biggest or most expensive collection of tools. It’s about tuning your workspace—adding the select, often-overlooked tools that streamline your process, solve persistent problems, and inspire new creative directions. Investing in hidden gem tools is one of the smartest moves a DIY crafter can make, regardless of skill level or specialty. As you experiment with these specialty gadgets—whether it’s a digital caliper for perfect measurements, a third hand tool for tricky assembly, or a mini desktop vacuum for instant cleanup—you’ll notice not only a boost in efficiency, but a new sense of creative possibility. These tools don’t replace skill or inspiration, but they do make your journey smoother and more enjoyable. Approach your studio as a living workspace: periodically review your workflow, stay curious about new tools, and don’t hesitate to make small upgrades that pay big dividends. Over time, your craft studio will evolve into a place where your tools work as hard—and as cleverly—as you do. Happy making!


Can you suggest one lesser-known tool that made the biggest difference in your own craft studio workflow, especially for reducing mistakes or wasted materials?
One tool that really improved my workflow is a precision rotary cutter with an adjustable guide arm. It’s not as common as standard rotary cutters, but the guide helps keep lines straight and measurements accurate when cutting fabric or paper. This has definitely reduced material waste and minimized cutting errors in my projects.
For those on a limited budget, which of the uncommon tools mentioned here would give the biggest boost to a small studio’s efficiency without being a major investment?
If you’re working with a tight budget, the magnetic tool strip and stackable storage bins highlighted in the article are excellent choices. Both are affordable yet can dramatically improve organization and workspace efficiency, making it easier to access and store your most-used supplies without taking up much room or cash.
I like the idea of uncommon tools reducing waste and mistakes. Can you share an example of a tool that specifically helped you avoid costly errors as a beginner?
One tool that made a big difference for me as a beginner was a self-healing cutting mat combined with a rotary cutter. It kept my measurements precise and prevented accidental cuts on work surfaces. This really reduced material waste and helped me avoid costly mistakes, especially when working with fabric or paper.
Could you elaborate on any mistakes or wasted materials that these uncommon tools have helped you reduce, especially for papercrafting or woodworking?
Certainly! For papercrafting, precision cutting tools like Japanese craft knives and metal edge rulers have greatly reduced misaligned cuts, saving both paper and time. In woodworking, digital calipers and marking gauges help avoid measurement errors, which means less wasted wood from incorrect cuts. These tools allow for more accurate work, so there’s less need to redo projects or throw out materials due to mistakes.
Can you give examples of uncommon tools that specifically help reduce repetitive strain during long crafting sessions? I do a lot of papercrafting and sometimes get sore hands, so I’m interested in tools that make things easier physically.
For papercrafting, tools that ease strain include ergonomic rotary cutters, spring-loaded scissors, and automatic paper scoring machines. These reduce repetitive motions and hand fatigue. Another helpful tool is a quality bone folder with a comfortable grip for creasing paper. Adjustable-height worktables and cushioned anti-fatigue mats can also make long sessions less taxing on your hands and body.
You mentioned clever gear choices for organizing craft spaces. Can you suggest any lesser-known storage solutions or organizing tools that work well in small student apartments?
For small student apartments, stackable drawer units or rolling carts with slim profiles can be a game-changer. Magnetic strips for metal tools, over-the-door organizers for supplies, and foldable storage bins that tuck under beds help maximize limited space. Pegboards with mini hooks or small hanging baskets also keep things tidy without taking up much room.
How much of a learning curve should I expect when adding these uncommon tools to my routine? Do most people find them intuitive, or would you recommend looking for tutorials before diving in?
Most of the uncommon tools mentioned in the article strike a balance between intuitive design and unique features, so the learning curve can vary. While some people find them easy to pick up, a quick review of tutorials or user guides can save you time and help you get the most out of each tool. It’s usually worth investing a little time upfront to get comfortable.
How much extra time did it take you to integrate these uncommon tools into your actual workflow? Did you have a learning curve or did most of them help you work faster right away?
Most of the uncommon tools had a brief learning curve—usually just an afternoon to get comfortable. A few, like the digital fabric cutter, took a couple of sessions to master. Overall, after the initial setup, they noticeably sped up my workflow and made certain tasks much smoother almost immediately.
How much should I expect to budget for some of these underrated tools? Are most of them affordable for hobbyists, or do the costs add up pretty fast?
Most of the underrated tools mentioned in the article are quite affordable for hobbyists, with prices ranging from $10 to $50 for items like specialty rulers, ergonomic cutters, and unique storage solutions. A few higher-end gadgets, such as multi-purpose workstations or precision electric tools, can cost $100 or more. Budgeting around $50 to $150 should cover a good starter selection without breaking the bank.
Comparing the impact of investing in a specialty tool versus just getting higher quality of basic tools, which do you think leads to a bigger jump in creative results for a beginner?
For beginners, upgrading to higher-quality basic tools usually makes the biggest difference at first. They improve precision, ease of use, and reduce frustration. Specialty tools can be transformative later on, but mastering the basics with good equipment helps build skills and confidence before diving into more niche gadgets.
Are there specific brands or features you recommend looking for when choosing these less common tools, particularly for someone interested in both woodwork and papercraft?
For both woodwork and papercraft, look for brands known for precision and durability like Olfa for cutting tools and Dremel for multi-tools. Features to consider include interchangeable blades, ergonomic handles, and variable speed controls. Tools with adjustable guides or depth settings are also valuable for versatility across different materials and projects.
I’m interested in trying out an embossing heat gun for paper crafts like you described. Are there specific brands or features you’d recommend for beginners who want professional results without spending too much?
For beginners seeking an embossing heat gun, look for models with dual temperature settings and a focused nozzle for precise control. Brands like Ranger and Chandler Tool are often recommended as they balance quality and price. Make sure the gun feels comfortable in your hand and avoid those marketed mainly for industrial use, as they can get too hot for paper crafts.
I’m curious about the embossing heat gun you mentioned—how affordable are the quality options, and is it something a beginner could use without much trouble?
Quality embossing heat guns are generally quite affordable, with many reliable models available for around $20 to $40. They’re designed to be user-friendly, so beginners often find them easy to handle. Just be sure to follow safety instructions and practice on scrap material first to get comfortable with the process.
After adding one or two of these specialty tools to your studio, how long did it take before you really noticed an improvement in efficiency or creativity? I’m curious about what to expect as a beginner.
Most beginners start noticing improvements within a week or two of using these specialty tools, especially as you get comfortable with them. Efficiency often increases first—you’ll find tasks get done faster or more smoothly. Creative benefits tend to appear as you explore new techniques the tools allow. Give yourself some time to experiment, and you’ll likely see noticeable changes pretty quickly.
I do papercrafting and jewelry-making at home. Are there any hidden gem tools that work well for both crafts, or do you recommend separate specialty tools for each? I’m trying to keep my studio organized without buying too much extra gear.
Some tools can definitely pull double duty for both papercrafting and jewelry-making. Precision tweezers, self-healing cutting mats, and fine-tip scissors are useful in both crafts. A quality craft knife and a steel ruler also work well across the board. While some specialty tools are necessary for specific techniques, starting with versatile basics will help you stay organized and avoid clutter.
When it comes to organizing a craft studio, are there any lesser-known storage solutions or clever tool organizers you recommend for keeping specialty tools accessible but out of the way?
Absolutely! Magnetic knife strips can be mounted on walls to hold metal crafting tools safely and visibly. Stackable drawer organizers and labeled bins with pull-out trays let you separate specialty tools by use or material. Pegboards with adjustable hooks are another flexible option for arranging odd-shaped items, while hanging shoe organizers work surprisingly well for storing small, unique tools out of the way but still within reach.
How much time did it take you to get comfortable using specialty tools like doweling jigs and embossing heat guns? Were there any unexpected learning curves I should be aware of as a first-timer?
Getting comfortable with specialty tools like doweling jigs and embossing heat guns took me about a week of regular use for each. The doweling jig required a bit of patience to align holes accurately, while the heat gun took practice to control heat without damaging materials. Expect a little trial and error at first, especially with temperature-sensitive projects. Take your time and test on scraps when starting out.