Introduction: Why Lighting Matters in Your DIY Craft Studio
Lighting is often the unsung hero of a productive DIY craft studio. While many crafters meticulously plan storage and tool layouts, the impact of lighting on creativity, comfort, and precision is sometimes overlooked. Whether you’re painting, sewing, working with resin, or assembling intricate models, the right lighting can elevate your projects, reduce eye strain, and even prevent costly mistakes caused by poor color matching. In this comprehensive guide, we’ll delve deep into lighting solutions tailored specifically for DIY craft studios. From harnessing natural daylight to choosing the best task lights, creating mood with ambient lighting, and tackling common craft-specific challenges (like glare and shadow management), you’ll discover actionable strategies to illuminate your workspace and boost your creative output. Ready to brighten every project? Let’s shed light on the best practices for your unique studio.
Understanding Lighting Needs in Craft Spaces
Types of Lighting and Their Purpose
- Natural Light: Preferred by many artists for its true color rendering and mood-boosting properties.
- Task Lighting: Focused, bright light directed at your work surface to reveal detail and prevent eye fatigue.
- Ambient Lighting: General illumination that fills the room, reducing harsh contrasts and shadows.
- Accent Lighting: Highlights specific features or displays, often used for inspiration boards or finished pieces.
Common Lighting Challenges for Crafters
- Color Distortion: Inaccurate light can cause fabric, paint, or bead colors to appear off, leading to mistakes.
- Glare and Shadows: Poorly placed lights can create shadows that obscure detail or glare that strains your eyes.
- Inconsistent Light Levels: Some areas may be too bright, while others are dim, reducing overall comfort and productivity.
Maximizing Natural Light in Your Studio
Studio Orientation and Window Placement
If you have the freedom to choose your studio’s location, prioritize rooms with north or northeast-facing windows for the most consistent, diffused daylight. South-facing windows offer more intense light, which may require sheer curtains or blinds to soften. East-facing windows provide gentle morning light, while west-facing exposures can be harsh in the afternoon.
Window Treatments for Light Control
- Sheer Curtains: Soften daylight and reduce glare without blocking brightness.
- Adjustable Blinds: Angle slats to direct light where you need it most.
- Frosted Window Films: Offer privacy and diffuse harsh sunlight for even illumination.
Reflective Surfaces and Light Bounce
Enhance natural light by using light-colored walls, ceilings, and floors. Place mirrors or metallic accents opposite windows to reflect and amplify daylight deeper into your workspace. Avoid dark or matte finishes that absorb light.
Choosing the Right Artificial Lighting
Understanding Light Bulb Types
- LED: Energy-efficient, long-lasting, and available in a wide range of color temperatures (from warm to daylight).
- Fluorescent: Common in many studios, but may flicker and sometimes distort color.
- Halogen: Bright and crisp, but generate more heat and use more energy.
Color Temperature and Color Rendering Index (CRI)
For color-critical work, select bulbs labeled as “daylight” (5000K-6500K) with a CRI of 90 or higher. This ensures colors appear true and consistent. Avoid bulbs with strong yellow (2700K) or blue (over 6500K) casts unless you’re seeking a specific mood.
Fixture Selection for Different Tasks
- Adjustable Desk Lamps: Ideal for sewing, drawing, or jewelry making. Look for models with flexible arms and dimming controls.
- Under-Cabinet LED Strips: Provide shadow-free illumination for countertops and storage nooks.
- Ceiling-Mounted Panels or Track Lights: Offer even ambient light, especially in larger studios.
- Magnifying Lamps: Essential for miniature painting, embroidery, or tasks requiring extra precision.
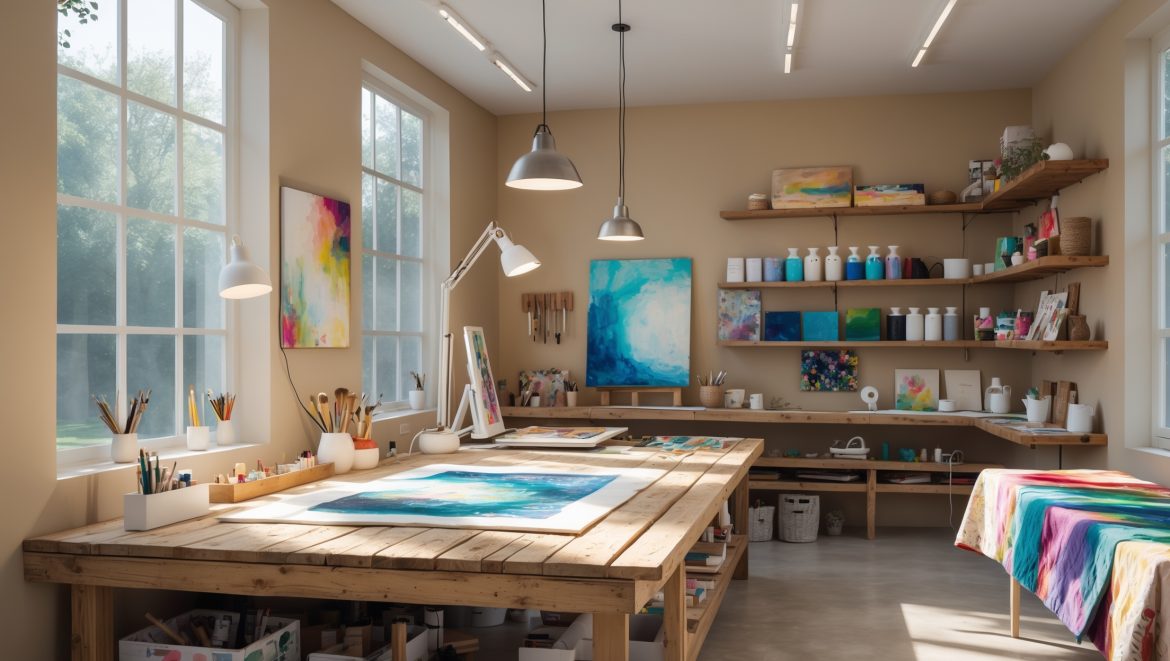
Layering Light: Crafting a Balanced Studio Environment
The Three-Layer Approach
- Ambient Lighting: Start with overhead lights—LED panels, flush mounts, or pendant fixtures—to fill the room.
- Task Lighting: Add desk or clamp lamps positioned to avoid casting shadows from your dominant hand.
- Accent Lighting: Use LED strips, spotlights, or puck lights to highlight display shelves, inspiration walls, or color swatch boards.
Positioning for Maximum Effect
Place task lights to the left if you’re right-handed (and vice versa) to minimize hand shadows. Angle fixtures to reduce glare on shiny surfaces like glass cutting mats or resin molds. For group workspaces, ensure each station has its own adjustable light to accommodate different projects.
Special Considerations for Different Craft Disciplines
Painting and Drawing
- Prioritize high-CRI, neutral daylight bulbs to ensure accurate color mixing.
- Use easel lamps or articulating desk lamps for targeted lighting control.
Sewing and Textile Arts
- Install bright, even lighting over sewing machines and cutting tables.
- Consider clip-on task lights for detail work like embroidery or quilting.
Resin, Jewelry, and Miniatures
- Integrate magnifying lamps with built-in LED rings for fine detail and precision.
- Use small, focused spotlights to minimize shadow while working with tiny components.
Paper Crafts and Scrapbooking
- Install under-shelf LED strips to illuminate work surfaces without clutter.
- Opt for daylight bulbs to prevent color distortion in papers and inks.
DIY Lighting Projects for Crafters
Installing Under-Cabinet LED Strips
- Measure the length of your shelves or cabinets and purchase cut-to-size LED strip kits.
- Clean surfaces before adhering strips for best adhesion.
- Plug into an accessible outlet or use battery-powered versions for flexibility.
Building a Custom Task Lamp
- Repurpose an old adjustable desk lamp by swapping in a high-CRI LED bulb.
- Add a dimmer switch for adjustable brightness.
- Paint the lamp base a light color to reflect more light onto your work surface.
Creating a Portable Light Board
- Use an acrylic sheet and mount LED strips along the edges.
- Connect to a USB power bank for mobility.
- Perfect for tracing, stenciling, or backlighting translucent materials.
Lighting Maintenance and Safety Tips
Regular Cleaning
Dust and debris can significantly reduce light output. Wipe down bulbs, fixtures, and reflective surfaces monthly using a dry microfiber cloth. Avoid harsh cleaners that may scratch finishes or cloud translucent covers.
Safe Electrical Practices
- Check cords and plugs for wear and replace damaged components immediately.
- Don’t overload outlets—use surge protectors and follow manufacturer guidelines.
- Label switches and dimmers for easy identification, especially if you have multiple zones.
Upgrading Old Fixtures
If your studio uses outdated fluorescent fixtures, consider upgrading to LEDs for better efficiency, color quality, and longevity. Many LED replacement tubes fit existing fixtures, making the swap simple and cost-effective.
Lighting on a Budget: Cost-Saving Strategies
Prioritize High-Impact Areas
Invest first in task lighting for your main work area, then address ambient and accent needs as budget allows. Portable desk lamps and clamp-on fixtures offer flexibility and can be moved as your studio layout evolves.
DIY Solutions
- Shop online for affordable LED strip kits or secondhand fixtures to retrofit.
- Repurpose thrifted lamps with new bulbs for a custom look at a fraction of the price.
- Take advantage of natural light during the day to reduce reliance on electricity.
Energy Efficiency
Opt for ENERGY STAR-rated LED bulbs and fixtures to lower your energy bills and reduce replacement frequency. Use smart plugs or timers to ensure lights are only on when needed.
Case Study: Transforming a Dim Spare Room into a Craft Haven
The Challenge
Linda, an avid quilter and card maker, struggled with a windowless spare room that left her projects looking dull and her eyes strained. Her goal was a bright, inviting space without major renovations.
The Solution
- Installed two large LED ceiling panels for general lighting.
- Added a swing-arm task lamp at her sewing station and under-shelf LED strips above the worktable.
- Painted the walls a soft white and placed a large mirror opposite the entrance to reflect light.
The Result
Linda now enjoys vibrant, accurate colors when matching fabrics or inks, and her eyes no longer tire after hours at the machine. The space feels open and energizing, proving that smart lighting can transform even the darkest studio.
Advanced Tips: Smart Controls and Future-Proofing
Smart Lighting Integration
- Install Wi-Fi-enabled bulbs or switches to control brightness and color temperature via smartphone or voice assistant.
- Set up scenes for different tasks—bright white for crafting, soft warm for relaxation or brainstorming.
Modular Fixtures for Flexibility
Choose lighting systems with modular components, allowing you to add or reposition fixtures as your needs change or as you try new crafts. Magnetic tracks, plug-and-play connectors, and wireless controls offer adaptability for evolving studios.
Conclusion: Illuminate Your Creativity
Lighting is more than a practical concern—it’s a catalyst for creative flow, precision, and comfort in your DIY craft studio. By thoughtfully combining natural daylight with layered artificial lighting, you’ll drastically improve your ability to see fine details, match colors accurately, and work comfortably for hours. Every studio, regardless of size or budget, can benefit from these strategies: maximize available daylight, use high-CRI bulbs for color-critical tasks, layer ambient, task, and accent lights, and maintain fixtures for optimal performance. Don’t neglect lighting in your next studio upgrade—an investment here pays dividends in quality, productivity, and sheer enjoyment. With the right illumination, every project becomes a masterpiece, and your studio becomes a true creative haven. It’s time to see your craft in the best possible light—literally and figuratively. Happy making!


You mentioned that poor lighting placement can cause both glare and shadows. Can you suggest specific ways to arrange lights to minimize these issues when I’m working on fine painting details?
To reduce glare and shadows when painting fine details, place lights at a 45-degree angle to your work surface rather than directly overhead. Use diffused light sources like softbox lamps or daylight-balanced LEDs to soften shadows. Avoid having a strong light directly behind you, as it can cast your shadow onto your work area. If possible, use multiple light sources from different sides for even illumination.
I noticed you talked about preventing costly mistakes from poor color matching. Is there a particular color temperature or bulb type that’s best for crafts like resin work, where color accuracy is super important?
For resin work and other crafts where color accuracy is crucial, look for bulbs labeled as ‘daylight’ with a color temperature around 5000K to 6500K and a high Color Rendering Index (CRI) of 90 or above. LED bulbs with these specs are a great choice because they show colors more accurately and reduce unwanted color shifts.
Could you elaborate on how to balance ambient and task lighting if my craft studio has a mix of natural and artificial light sources? I often struggle with getting even illumination throughout the space, especially on cloudy days.
To balance ambient and task lighting in a mixed-light studio, start by maximizing diffused natural light with sheer curtains or blinds. Supplement on cloudy days with adjustable ceiling fixtures for overall brightness, then add focused task lamps at each work area. Aim for consistent color temperatures among bulbs to avoid uneven tones, and consider repositioning lamps to eliminate shadows and dark corners.
I’m new to setting up a dedicated craft space, and I’m worried about creating shadows when working on detailed projects like model assembly. Any recommendations on how to arrange task lighting to cut down on both glare and shadows?
To reduce shadows and glare, use multiple adjustable task lights placed at different angles rather than relying on a single overhead source. Position lights on both sides of your workspace to balance illumination. Opt for daylight-balanced LED lamps with diffusers to soften the light and prevent harsh reflections, making it easier to see fine details clearly.
Could you give tips on fixing inconsistent light levels in a room that has both bright and darker corners? I’ve noticed especially at night it gets hard to see details everywhere in my craft area.
To fix inconsistent light levels, try adding adjustable task lamps or LED strips to darker corners. Use daylight-balanced bulbs to keep the color consistent. Position lights so they overlap a bit, reducing shadows and making the whole area brighter and more even, especially at night. Consider rearranging your workspace so key areas are closer to the best light sources.
If I’m on a tight student budget, what are the most cost-effective solutions to reduce glare and shadows without having to overhaul my whole lighting setup?
You can reduce glare and shadows affordably by using white poster boards or inexpensive foam boards as reflectors to soften and redirect light. Also, try repositioning your current lamps—placing them at a 45-degree angle can help minimize harsh shadows. Swapping in LED bulbs with a diffused cover is another low-cost way to achieve more even lighting.