Introduction: Why Sharpening Matters in Your DIY Craft Studio
Every creative studio is only as effective as the tools it houses. Whether you’re a paper artist, jewelry maker, wood crafter, or textile enthusiast, sharp tools are the backbone of precision, safety, and satisfaction in your projects. Dull blades snag fabric, crush delicate papers, cause hand fatigue, and even lead to accidents—turning joyful crafting into a frustrating, potentially hazardous chore. Yet, many DIYers neglect regular sharpening, either intimidated by the process or unaware of its impact.
This comprehensive guide will demystify tool sharpening for the DIY crafter. You’ll learn not only how to sharpen scissors, craft knives, chisels, rotary cutters, and other common studio tools, but also when to do it, what equipment you need, and how to prevent damage during sharpening. We’ll cover practical, affordable methods suitable for small studios, address common mistakes, and outline a sustainable routine that will keep your creative instruments in top condition for years. Ready to transform your crafting experience with razor-sharp performance? Let’s dive in.
Understanding Tool Dullness: Signs and Risks
How to Recognize a Dull Tool
- Scissors: Struggle to cut cleanly, crush or fold material, require extra force.
- Craft Knives: Tear or drag instead of slicing, leave jagged edges.
- Chisels and Gouges: Skitter across wood/fiber, leave rough chips, require multiple passes.
- Rotary Cutters: Skip threads, leave uncut spots on fabric, make a crunching sound.
Risks of Using Dull Tools
- Increased risk of slips and injuries due to excessive force.
- Reduced accuracy and quality of work.
- Hand and wrist fatigue, repetitive strain injuries.
- Damage to expensive materials from tearing or crushing.
Regular sharpening prevents these issues, keeps your workflow smooth, and extends the life of your tools.
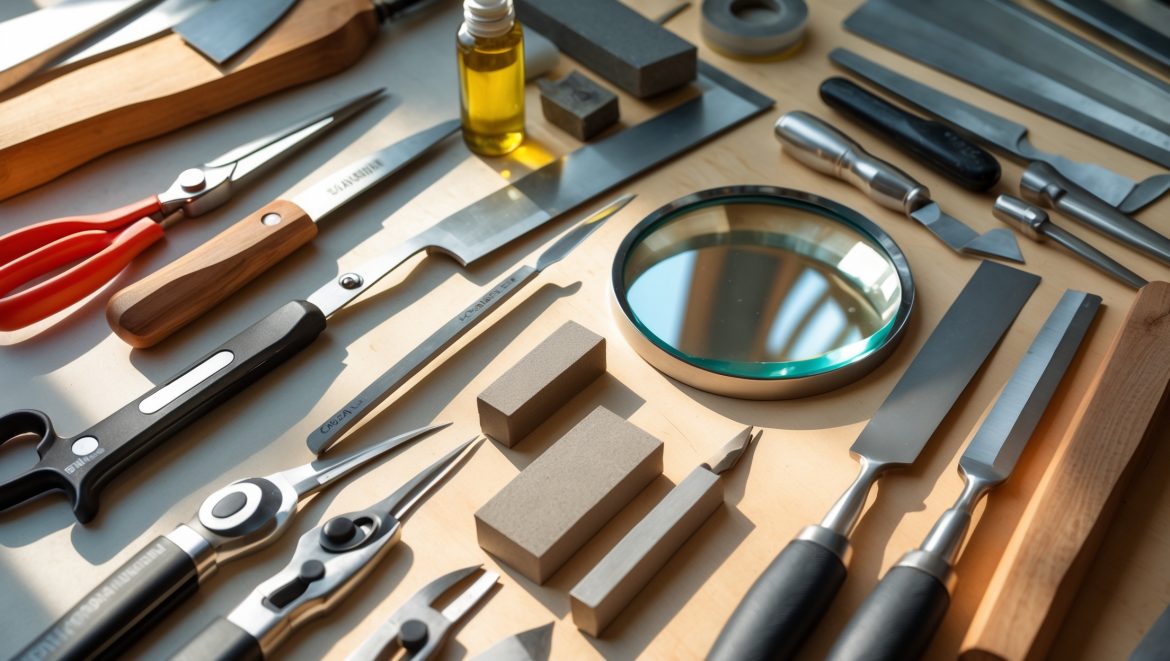
Essential Sharpening Equipment for the Craft Studio
Must-Have Sharpening Tools
- Sharpening Stones: Whetstones (water stones and oil stones) in coarse, medium, and fine grits are versatile for most blades.
- Sharpening Rods: Ceramic or diamond rods for fine-tuning edges and maintaining sharpness between major sharpenings.
- Honing Oil or Water: Depending on your stone type, to lubricate and carry away metal filings.
- Strops: Leather or synthetic for polishing and final edge refinement, especially on chisels and knives.
- Rotary Cutter Blade Sharpeners: Specialized devices for rotary blades, often compact and manual.
- Small Screwdrivers: For disassembling scissors or tools with removable blades.
- Magnifying Glass: For inspecting blade edges before and after sharpening.
- Protective Gloves and Safety Glasses: Essential for safe handling of exposed blades.
Optional but Useful Gear
- A bench vise or clamp for holding tools steady.
- Sharpening guides for precise angle control.
- Microfiber cloths for cleaning and buffing.
Preparing for Sharpening: Workspace and Safety
Setting Up Your Sharpening Station
- Choose a flat, stable work surface with good lighting; natural daylight is ideal.
- Lay down a non-slip mat or towel to prevent sharpening stones and tools from shifting.
- Keep all sharpening tools within easy reach, organized by type and grit.
- Have a container of water (for water stones) or oil (for oil stones) ready for lubricating stones.
Sharpening Safety Checklist
- Wear cut-resistant gloves and safety glasses.
- Keep fingers behind the blade edge at all times.
- Work slowly and deliberately—never rush the process.
- Ensure tools are clean; wipe away any adhesives or debris before sharpening.
Sharpening Scissors: Step-by-Step
Disassembly (if possible)
If your scissors have a screw joint, use a small screwdriver to separate the blades for more thorough sharpening. If not, you can sharpen with them closed, but take extra care to avoid uneven edges.
Sharpening with a Whetstone
- Lubricate your stone with water or oil as appropriate.
- Hold the blade at the factory angle (usually 75–80° for fabric scissors, 60–70° for paper).
- Draw the blade across the stone from base to tip, maintaining a consistent angle—10–15 strokes per side.
- Repeat with a finer grit stone for a polished edge.
- Reassemble scissors and test on scrap material; re-sharpen as needed.
Maintaining the Edge
- After each use, wipe the blades with a soft cloth.
- Cut a layer of aluminum foil or fine sandpaper every few weeks to hone the edge between major sharpenings.
Sharpening Craft Knives and Utility Blades
Fixed-Blade Sharpening
- Remove the blade from the handle if safe and possible.
- Place the blade flat on the coarse grit of your whetstone at a 20–25° angle.
- Push the blade across the stone in smooth strokes, alternating sides every 5–10 strokes.
- Move to a fine grit stone for finishing.
- Strop the edge on leather or a synthetic strop for a razor finish.
- Reassemble and carefully test on scrap material.
Disposable Blade Replacement
- If using breakaway or snap-off blades, replace them once dull. Attempting to sharpen these is usually not effective or safe.
Chisel and Gouge Sharpening for Wood and Linocut Work
Sharpening Flat Chisels
- Secure the chisel bevel-side down on your stone at the manufacturer’s angle (usually 25–30°).
- Slide it across the stone in controlled, even strokes, ensuring full contact.
- Repeat with finer grits for a mirror polish.
- Flip and flatten the back (non-beveled side) to remove burrs.
- Strop for a final polish.
Sharpening Gouges
- Use a rounded ceramic or slipstone that matches the gouge’s curvature.
- Roll the tool along the stone, maintaining the angle and full edge contact.
- Finish with a fine slipstone and strop with a shaped leather block.
Rotary Cutter Blade Sharpening: Quick and Safe
Manual Sharpening Devices
Special rotary cutter sharpeners hold the blade at the correct angle, allowing you to rotate it against a honing surface. Follow manufacturer instructions, usually involving:
- Disassembling the rotary cutter and cleaning the blade.
- Inserting the blade into the sharpener and rotating it as directed (often 20–30 rotations per side).
- Reassembling and testing on scrap fabric.
When to Replace Instead of Sharpen
If after sharpening your rotary blade still skips threads or leaves uncut spots, or if you notice nicks/chips, it’s time to replace the blade entirely. Mark your used blades and dispose of them safely in a blade bank or wrapped in tape.
Specialty Tools: Awls, Punches, and Shears
Sharpening Awls and Punches
- For pointed awls, use a fine-grit stone or a diamond needle file to restore the tip. Rotate as you file to maintain symmetry.
- Punches (for leather, paper, fabric): Use a tapered sharpening rod and work from the inside out to retain the cylindrical shape.
Shears and Pinking Shears
- For standard shears, follow the same steps as scissors.
- Pinking shears require a specialized sharpener or professional service. Do not attempt DIY sharpening unless you have a tool specifically designed for the zigzag blades.
Common Sharpening Mistakes and How to Avoid Them
- Incorrect Angle: Sharpening at the wrong angle can ruin the edge or make it dangerous. Always check manufacturer specs or use a sharpening guide.
- Skipping Grits: Don’t jump from coarse to fine—progress through each grit for a consistent edge.
- Applying Too Much Pressure: Let the abrasive surface do the work; excess force can gouge blades or cause uneven wear.
- Not Lubricating Stones: Dry sharpening stones clog and scratch blades.
- Neglecting Burr Removal: Always remove the wire edge (burr) on the reverse side after sharpening.
- Sharpening Dirty Tools: Clean adhesives, tape, and residue off blades before starting.
Sharpening Schedule: How Often Should You Sharpen?
- Scissors and Shears: Every 3–6 months for frequent use, annually for occasional use.
- Craft Knives: When you notice dragging or tearing—typically every few weeks for daily users.
- Chisels/Gouges: Sharpen at the start of every major project; strop frequently in between.
- Rotary Cutters: Hone after every large project; replace blade after 3–5 sharpenings or when nicks appear.
Keep a simple maintenance log or calendar reminder to establish your sharpening routine.
Care and Storage Post-Sharpening
Cleaning and Oiling
- Wipe down blades with a microfiber cloth to remove residue.
- Lightly oil metal parts to prevent rust (avoid contact with crafting materials).
- Store tools dry and, if possible, in blade protectors or sheathes.
Safe Storage Solutions
- Magnetic strips for knives and scissors (out of reach of children).
- Drawer organizers with blade guards.
- Dedicated tool rolls or cases for portable studios.
Sharpening for Different Materials: Tips and Tricks
- Paper Crafters: Clean blades frequently; paper fibers can dull edges quickly. Use a fine stone for ultra-sharp results.
- Textile Artists: Reserve one pair of scissors for fabric only; paper or plastic dulls blades faster.
- Woodworkers: Invest in a honing guide for consistent chisel and gouge angles.
- Mixed-Media Artists: Be aware of adhesives and paint build-up; clean before sharpening.
Sharpening on a Budget: DIY Alternatives and Hacks
- Use the bottom of a ceramic mug (unglazed ring) as an emergency sharpening surface for knives and small blades.
- Fine-grit sandpaper (600–2000) on a flat surface doubles as a sharpening pad for scissors and knives.
- Strop on old denim or newspaper if leather is unavailable.
- Community tool libraries may lend out sharpening equipment if you’re not ready to invest.
When to Seek Professional Sharpening Services
Some tools—such as pinking shears, serrated blades, or heavily damaged edges—are best left to professionals. Look for local hardware stores, knife shops, or mobile sharpening vans that cater to crafters. If you’re unsure, err on the side of caution: improper sharpening can permanently damage specialized tools.
Conclusion: Sharpening as a Creative Ritual
Investing time in sharpening your craft tools is an act of respect for your creative process and materials. The difference between a dull and a keen edge is not just technical—it’s transformative. Sharp tools glide through fabric, slice cleanly through paper, carve wood with satisfying precision, and make each crafting session safer and more enjoyable. As you build sharpening into your studio routine, you’ll not only save money on replacements but also gain a deeper appreciation for your tools’ craftsmanship and longevity.
Remember, sharpening is a skill that improves with practice. Start simple, follow the steps outlined here, and don’t be discouraged by initial mistakes—they’re part of the learning journey. Keep a log of when you sharpen each tool and how it performs afterward. Over time, you’ll develop an intuitive sense for when an edge needs attention and exactly how to restore it. Your projects will show the difference, and so will your hands and mind: less strain, more flow, and a renewed sense of creative mastery. So, roll up your sleeves and make sharpening a celebrated part of your DIY craft studio life—your projects (and your future self) will thank you.


Is there a certain type of sharpening stone or tool you recommend for small studios where space and budget are limited? I want to avoid buying something too bulky or expensive if a simpler option works well.
For small studios on a budget, a double-sided combination whetstone is a practical choice. It’s compact, affordable, and offers both coarse and fine grits for various sharpening needs. You can sharpen most craft tools with it, and it stores easily without taking up much space.
Can you recommend the best way to safely sharpen rotary cutter blades at home? I’m always nervous about handling those small, round blades without some kind of guide.
For sharpening rotary cutter blades safely at home, use a rotary blade sharpener tool designed with a protective case or guide. This lets you insert the blade and rotate it without direct contact, reducing the risk of cuts. Always wear cut-resistant gloves for extra safety and follow the tool’s instructions carefully.
If I’ve already noticed my craft knives are tearing paper, is it possible I’ve damaged the blade beyond sharpening, or can even heavily dull tools usually be restored?
Even if your craft knife is tearing paper, it’s likely just dull rather than permanently damaged. Most blades can be restored with proper sharpening, unless the edge is chipped, bent, or corroded. Try sharpening first—if the problem persists after a careful attempt, then consider replacing the blade.
What’s the quickest way to safely sharpen a chisel or gouge at home when I’m short on time but want to avoid hand fatigue and repetitive strain injuries? Any must-have tools or steps to speed up the process?
To quickly sharpen a chisel or gouge while minimizing hand fatigue, use a low-speed bench grinder or a powered sharpening system with an adjustable jig. These tools keep the blade steady and ensure a consistent edge. Just secure the tool in the jig, let the machine do the work, and finish with a quick honing on a leather strop for best results.
Could you elaborate on some common mistakes people make while sharpening their studio tools? I’m especially interested in what to avoid so I don’t unintentionally damage my knives or scissors.
Absolutely—some common mistakes to watch out for include using the wrong sharpening angle, applying too much pressure, and skipping finer grit stones for a smooth finish. Many people also forget to clean tools before sharpening, which can damage blades or stones. Avoid rushing through the process; take your time to maintain control and preserve your tools’ edge.
Does your guide discuss any ways to quickly test the sharpness of a tool before starting a project, especially for materials like delicate textiles or specialty papers where a dull blade can be particularly damaging?
Yes, the guide explains simple tests to check tool sharpness before starting your project. It suggests making trial cuts on scrap pieces of the same material, like delicate textiles or specialty papers, to ensure clean edges without snags or tears. This helps you avoid damaging your actual project materials.