Introduction: Why Every DIY Crafter Needs a Spray Booth
Whether you’re an avid model maker, jewelry designer, or mixed media artist, you’ve likely encountered the challenges of applying sprays, sealants, or finishes indoors. Without proper containment and ventilation, these tasks can lead to lingering odors, dust contamination, and even health risks from airborne particulates and fumes. That’s where a well-designed DIY craft spray booth comes in—a game-changing addition to your creative workspace that elevates both safety and the quality of your work. In this practical guide, you’ll learn how to build a spray booth that fits your space, your budget, and your specific crafting needs. From selecting the best materials to optimizing airflow and maintaining your booth, every step is covered with clear details and actionable advice. Whether you’re a beginner or a seasoned creative, building your own spray booth is an investment in both your craft and your well-being. Ready to achieve flawless finishes in a cleaner, safer environment? Let’s dive in.
Understanding Spray Booth Basics
What Is a Spray Booth?
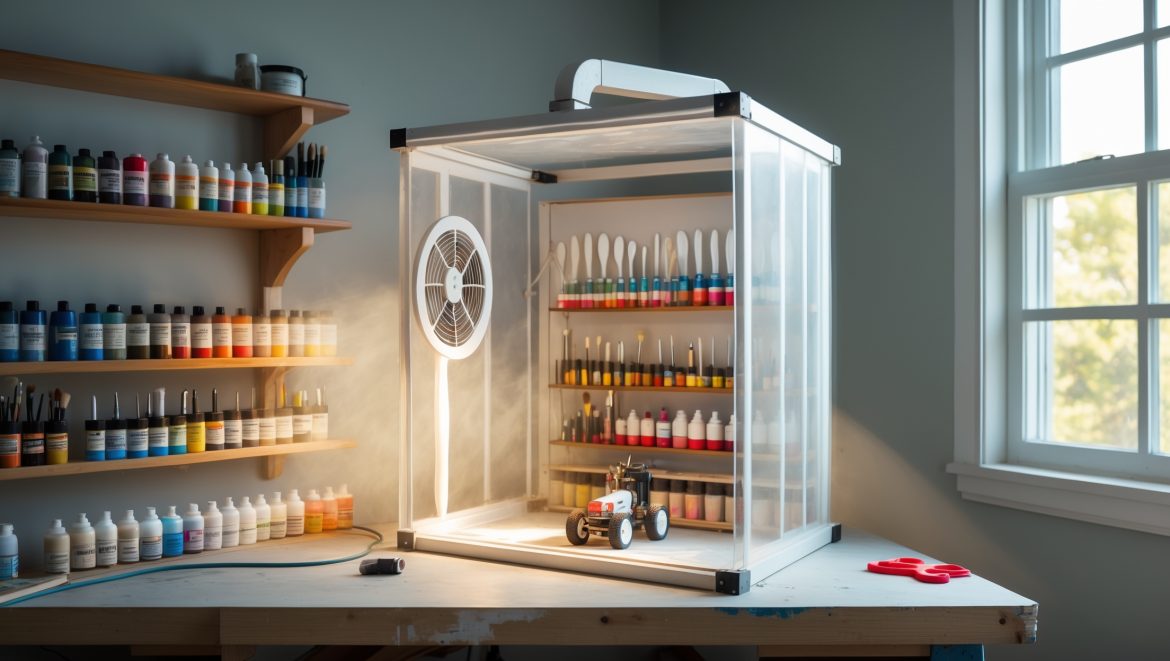
A spray booth is an enclosed space designed to contain overspray, control airflow, and filter fumes and particles generated by spray paints, sealants, adhesives, or finishing sprays. While industrial versions are large and costly, a DIY booth can be customized to fit a table or workbench, making it ideal for home studios.
Why Use a Spray Booth in a Home Craft Studio?
- Health & Safety: Reduces inhalation of toxic fumes and fine particles.
- Cleanliness: Prevents overspray from settling on other projects or surfaces.
- Finish Quality: Controls dust, leading to smoother, more professional results.
- Odor Control: Contains and filters strong smells, keeping your studio pleasant.
Planning Your DIY Spray Booth
Assessing Your Crafting Needs
Before building, consider the types of projects you’ll use the booth for. Resin art, airbrushing, and spray painting each have different requirements for size and filtration. Make a list of your most common materials and estimate the largest object you’ll need to fit inside.
Choosing a Location
- Ventilation: Near a window or exterior door is ideal for venting fumes outside.
- Power Access: Ensure a nearby outlet for fans and lighting.
- Clearance: Allow room to move around the booth and access both the front and back if needed.
Setting a Budget
A basic DIY spray booth can be built for $50–$150, depending on size and materials. Key budget items include:
- Panels (acrylic, polycarbonate, or foam board)
- Box fan or inline duct fan
- HEPA or carbon filter
- Lighting (LED strips or clamp lamps)
- Miscellaneous hardware (tape, hinges, ducting, fasteners)
Materials and Tools Checklist
Materials
- 4 sheets of clear acrylic or polycarbonate (for sides, top, and back)
- 1 sheet of sturdy foam board or plywood (for the base)
- Box fan (20” is common) or inline duct fan (4”–6” diameter)
- HEPA or activated carbon furnace filter (size to match fan)
- Flexible ducting (optional, for venting outdoors)
- Weather stripping or foam tape (to seal gaps)
- Hinges or hook-and-loop strips (for removable front panel)
- LED strip light or clamp lamp
- Extension cord with switch (if needed)
- Masking tape or silicone caulk (for temporary or permanent assembly)
Tools
- Utility knife or acrylic cutter (for trimming panels)
- Drill and bits (if attaching hardware)
- Screwdriver
- Measuring tape and marker
- Dust mask and gloves (for safety during assembly)
Step-by-Step: Building Your DIY Spray Booth
Step 1: Measure and Cut Panels
Decide on your booth’s interior dimensions. For most craft projects, 24” wide x 18” high x 18” deep is ample. Mark and cut your acrylic or foam board to create:
- 2 sides (18” x 18”)
- 1 top (24” x 18”)
- 1 back (24” x 18”)
- 1 base (24” x 18”)
Step 2: Assemble the Booth Frame
Arrange the panels on a flat surface. Use masking tape for a temporary fit, then reinforce with silicone caulk or screws for a sturdier build. Ensure all panels are flush and seams are sealed to prevent leaks. Leave the front open for access.
Step 3: Install the Fan and Filtration System
- Fan Placement: Cut a hole in the back panel sized for your box fan or attach an inline duct fan at the top rear.
- Filter: Attach a HEPA or carbon filter in front of the fan intake using tape or brackets. This traps particulates and odors before air is exhausted.
- Venting (Optional): If venting outdoors, connect flexible ducting to the fan outlet and secure it through a window or vent port. Seal any gaps with weather stripping.
Step 4: Add Lighting
Mount an LED strip or clamp lamp inside the booth, positioning it to minimize shadows on your work surface. If using a clamp lamp, secure it to the outside of the booth pointing in through the top or side panel. Use cool, daylight-balanced bulbs for accurate color representation.
Step 5: Create a Removable Front Panel
For added dust control, make a front cover using acrylic or clear plastic sheeting attached with hook-and-loop strips or hinges. Cut hand holes or flaps for easy access, or leave the lower half open if you prefer more flexibility.
Step 6: Test and Seal
With the fan running, check for air leaks and ensure airflow draws from the front to the back (or top) of the booth. Adjust seals as needed. Place a lightweight piece of tissue at the booth opening—the tissue should be gently pulled inward, showing effective airflow.
Optimizing Your Spray Booth for Different Crafts
Airbrushing and Fine Detailing
For airbrush work, prioritize a high-efficiency filter and consistent, gentle airflow to avoid blowing paint off your project. Consider adding a turntable to the booth floor for easy rotation.
Spray Painting and Sealing
For spray cans or sealants, ensure the fan is powerful enough to rapidly clear overspray. Use a dual-filter setup (HEPA plus activated carbon) if working with solvent-based products.
Resin Casting and Finishes
Some resins off-gas VOCs; always use carbon filtration and maximize venting. Use the booth as a dust-free curing station by running the fan on low speed after spraying.
Maintenance and Upkeep
Routine Cleaning
- Wipe down interior panels with a damp, lint-free cloth after each use.
- Clean filters monthly or when visibly dirty. Replace if airflow is reduced.
- Vacuum or sweep the base to remove dried overspray, dust, and debris.
Filter Replacement
- HEPA filters: Replace every 3–6 months depending on usage.
- Carbon filters: Replace when odors persist or every 2–3 months.
Fan and Electrical Safety
- Unplug the fan when cleaning the booth or replacing filters.
- Inspect cords and plugs for wear. Replace damaged components immediately.
- Never use a fan with exposed wiring or in a damp environment.
Safety Tips for DIY Spray Booths
- Always use the booth in a well-ventilated area.
- Wear a respirator mask when spraying solvent-based products.
- Keep flammable materials (paper, rags) away from electrical components.
- Do not use the booth for projects requiring open flames or heat guns unless the booth is rated for high heat.
- Store spray cans and chemicals in a cool, dry place away from the booth’s electrical parts.
Customizing and Upgrading Your Spray Booth
Adding a Lazy Susan or Turntable
Install a rotating base to easily spray all sides of your project. Look for non-slip, chemical-resistant models or make your own with a bearing plate and acrylic disk.
Advanced Ventilation
For heavy-duty use, upgrade to a two-stage fan and duct system. Consider adding a booster fan for longer duct runs, or integrating a window-mounted exhaust panel to maximize fume removal.
Built-In Storage
Mount small shelves or hooks on the outer sides for storing paints, masks, and cleaning supplies, keeping essentials within reach and your workspace uncluttered.
Lighting Upgrades
Install dimmable or color-adjustable LEDs for better visibility on detailed work. Add secondary side lighting to reduce shadows further.
Frequently Asked Questions
Can I use a cardboard box instead of acrylic panels?
While cardboard can serve as a temporary spray station, it’s less durable, harder to clean, and more flammable. Acrylic or polycarbonate is a much safer, longer-lasting choice.
Does my spray booth need to vent outdoors?
For most solvent-based sprays or heavy use, outdoor venting is highly recommended. If venting isn’t possible, use a dual-stage filter system and limit booth use to water-based products.
Do I still need to wear a mask when using a spray booth?
Yes. Even with good filtration, a quality respirator mask is important, especially for aerosolized chemicals.
Conclusion: Elevate Your Craft Studio with a DIY Spray Booth
Building a dedicated spray booth is one of the most impactful upgrades you can make to your DIY craft studio. Not only does it safeguard your health by minimizing exposure to airborne toxins and particulates, but it also dramatically improves the quality and consistency of your finished projects. With a modest investment of time and materials, you’ll gain a professional workspace feature that brings peace of mind and empowers more creative experimentation. Remember to tailor your booth to your unique setup—think about the projects you make most, the space you have available, and the importance of choosing the right filtration for your media. Regular maintenance and smart safety practices will keep your booth running efficiently for years to come. Whether you’re perfecting your airbrush technique, sealing a handmade sculpture, or protecting delicate jewelry, your new spray booth is a step towards cleaner air, crisper finishes, and a happier, healthier craft life. Take the plunge, follow this guide, and enjoy the upgrade every time you create.


If I mainly work with resin art and occasional airbrushing, should I follow a different setup than someone who primarily uses spray paints?
For resin art and airbrushing, your booth should focus on capturing fine particulates and fumes rather than just spray paint overspray. Use filters rated for VOCs and fumes, and ensure your exhaust system is strong enough for resin fumes. Many details will overlap, but prioritize ventilation and regularly change filters for your specific materials.
My workspace is pretty tight. Are there any modifications or suggested materials for making the spray booth easily collapsible or storable, especially for people who craft in multi-use areas like a kitchen or spare room?
For small or shared spaces, you can build a collapsible spray booth using lightweight PVC pipes for the frame and attach plastic sheeting with Velcro or clips. When you’re done, it breaks down quickly for easy storage under a bed or in a closet. Hinged or folding panels made from foam board are another great portable option.
I noticed the article mentions optimizing airflow to maintain safety—could you elaborate on how to set up the ventilation system if the workspace doesn’t have a window nearby?
If your workspace lacks a window, you can use a flexible duct attached to an inline fan or bathroom exhaust fan mounted on your spray booth. Run the duct to a door, vent, or even a dryer vent leading outside. Ensuring the fan pulls air out effectively will minimize fumes and keep your workspace safe.
Could you clarify what kind of ventilation fan is best for a small DIY spray booth? I want to make sure it’s effective but doesn’t blow particulate dust all over my studio.
For a small DIY spray booth, a bathroom exhaust fan or a low-CFM inline duct fan works well. Look for one with a built-in filter or plan to add a filter before the fan to trap paint particles. This setup helps remove fumes without spreading dust around your studio.
What are some low-cost material options for building a reliable spray booth if I’m trying to stick to a tight budget? I’d like to avoid anything too complex or expensive.
For a budget-friendly spray booth, consider using large cardboard boxes as the main structure. You can line the interior with plastic sheets or old shower curtains for easy cleaning. Use inexpensive box fans for ventilation and add basic furnace filters to help catch overspray. This setup keeps things simple, low-cost, and effective for most DIY craft projects.
Can you give an estimate of how much the materials for the recommended booth in your guide would cost if I want to build something that fits on an average-size workbench?
For a spray booth sized to fit an average workbench, you can expect to spend around $50 to $120 on materials. This includes items like a large plastic storage bin or plywood panels, a small bathroom fan, furnace filters, LED light strips, ducting, and basic hardware. Costs can vary depending on what you already have and the brands you choose.
When it comes to selecting the best materials for building the spray booth, are there specific types of filters or fans that you recommend for controlling fumes from resin and spray paints?
For controlling fumes from resin and spray paints, it’s best to use a high-quality carbon filter or HEPA filter, as they are effective at trapping fine particles and odors. When choosing a fan, look for one rated as ‘explosion-proof’ or suitable for ventilating flammable fumes to ensure safety. Always check the airflow rating (CFM) to match your booth size.