Introduction: Why a Maintenance Calendar Matters for DIY Crafters
Every seasoned DIY enthusiast knows that high-quality tools are at the heart of creative magic. Whether you’re a paper crafter, jewelry maker, woodworker, or textile artist, your equipment is more than just a means to an end—it’s an investment in your craft and your creative joy. But all too often, tools are neglected until they fail or frustrate, leading to wasted materials, expensive replacements, and disrupted projects. The solution? A proactive, seasonal maintenance calendar tailored for DIY crafters. In this guide, you’ll discover how a systematic approach to tool care not only extends the life of your equipment but also enhances safety, accuracy, and the overall crafting experience. From monthly routines to quarterly deep-cleans, we’ll break down exactly what to do and when, so you can focus on what matters most: bringing your creative vision to life.
Understanding the Importance of Regular Tool Maintenance
Protect Your Investment
Craft tools can represent a significant financial outlay. Regular maintenance ensures you get the maximum return on your investment, preventing premature wear and expensive replacements.
Improve Safety
Dull blades, gummed-up glue guns, or misaligned cutting mats can lead to accidents and injuries. Routine inspections and upkeep keep your workspace safer for you and anyone sharing your creative space.
Maintain Precision and Quality
Crisp cuts, consistent gluing, and clean stamping all rely on well-maintained tools. A maintenance calendar helps guarantee that your results will always meet your standards.
Monthly Maintenance Tasks: Your Essential Checklist
Monthly routines form the backbone of your maintenance calendar. These are quick, simple tasks that keep tools in prime condition and prevent bigger problems down the line.
- Inspect Blades and Cutting Tools: Check scissors, rotary cutters, craft knives, and paper trimmers for nicks, dullness, or residue. Clean and sharpen or replace as needed.
- Clean Glue Guns and Adhesive Dispensers: Remove glue buildup from tips and housings. Test trigger action for smooth dispensing.
- Wipe Down Surfaces: Use a damp microfiber cloth to wipe handles, tool surfaces, and storage bins to remove dust, lint, and residue.
- Test Electrical Tools: Briefly power on hot glue guns, heat embossing tools, and sewing machines to check for proper function. Inspect cords for fraying or damage.
- Lubricate Moving Parts: For tools like pliers, paper punches, and sewing machines, apply a drop of tool oil to hinges and moving parts. Wipe away excess.
- Check for Rust: In humid climates, inspect metal tools for early signs of rust. Use fine steel wool to remove spots and apply a light protective oil.
Quarterly Deep-Clean: Going Beyond the Surface
Every three months, dedicate time to a more thorough cleaning and inspection. This helps catch issues before they escalate and resets your workspace for the season ahead.
How to Deep-Clean Hand Tools
- Disassemble multi-part tools (where possible) for cleaning.
- Soak removable blades or metal parts in warm, soapy water. Dry thoroughly.
- Use cotton swabs to remove lint from tight spaces (sewing machine bobbin cases, scissor pivots, etc.).
- Polish wooden handles with a light application of mineral oil to prevent cracking.
Sewing and Textile Equipment
- Change needles and blades on sewing machines, rotary cutters, and sergers.
- Clean lint traps and bobbin areas using a small brush or vacuum attachment.
- Check tension and recalibrate if necessary.
Specialty Tools (e.g., Jewelry, Woodworking)
- Ultrasonic clean small metal parts (for jewelry tools).
- Wax or oil wooden tool handles and cutting boards.
- Inspect for cracked or loose tool heads and repair as needed.
Seasonal Maintenance: Adapting to Environmental Changes
Changes in temperature and humidity can affect both your tools and your crafting materials. Adjust your routine each season to protect your equipment from the elements.
Spring and Summer
- Monitor for increased rust risk during humid months. Increase frequency of rust checks and ventilation.
- Test adhesives and paints for shelf life; dispose of expired products responsibly.
Autumn and Winter
- Check batteries in cordless tools; recharge or replace as needed.
- Store temperature-sensitive materials (like glues and paints) above freezing.
- Inspect for static buildup on cutting mats and tools; clean with anti-static spray if necessary.
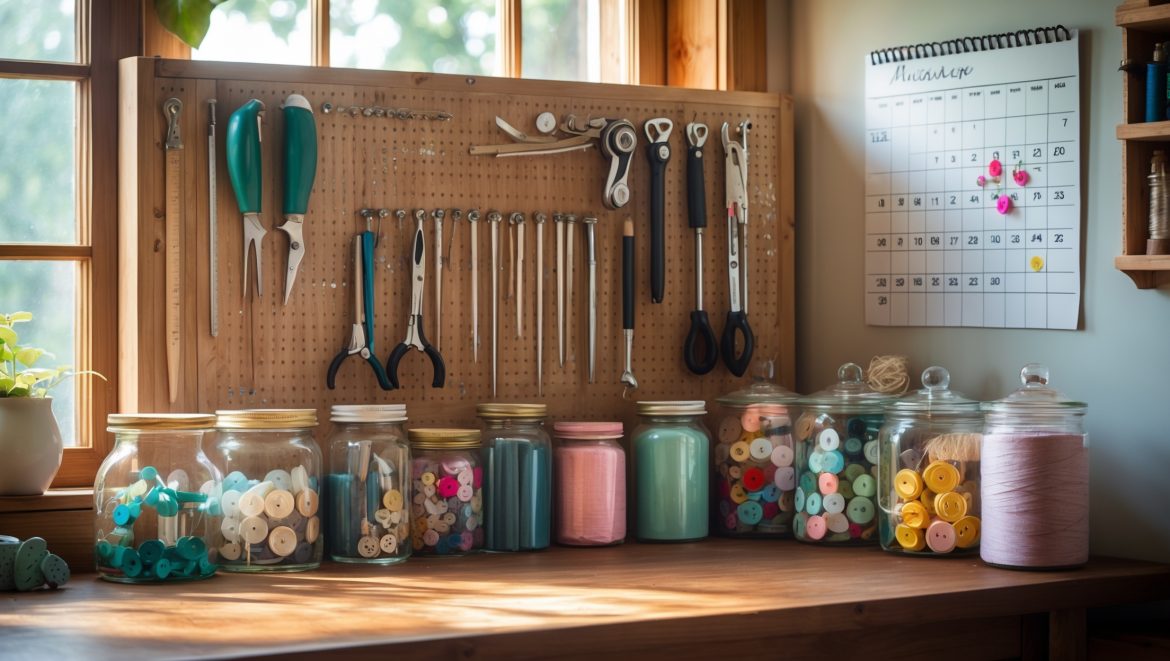
Storage Solutions to Extend Tool Life
Organized Accessibility
Store your most-used tools within easy reach on a pegboard, magnetic strip, or open shelving. This reduces accidental damage from rummaging through drawers.
Controlled Environments
- Use airtight containers for blades, rotary cutters, and small metal parts to limit exposure to air and moisture.
- Employ silica gel packs in tool drawers to absorb excess humidity.
- Hang pliers, scissors, and specialty tools to avoid dulling and deformation.
Labeling and Inventory
Label storage bins and drawers clearly. Keep a simple inventory sheet to track tool condition, purchase dates, and maintenance history—especially helpful for specialty or expensive equipment.
Troubleshooting Common Issues
Blades Won’t Stay Sharp
- Sharpen regularly and avoid using craft blades on materials they’re not designed for.
- Replace blades showing chips or warping.
Sticky Residue on Tools
- Remove adhesives with rubbing alcohol or a citrus-based cleaner.
- Prevent future buildup by cleaning after each use.
Misaligned or Loose Parts
- Tighten screws and bolts quarterly.
- For tools with replaceable heads, ensure they’re seated properly before use.
Electrical Malfunctions
- Unplug tools before maintenance. Check cords for damage and replace if frayed.
- If a tool fails to power on, consult the manufacturer’s troubleshooting guide before attempting repairs.
Maintenance Calendar Template: Month-by-Month Breakdown
Use this sample calendar as a starting point, then customize it based on your tool collection and crafting frequency.
- January: Deep-clean all cutting tools; replace mat surfaces as needed.
- February: Check and lubricate moving parts on pliers, punches, and jewelry tools.
- March: Inspect adhesives and paints for expiration; organize storage.
- April: Clean and recalibrate sewing and textile equipment.
- May: Test and charge batteries in cordless tools.
- June: Inspect for rust on all metal tools; oil as necessary.
- July: Deep-clean glue guns and heat tools; check for buildup.
- August: Inventory specialty tools; review for repairs or replacements.
- September: Organize workspace for upcoming busy crafting season.
- October: Sharpen all blades; replace worn cutting mats.
- November: Inspect tool storage; refresh silica gel packs.
- December: Year-end deep clean; review maintenance logs and plan for upgrades.
Making Maintenance a Habit: Tips for Success
- Set Reminders: Use digital calendars or phone alarms to prompt monthly and quarterly tasks.
- Reward Yourself: Pair maintenance days with a favorite treat or playlist to make the process enjoyable.
- Involve the Family: Turn maintenance into a group activity for shared workspaces or family craft rooms.
- Keep Supplies Handy: Store cleaning cloths, oils, and small tools together in a dedicated maintenance kit.
Conclusion: Craft with Confidence Through Proactive Care
Your creative journey deserves tools that are as reliable and inspired as you are. Establishing a DIY crafter’s tool maintenance calendar isn’t just about protecting your investment—it’s about honoring your process, ensuring every cut, stamp, or stitch is as effortless as possible. By dedicating a little time each month and season, you’ll prevent costly breakdowns, reduce frustration, and maintain the safety and precision your craft demands. Imagine opening your workspace to find every tool ready, every blade sharp, and every machine humming smoothly—no last-minute scrambles or mid-project letdowns. Make maintenance a cornerstone of your creative routine and watch your projects (and your peace of mind) flourish. So set your calendar, gather your supplies, and give your tools the care they deserve. Your crafts—and your future self—will thank you.


If I’ve neglected my tools for a while and they already have some rust or buildup, what’s the best first step to get them back into working order before I follow the monthly checklist?
If your tools have rust or buildup, start by cleaning them thoroughly. Use a wire brush or steel wool to remove rust, and a cloth with mild soap and water for grime. Make sure to dry them completely, then lightly oil any metal parts to prevent further rusting. Once they’re clean and rust-free, you can begin following the regular maintenance checklist.
If I’m on a tight budget and can’t replace tools often, which maintenance tasks should be my priority to really extend the life of things like scissors and glue guns?
For scissors, focus on wiping the blades clean after each use, drying them thoroughly, and occasionally sharpening them or tightening any loose screws. For glue guns, always unplug them after use, clean off glue residue while still slightly warm (but unplugged), and check the cord for damage. These simple steps will help your tools last much longer on a budget.
Are there any tools in a paper crafting setup that require more frequent maintenance than the monthly routine you mentioned? I find my paper trimmer gets sticky after heavy use.
Paper trimmers are definitely one of the tools in a paper crafting setup that benefit from more frequent maintenance, especially with heavy use. Sticky blades can affect cutting quality, so it’s a good idea to wipe the blade and cutting track clean after every major project. Also, scissors and glue applicators often need more regular cleaning to prevent buildup and keep them working smoothly.
I’m curious about what kind of cleaning solutions or products you recommend for regular maintenance of cutting tools like scissors and rotary cutters, especially for those working with both fabric and paper.
For cleaning scissors and rotary cutters, a mild dish soap diluted in warm water works well to remove residue from fabric or paper. After washing, dry them thoroughly to prevent rust. For sticky build-up, a small amount of rubbing alcohol on a soft cloth can help. Always oil the pivot points lightly after cleaning to keep them moving smoothly.
For crafters on a tight budget, are there cost-effective alternatives to commercial tool-cleaning solutions that you recommend, especially for cleaning blades or removing adhesive residue?
Absolutely, there are several budget-friendly options for cleaning tools. For blades, a simple mixture of warm water and dish soap works well—just be sure to dry thoroughly to prevent rust. To remove adhesive residue, rubbing alcohol or even a small amount of vegetable oil can be very effective. Always test on a small area first to ensure there’s no damage.
What would you recommend for keeping rotary cutter blades sharp if I’m on a tight budget and can’t replace them frequently?
To keep your rotary cutter blades sharp on a budget, you can use a simple blade sharpener or even a piece of aluminum foil. Fold the foil several times and make a few cuts through it with your rotary cutter—this can help extend the blade’s sharpness. Make sure to clean the blade regularly and avoid cutting over pins or thick seams to further preserve its edge.