Introduction: Building Your Creative Space Without Breaking the Bank
Setting up your first DIY craft studio is an exciting leap into creative independence, but the costs can quickly spiral if you’re not prepared. Whether you’re dreaming of a cozy corner for watercolor painting or a full-fledged workshop for woodworking and sewing, every crafter faces that nagging question: How much will this really cost? The reality is, crafting spaces come in all shapes and budgets. Without a clear plan, it’s easy to overspend on trendy gadgets or underestimate hidden expenses like storage solutions and safety upgrades. But with a little strategy—and a lot of honesty—you can build a functional, inspiring studio on a budget that works for you. In this guide, we’ll break down the real-world costs of setting up a DIY craft studio from scratch. We’ll cover everything from essential tools and furniture to overlooked expenses like lighting, organizational systems, and ongoing supplies. You’ll learn how to prioritize purchases, identify smart ways to save, and avoid common budgeting mistakes. By the end, you’ll have a transparent, itemized budget blueprint to help you launch your creative journey without financial regret.
1. Assessing Your Space and Needs
1.1 Defining Your Crafting Focus
Start by determining the primary crafts you’ll pursue. Will you be sewing, painting, woodworking, jewelry-making, or a mix? Each discipline demands different tools, storage, and safety needs. List your top three crafts and note their unique requirements. This focus prevents buying unnecessary equipment and helps you allocate your budget where it matters most.
1.2 Measuring and Mapping Out Your Studio
Measure your available space—whether it’s a spare bedroom, basement nook, or garage corner. Sketch a simple floor plan. Identify power outlets, windows, and tricky spots (like low ceilings or damp areas) that might influence your purchases. A measured plan saves you from overspending on furniture that won’t fit, or tools that require more space than you have.
1.3 Setting a Realistic Budget Range
Typical first-time DIY craft studios range from $500 (lean, upcycled, and compact) to $4000+ for larger, professionally equipped spaces. Define your maximum spend upfront, but allow a 10–15% buffer for unexpected costs. Remember: It’s better to start small and upgrade later than to overextend yourself financially.
2. The Itemized Cost Breakdown: What You’ll Really Spend
2.1 Workspace Furniture
- Work Table/Bench: $70–$400. Price varies by size, sturdiness, and features (storage drawers, adjustable height). Upcycled desks can cut costs.
- Chair/Stool: $40–$200. Choose ergonomic options if you’ll work for long periods; otherwise, sturdy secondhand finds can suffice.
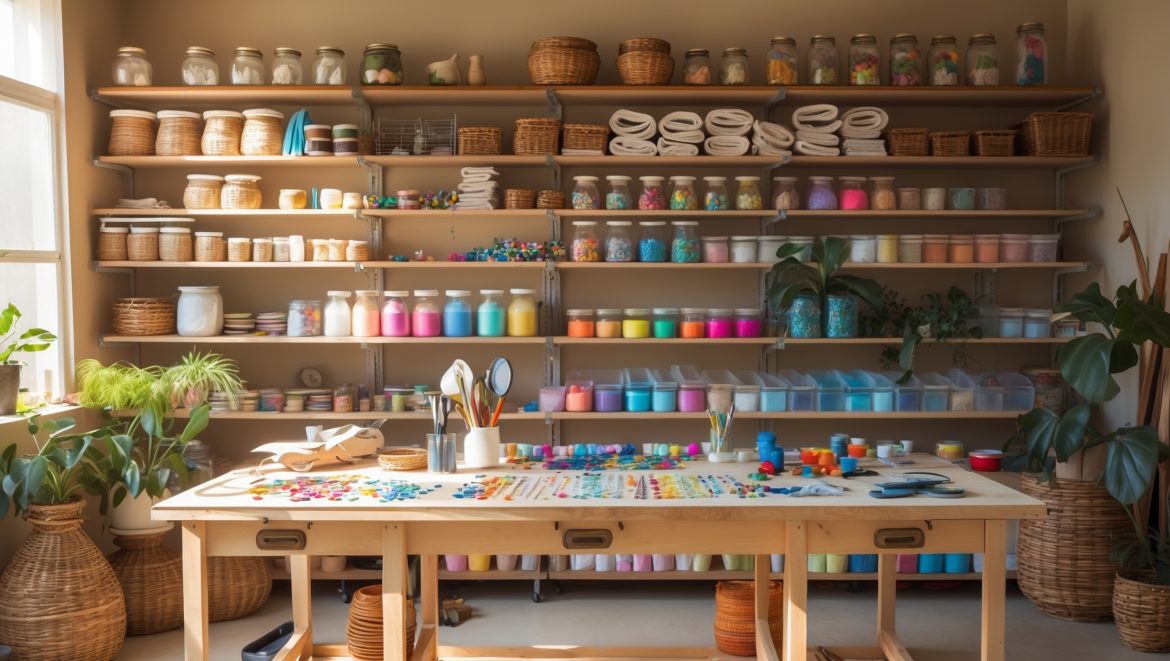
- Shelving Units: $35–$250. Wall-mounted shelves are space-efficient and budget-friendly.
- Cabinets/Drawers: $50–$300. Essential for secure, dust-free storage of delicate materials.
Budget Tip: Scout local buy/sell groups for gently used furniture. Many crafters upgrade and sell barely-used items at a fraction of retail cost.
2.2 Lighting Solutions
- Overhead LED Fixtures: $60–$150. Opt for daylight-balanced bulbs to reduce eye strain.
- Task Lamps: $25–$80 each. Flexible-arm lamps are ideal for detail work.
- Extension Cords/Power Strips: $15–$40. Don’t skimp on surge protection.
Budget Tip: Natural light is free! Position your workspace near windows to minimize artificial lighting needs during the day.
2.3 Essential Tools & Equipment
- Starter Tool Set: $75–$350. Includes basics like scissors, cutting mats, rulers, pliers, utility knives.
- Craft-Specific Tools: $50–$500. Example: sewing machines, rotary cutters, wood burners, jewelry pliers.
- Power Tools (if needed): $100–$600. Cordless drills, sanders, or scroll saws for more advanced projects.
Budget Tip: Buy tools as you need them for specific projects. Starter kits are often cheaper than piecemeal purchases.
2.4 Storage & Organization
- Bins & Boxes: $20–$100. Clear plastic bins make it easy to see contents.
- Drawer Organizers: $10–$60. Keep small supplies neat and accessible.
- Pegboards & Hooks: $30–$80. Perfect for wall-mounted tool storage.
Budget Tip: Repurpose jars, shoe boxes, or food containers for zero-cost storage options.
2.5 Materials and Consumables
- Initial Material Stock: $60–$300. Paper, fabrics, paints, beads, adhesives, etc.
- Bulk Buying: $50–$150. Buying in bulk saves money for core supplies you use often.
Budget Tip: Don’t overstock at first. Focus on materials for your first few planned projects, then build inventory with experience.
2.6 Safety and Comfort
- Fire Extinguisher: $25–$50.
- First Aid Kit: $15–$40.
- Ventilation Fan (if needed): $60–$200.
- Anti-Fatigue Mats: $30–$100. Essential for standing workstations.
Budget Tip: Safety is non-negotiable. Never cut corners here to save money.
2.7 Decor and Inspiration
- Wall Art/Inspiration Board: $20–$75. DIY your own for less.
- Plants/Greenery: $10–$50. Adds life and improves air quality.
Budget Tip: Decorate slowly—let your studio evolve as your style develops.
2.8 Miscellaneous/Hidden Costs
- Trash Bins/Recycle Containers: $10–$35.
- Cleaning Supplies: $20–$50.
- Internet/Wi-Fi Upgrade (if streaming tutorials): $0–$200.
2.9 Sample Budgets by Studio Size
- Lean Starter (small desk, basic tools, minimal storage): $400–$700.
- Mid-Range (dedicated room, ergonomic chair, quality lighting, expanded tools): $1200–$2000.
- Pro Setup (large space, full tool suite, optimized storage, advanced safety): $2500–$4500.
3. How to Prioritize Purchases and Avoid Overspending
3.1 Must-Haves vs. Nice-to-Haves
Create two lists: Essentials (core tools, workspace, basic storage, safety gear) and Wishlist (decor, advanced tools, specialty lighting). Invest in essentials first. Revisit the wishlist as your skills—and available funds—grow.
3.2 Spreading Out Your Spend
Consider building your studio in phases—start with a functional core, then expand as you take on more ambitious projects. This reduces financial stress and prevents buyer’s remorse.
3.3 Smart Shopping Strategies
- Buy Used: Tools, furniture, and storage solutions are often available secondhand in great condition.
- Watch for Sales: Craft stores frequently run seasonal sales and offer coupons.
- Community Swaps: Join local crafting groups—members often trade or give away supplies.
- DIY Your Storage: Build your own pegboards, shelves, or organizers to save significantly.
4. Budgeting Tools and Tracking Your Expenses
4.1 Using Spreadsheets and Apps
Track every purchase in a simple spreadsheet or a free budgeting app (like Mint or YNAB). Log:
- Item description
- Vendor/source
- Cost (incl. tax/shipping)
- Purchase date
- Category (furniture, tools, supplies, etc.)
This running tally helps you spot spending patterns and identify areas where you can cut back or reallocate funds.
4.2 Reviewing and Adjusting
Set aside time monthly to review your spending. Are you on track? Did you overspend in one category? Use this info to adjust future purchases—maybe you can delay a decor buy to invest in a better tool, or vice versa.
5. Avoiding Common Budgeting Mistakes
- Buying Everything at Once: Resist the urge. Buy core items, then fill gaps as you go.
- Ignoring Hidden Costs: Always budget for shipping, taxes, and small fixtures (hooks, fasteners, cleaning gear).
- Skimping on Safety: Don’t save money by skipping fire extinguishers, first aid kits, or proper ventilation.
- Overstocking Materials: Don’t buy huge quantities until you know what you’ll use most.
- Forgetting Comfort: Ergonomic chairs and anti-fatigue mats are worth the investment for your health.
6. Real-World Case Study: Budgeting for a Mixed-Media Craft Studio
Meet Jamie: Jamie wanted a multipurpose craft space for painting, sewing, and papercrafts, with a budget of $1200. Here’s how Jamie allocated funds:
- Work Table & Chair: $250 (upcycled desk, new ergonomic chair)
- Shelving & Storage: $180 (IKEA shelves, thrifted bins)
- Lighting: $110 (daylight LED ceiling fixture, two flexible task lamps)
- Starter Tools: $220 (basic sets for sewing and painting, cutting mat, utility knives)
- Materials: $150 (initial fabric, paint, specialty papers)
- Safety/Comfort: $95 (first aid kit, fire extinguisher, anti-fatigue mat)
- Decor/Inspiration: $55 (DIY corkboard, small potted plants)
- Miscellaneous: $65 (trash bin, cleaning supplies)
Total Spend: $1,125 (under budget, with $75 reserved for future upgrades)
7. Upgrades and Future-Proofing Your Studio
7.1 Planning for Expansion
As your skills grow, so will your need for specialized tools and storage. Set aside a small monthly budget for upgrades. Consider modular furniture and shelving for easy reconfiguration.
7.2 Sustainable Spending
Invest in quality over quantity for high-use items (work surfaces, lighting, core tools). These will last longer and reduce replacement costs over time.
Conclusion: Crafting Creatively—And Cost-Consciously
Launching a DIY craft studio is one of the most rewarding investments you can make in your creative life. But like every great project, it starts with a solid plan—and a clear-eyed view of the real costs involved. By approaching your studio setup with intention, transparency, and a willingness to prioritize, you sidestep the common money traps that derail so many would-be makers. Remember: you don’t need to buy everything at once or spend a fortune to create a space that sparks inspiration. Start with the essentials, let your workspace evolve with your skills, and keep a close eye on your spending. Use the tips, sample budgets, and real-world examples in this guide to shape a studio that’s both functional and financially sustainable. Most importantly, give yourself permission to enjoy the journey: every creative tool you buy and every storage hack you invent is an investment in your unique artistic voice. The craft studio of your dreams is closer—and more affordable—than you think. Happy crafting!


When mapping out your studio space, do you have recommendations for affordable ways to address tricky spots like damp areas or low ceilings? I want to avoid costly fixes but still make my space functional.
For damp areas, try using moisture absorbers, sealing cracks with caulk, or placing a dehumidifier if needed—these are budget-friendly compared to major renovations. For low ceilings, use compact, low-profile shelving and stick to lighter colors to create a sense of openness. Working with portable or foldable furniture can also help maximize tricky spaces without big expenses.
I’m curious about how to prioritize spending if my top crafts—like sewing and painting—have really different storage and supply needs. Do you have tips on splitting the budget between them without going overboard?
Since sewing and painting require different tools and storage, try making a list of must-haves for each. Allocate more budget to essentials like a sewing machine or good paints, then look for space-saving storage solutions that work for both, such as shelves or clear bins. Start with basics, then gradually add specialized storage as you figure out your workflow.
I’m just starting to plan my craft studio, and I noticed you mentioned not underestimating lighting costs. Can you give some examples of affordable lighting options that actually make a difference, especially if I’m working in a basement corner with little natural light?
For a basement studio, LED panel lights or daylight-balanced LED bulbs are affordable and make a big difference. Clip-on lamps with adjustable arms are great for directing light right where you need it. You might also consider inexpensive ring lights or under-cabinet LED strips to brighten up specific work areas.
Could you give a rough estimate on how much lighting and organizational systems usually add to the overall cost? I didn’t realize those expenses could sneak up until you mentioned them here.
Lighting can range anywhere from $50 for basic clamp lights up to $200 or more if you opt for softboxes or LED panels. Organizational systems like shelves, storage bins, and pegboards often add another $50 to $150, depending on the size of your space and the materials you choose. These costs can definitely add up, so it’s wise to factor them into your initial budget.
When you mention mapping out tricky spots such as low ceilings or damp areas, do you have tips or inexpensive solutions for adapting these kinds of spaces for crafting?
For low ceilings, consider using compact, stackable storage and wall-mounted shelves to maximize space. In damp areas, use moisture-resistant materials like plastic bins instead of cardboard, and add a small dehumidifier or moisture absorbers to help control humidity. Good ventilation and LED lighting can also make these spaces more comfortable and craft-friendly without breaking the bank.
If my crafting focus changes over time, what’s the best way to adapt my budgeting and studio layout without having to completely redo everything?
As your crafting interests evolve, try to invest in flexible storage solutions, modular furniture, and multi-purpose tools. This way, you can rearrange your space and reallocate your budget toward new materials without starting from scratch. Regularly reassess what you use most and adjust your layout and spending accordingly.
Is there a recommended minimum budget range that most first-time DIY crafters should plan for, just to get a basic but functional workspace started?
A basic but functional DIY crafting workspace can usually be set up with a budget of $150 to $300. This should cover essentials like a sturdy table, decent lighting, storage bins, and some basic tools or supplies, depending on your specific craft. Adjustments can be made based on what you already have or the type of crafting you plan to do.
When you mention hidden expenses like storage solutions and safety upgrades, could you provide a rough estimate for those line items, especially for someone just starting with a multipurpose craft studio?
For a beginner setting up a multipurpose craft studio, plan about $50–$150 for basic storage solutions like shelves, bins, and organizers. Safety upgrades such as a first-aid kit, fire extinguisher, and proper lighting usually total another $40–$100. Adjust these numbers based on your space and needs, but this should give you a solid starting point.