Introduction: Why a Safety Checklist is Essential for Every DIY Craft Studio
If you love DIY, crafts, or creative living, chances are you spend many hours in your craft studio—whether that’s a dedicated room, a converted garage, or a corner of your home. This is a space for creativity, innovation, and hands-on making. But it’s also a space filled with potential hazards: sharp blades, power tools, flammable materials, solvents, cords, and clutter. Even experienced makers can overlook crucial safety steps in the excitement of a new project. One small oversight can lead to injury, property damage, or even a devastating fire.
A robust safety checklist isn’t just for beginners or large workshops. It’s a practical tool that empowers every crafter to prevent accidents before they happen. Whether you’re sewing, woodworking, painting, or working with resin, a clear, actionable safety procedure helps you protect yourself, your space, and your projects. In this in-depth guide, we’ll walk through a comprehensive checklist tailored for DIY craft studios—covering everything from daily habits and storage practices to chemical handling and emergency preparedness. Use this checklist to audit your current setup, spot overlooked risks, and create a safer, more productive creative environment.
Section 1: Craft Studio Hazard Identification
Common Hazards in DIY Craft Spaces
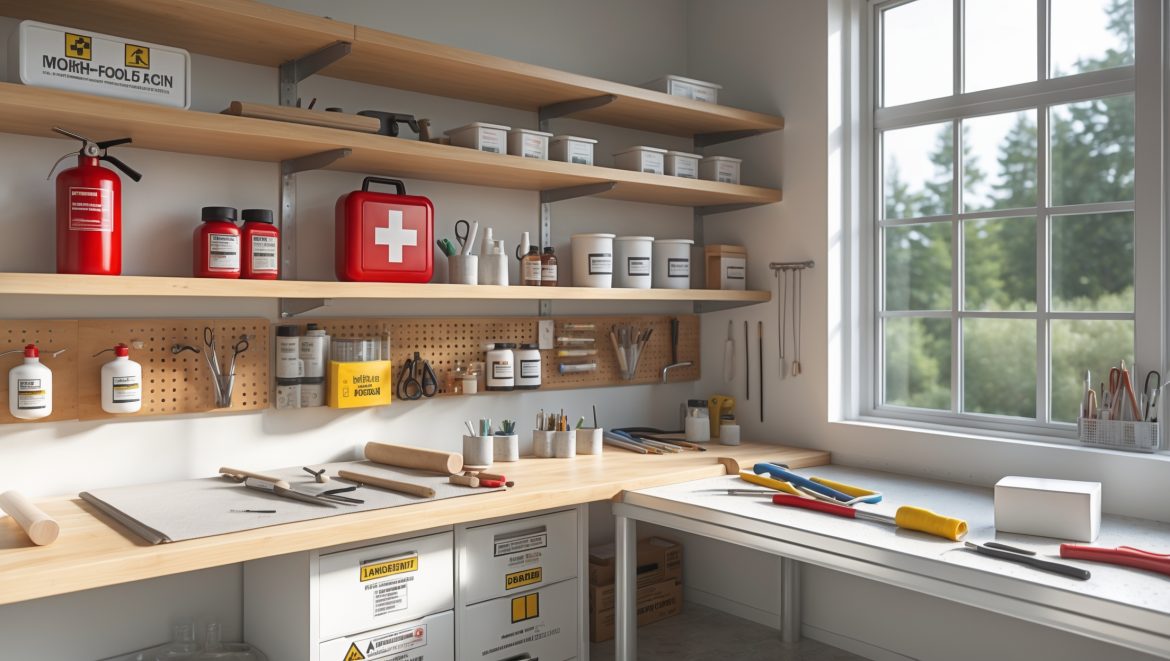
- Sharp Tools: Scissors, utility knives, rotary cutters, craft blades, and saws.
- Power Tools: Drills, sanders, hot glue guns, soldering irons, and wood burners.
- Flammable Materials: Paint thinners, solvents, alcohol inks, spray adhesives, and fabrics.
- Trip Hazards: Extension cords, scattered supplies, and crowded walkways.
- Chemical Exposures: Epoxy resins, varnishes, cleaning agents, and adhesives.
- Allergens and Airborne Particles: Dust from sanding, fibers, and aerosol sprays.
- Electrical Safety: Overloaded outlets, damaged cords, and improper extension use.
- Ergonomic Risks: Repetitive motions and poor workstation setup.
Begin by walking through your space and cataloging all potential hazards. Take photos or notes, and don’t forget to examine storage areas, under tables, and behind equipment. An honest assessment is the first step to effective prevention.
Section 2: The Ultimate DIY Craft Studio Safety Checklist
1. General Workspace Organization
- Keep all work surfaces clean and uncluttered. Return tools and materials to their designated spots after each session.
- Maintain clear walkways; ensure no cords, boxes, or supplies block exits or major pathways.
- Store sharp tools in closed containers or mounted racks, out of reach of children and pets.
- Label all drawers and storage bins for quick access and tidy returns.
2. Safe Tool Handling and Storage
- Inspect tools before use; check for loose parts, dull blades, or frayed cords.
- Unplug power tools when not in use—even for short breaks.
- Store utility knives and scissors with blades retracted or sheathed.
- Keep a sharpening schedule for cutting tools; dull tools are more likely to slip and cause injury.
- Assign a dedicated area for hot tools (glue guns, soldering irons) with non-flammable mats and proper ventilation.
3. Chemical and Flammable Material Management
- Store paints, solvents, and adhesives in original containers with labels intact.
- Use a metal cabinet or fire-resistant storage for flammable chemicals.
- Keep chemicals away from heat sources and direct sunlight.
- Never mix chemicals unless instructed by the manufacturer.
- Ventilate your workspace when using strong-smelling or potentially hazardous substances. Use fans, open windows, or fume extractors.
- Wear gloves and eye protection when handling corrosive or irritating chemicals.
4. Electrical and Fire Safety
- Check all electrical cords for damage before plugging in.
- Do not daisy-chain extension cords or overload outlets.
- Use surge protectors for sensitive equipment.
- Keep a fire extinguisher rated for electrical and chemical fires within easy reach. Check its expiration date annually.
- Store a fire blanket near high-risk areas (e.g., where hot tools are used).
- Install smoke and carbon monoxide detectors; test monthly and replace batteries annually.
- Know how to shut off power to your studio in an emergency.
5. Air Quality and Dust Control
- Use a dust collection system or shop vacuum when sanding, sawing, or generating particulates.
- Wear a properly fitted N95 mask or respirator for dusty or chemical-heavy projects.
- Regularly clean air filters and replace as needed.
- Open windows or use an exhaust fan during projects that produce fumes or dust.
6. Personal Protective Equipment (PPE)
- Keep safety goggles, gloves, dust masks, and aprons accessible at your workstations.
- Change gloves immediately if they become contaminated with chemicals.
- Wear closed-toe shoes; avoid loose clothing that can catch in tools.
7. Emergency Preparedness
- Post emergency contact numbers and your home address by the entryway.
- Keep a stocked first aid kit with bandages, burn cream, eye wash, and antiseptic wipes.
- Know the location of your nearest exit and keep it unobstructed at all times.
- Create a plan for evacuating pets or family members in case of fire or chemical spill.
- Practice using your fire extinguisher (read the instructions) and review your exit routes quarterly.
8. Ergonomics and Repetitive Strain Prevention
- Adjust workbenches and chairs to a comfortable height; use anti-fatigue mats for standing work.
- Take regular breaks to stretch your hands, arms, and back.
- Alternate tasks to reduce repetitive motion injuries.
- Use ergonomic tools designed to reduce strain.
Section 3: Customizing the Checklist for Your Craft
Adapting for Common DIY Disciplines
- Sewing & Textiles: Mind pins and needles, unplug irons after use, and store rotary cutters safely.
- Woodworking: Prioritize dust collection, blade guards, and hearing protection.
- Painting & Resin Art: Emphasize ventilation, chemical gloves, and spill containment.
- Jewelry Making: Store acids and torches securely, and use safety glasses for cutting or soldering.
List the materials and equipment you use most often. Identify any unique hazards, and add custom steps to your checklist. For example, if you often dye fabrics, include eye protection and proper waste disposal. If you use a 3D printer, monitor for fumes and electrical safety.
Section 4: Integrating Safety into Daily Crafting Habits
Making Safety Second Nature
- Start every session with a quick workspace scan: check for spills, clear walkways, and plug in only what you need.
- End each session with a tidy-up: unplug tools, cap chemicals, sweep up debris, and reset PPE for next time.
- Keep your checklist posted where you can reference it—laminate and pin it near your workbench or door.
- Review and update your checklist at least twice a year or after major studio changes.
Consider setting phone reminders for monthly safety checks (smoke detector, fire extinguisher, first aid inventory). Incorporate safety checks into your project planning, so you never skip critical steps in your creative flow.
Section 5: Safety for Shared and Family Craft Studios
Protecting Kids, Pets, and Visitors
- Install child safety locks on cabinets with sharp or hazardous materials.
- Keep all tools and chemicals out of reach of young children and animals.
- Establish clear studio rules for family members and guests—no running, no food or drink near chemicals, and always ask before using equipment.
- Provide proper PPE in multiple sizes if your space is used by adults and kids.
- Supervise children closely and teach age-appropriate safety skills.
Label all dangerous items with clear icons or bright stickers. If you host craft parties or workshops, review safety procedures at the beginning of each session.
Section 6: Safety Audit—How to Evaluate and Improve Your Studio
Step-by-Step Audit Process
- Print your checklist and walk through your studio, inspecting each area and item.
- Take notes on hazards, missing equipment, or cluttered spots.
- Photograph trouble areas to track progress.
- Set realistic goals—tackle one section per week if needed.
- Repeat the audit quarterly, or after adding new tools or materials.
- Invite a crafty friend to review your setup; a fresh set of eyes often spots overlooked risks.
Document changes and celebrate improvements! A safer studio is a more productive and enjoyable space.
Conclusion: Craft with Confidence—Your Safety is the Real Foundation
Creativity thrives in a space where you feel secure, comfortable, and prepared for whatever your projects may bring. By implementing a comprehensive safety checklist, you’re not just preventing accidents—you’re investing in your wellbeing, your creative longevity, and the success of your craft. Consistent safety habits mean fewer interruptions, less stress, and more time to focus on what you love. Whether you’re just setting up your first DIY studio or you’re a veteran maker, it’s never too late to strengthen your safety game. Take the time to walk through the checklist, customize it for your unique needs, and revisit it often. Encourage fellow crafters to do the same—because a community that values safety is a community that grows together.
Remember, every great project starts with a solid foundation. Make safety the first step in your creative process, and enjoy peace of mind alongside your masterpieces. Happy—and safe—crafting!


For someone just starting out, how do you recommend organizing flammable materials and sharp tools so they’re both accessible but also kept as safe as possible? My craft area is pretty small and I worry about mixing things up.
Consider using separate, clearly labeled containers for flammable materials and sharp tools. Store flammables in a cool, dry spot away from heat sources, ideally in a closed bin or box. Keep sharp tools in a caddy or a magnetic strip on the wall, out of reach when not in use. Even in a small space, keeping these items apart reduces risks and keeps your area tidy and safe.
How often should I go through the full safety checklist to make sure I’m not missing any new risks as my projects and materials change over time?
It’s a good practice to review your full safety checklist at least once a month, or whenever you start a new type of project or bring in new materials. This helps you stay aware of any new hazards and keeps your workspace safe as things change.
If I’m just setting up a new corner craft area, how would you prioritize the hazards to address first? I want to make it safe but I’m on a tight budget, so I need to know where to start.
Start with the basics: focus on fire safety by keeping flammable materials away from heat sources and ensuring you have a working smoke detector. Next, address electrical safety by avoiding overloaded outlets and inspecting cords for damage. Also, make sure your work area is well-lit and tidy to prevent trips and falls. These steps offer solid protection without requiring a big investment.