Introduction: Why Flooring Matters in Your DIY Craft Studio
When planning a DIY craft studio, flooring might not be the first thing that comes to mind—but it’s one of the most influential elements in shaping your creative environment. The right floor supports your workflow, ensures safety, helps with ergonomics, and can even spark inspiration. Whether you’re working with paint, fabric, wood, or mixed media, your flooring will endure spills, dropped tools, rolling carts, and long hours of standing. Choosing wisely can save you money, prevent injuries, and make cleanup a breeze. In this comprehensive guide, we’ll explore practical flooring options for every budget, highlight safety and comfort considerations, and share creative ways to personalize your studio’s foundation. Let’s step into a world where every square foot supports your artistry.
Key Flooring Challenges in Craft Studios
Common Hazards and Wear
Craft studios face unique demands. Adhesives, dyes, and paints can stain porous surfaces. Sharp tools or dropped equipment may gouge soft floors. Heavy furniture or rolling storage can lead to dents and scratches. Additionally, standing for hours on a hard surface can cause fatigue and discomfort.
- Stains: Frequent in studios using paints, inks, or dyes.
- Scratches & Dents: Caused by moving furniture or heavy tools.
- Water Damage: Risk from spilled liquids or cleaning processes.
- Slips & Falls: Wet or dusty floors can be hazardous.
- Fatigue: Hard floors can cause joint and muscle strain during prolonged standing.
Flooring Options: Pros, Cons, and Costs
Concrete (Sealed or Painted)
Pros: Exceptionally durable, easy to clean, and highly resistant to stains and scratches. Can be customized with paint, epoxy, or decorative finishes.
Cons: Very hard underfoot; may require anti-fatigue mats. Susceptible to cracking if improperly installed. Can feel cold in winter months.
Estimated Cost: $2-$10/sq ft (DIY painting or sealing to professional epoxy coating).
Vinyl Plank or Tile
Pros: Water-resistant, resilient, and available in a vast range of colors and patterns. Softer and warmer than concrete. Simple click-lock systems make DIY installation feasible.
Cons: Can be punctured by sharp objects. Cheaper vinyl may off-gas VOCs.
Estimated Cost: $2-$7/sq ft.
Rubber Flooring
Pros: Excellent for comfort and slip resistance. Reduces noise, absorbs shock from dropped items, and is easy to clean. Available as tiles or rolls.
Cons: Can be more expensive. Some rubber products may have an odor when new. Limited style options.
Estimated Cost: $3-$10/sq ft.
Laminate Flooring
Pros: Affordable, easy to install, and available in many designs. Provides some cushioning and is easy to sweep.
Cons: Vulnerable to water damage. Surface can scratch or chip.
Estimated Cost: $1-$4/sq ft.
Cork Flooring
Pros: Eco-friendly, naturally cushioned, and warm underfoot. Reduces fatigue and is relatively quiet.
Cons: Prone to dents from heavy furniture. Needs sealing to prevent stains or water infiltration.
Estimated Cost: $3-$8/sq ft.
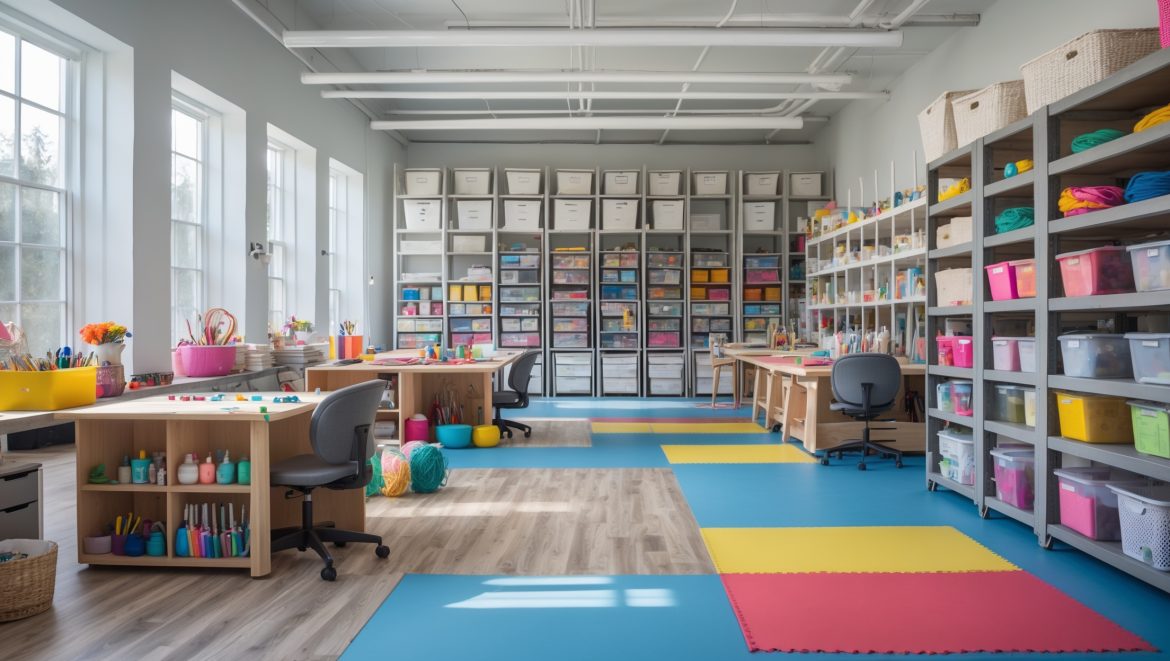
Interlocking Foam Tiles
Pros: Inexpensive, easy to install, and replaceable. Excellent for temporary studios or renters. Soft and forgiving for long crafting sessions.
Cons: Not as durable as other options. Can be damaged by sharp tools or heavy furniture. May absorb stains if not sealed.
Estimated Cost: $1-$4/sq ft.
Safety and Comfort Considerations
Reducing Slips and Trips
Choose flooring with a textured or matte finish to minimize slips, especially if you work with wet media. Place non-slip mats at entrances and near sinks. Keep walkways clear of clutter, and use area rugs with grippy backings—avoid loose or curled corners.
Supporting Long Hours on Your Feet
If your chosen floor is hard (concrete, tile, or laminate), invest in anti-fatigue mats for workstations. These mats relieve pressure on your feet, knees, and back. Rubber and cork provide built-in cushioning, making them ideal for artists who stand for extended periods.
Protecting Against Spills and Stains
Seal porous floors like concrete or cork to prevent stains. On vinyl and laminate, promptly wipe up spills to avoid warping or discoloration. Consider clear floor covers in high-risk zones, such as under paint stations.
Step-by-Step: DIY Installation Tips for Popular Flooring Types
Sealing or Painting Concrete
- Clean and degrease the floor thoroughly.
- Patch any cracks with concrete filler.
- Apply a concrete primer if painting.
- Paint with specialty concrete paint, or roll on an epoxy coating for extra durability.
- Seal with a clear topcoat for stain resistance.
Installing Vinyl Plank Flooring
- Acclimate planks in the studio for 48 hours.
- Clean and level the subfloor.
- Lay underlayment if required.
- Start at one wall, snapping planks together in staggered rows.
- Trim to fit edges, and leave a small expansion gap at walls.
- Install baseboards or quarter-round to cover gaps.
Laying Rubber Tiles or Rolls
- Sweep and clean the subfloor.
- Lay out tiles or rolls to acclimate and plan seams.
- Trim as needed with a sharp utility knife and straightedge.
- Interlock tiles or use adhesive for rolls (as per manufacturer instructions).
- Press seams tightly together.
Foam Tiles for Temporary Setups
- Lay tiles edge-to-edge, starting in one corner.
- Trim to fit with scissors or a utility knife.
- Leave a slight gap at the walls for expansion.
- Replace damaged tiles as needed.
Creative Finishes and Upgrades
Custom Painted Floors
Transform concrete or wood with floor paints and stencils. Use geometric patterns, faux rugs, or color-blocking to define work zones. Always seal painted surfaces for durability.
Incorporating Inlays and Borders
Add visual interest with vinyl or wood inlays. Contrasting borders can help delineate tool zones or add a professional touch to your studio.
Area Rugs and Mats
Use washable area rugs to introduce color and comfort. Choose low-pile, non-slip options to avoid tripping hazards. Place mats under rolling chairs, utility carts, or messy workstations for extra protection.
Maintenance Best Practices
- Regular Cleaning: Sweep or vacuum frequently to remove dust and debris. Mop with a slightly damp mop and a mild cleaner suitable for your flooring type.
- Immediate Spill Cleanup: Address spills quickly to prevent stains and water damage.
- Furniture Pads: Place felt pads or rubber coasters under furniture legs to prevent scratches and dents.
- Mat Rotation: Occasionally move mats and rugs to prevent uneven wear and fading.
- Inspect for Damage: Check periodically for cracks, lifted edges, or worn spots, and repair promptly to prevent accidents.
Budgeting and Planning Your Flooring Project
Measuring and Estimating Costs
Measure the square footage of your studio (length x width). Add 10% for waste and cutting errors. Factor in underlayment, adhesives, trims, and tools if DIYing. Don’t forget to budget for anti-fatigue mats or area rugs.
Saving with DIY Installation
Many flooring types are designed for easy DIY installation, saving significant labor costs. Watch manufacturer videos and read instructions carefully. If you have unique obstacles (uneven subfloors, moisture issues), consult with a professional before proceeding.
Flooring for Specialized Craft Needs
Messy Media: Paint, Resin, and Glue
Go for sealed concrete, vinyl, or rubber, which resist staining and are easy to wipe clean. Avoid carpet or unsealed wood. Use disposable drop cloths for extra messy projects.
Textile and Fabric Crafts
Choose smooth, dust-free flooring to minimize fiber accumulation. Laminate or vinyl work well. Avoid static-prone surfaces if you work with delicate fibers.
Woodworking and Heavy Equipment
Opt for concrete or heavy-duty rubber to absorb impact and support weight. Anchor equipment securely and use mats to catch sawdust for easier cleanup.
Eco-Friendly and Sustainable Choices
Bamboo and Cork
Both are renewable and offer comfort underfoot. Ensure proper sealing for moisture-prone areas.
Recycled Rubber
Often made from reclaimed tires, recycled rubber tiles provide durability and eco-credibility. Check for low-VOC certifications.
Flooring Mistakes to Avoid
- Ignoring Subfloor Prep: Skipping cleaning or leveling can result in uneven floors and premature wear.
- Underestimating Traffic: Choose materials rated for commercial or heavy residential use in high-activity studios.
- Choosing Looks Over Practicality: A beautiful but impractical floor can quickly become a source of frustration and extra maintenance.
- Neglecting Safety: Glossy finishes or loose rugs can become slip hazards. Prioritize texture and secure installation.
Conclusion: Build Your Creative Foundation
Your craft studio flooring does more than cover the ground—it’s the literal foundation for your creative journey. By considering your unique needs, preferred materials, and maintenance habits, you can create a space that is safe, comfortable, and uniquely yours. Durable options like sealed concrete, vinyl, or rubber stand up to years of artistry, while creative finishes and smart zone planning add inspiration to every step. Don’t overlook the importance of anti-fatigue mats and slip-resistant surfaces for long-term health and safety. With the right planning and a touch of DIY spirit, your studio’s floor will support your projects and your passion for years to come. Investing in good flooring isn’t just a practical decision—it’s an act of self-care for every crafter, maker, and creative soul. Step confidently into your studio, knowing you’ve built a beautiful, functional foundation for your imagination to soar.


For renters who can’t make permanent changes, are there temporary flooring solutions that address both safety and easy cleanup, especially for spill-prone studios?
Absolutely—there are several renter-friendly flooring options that work well in craft studios. Interlocking foam or rubber tiles are popular because they cushion against falls, absorb impact, and can be easily wiped clean. Vinyl floor mats or large area rugs with non-slip backing are also good for protecting floors from spills and mess, and you can roll them up when you move.
Could you give more details about using anti-fatigue mats with concrete or hard floors? Are there specific types that work best in a craft studio setting where spills and stains happen often?
Anti-fatigue mats are a great choice for concrete or hard floors in craft studios, as they cushion your feet and reduce strain during long work sessions. For areas prone to spills and stains, look for mats made of waterproof materials like rubber or PVC, which are easy to wipe clean. Textured or beveled-edge designs help prevent slips, making them practical and safe for creative environments.