Introduction: Why Seasonal Maintenance Matters in Your DIY Craft Studio
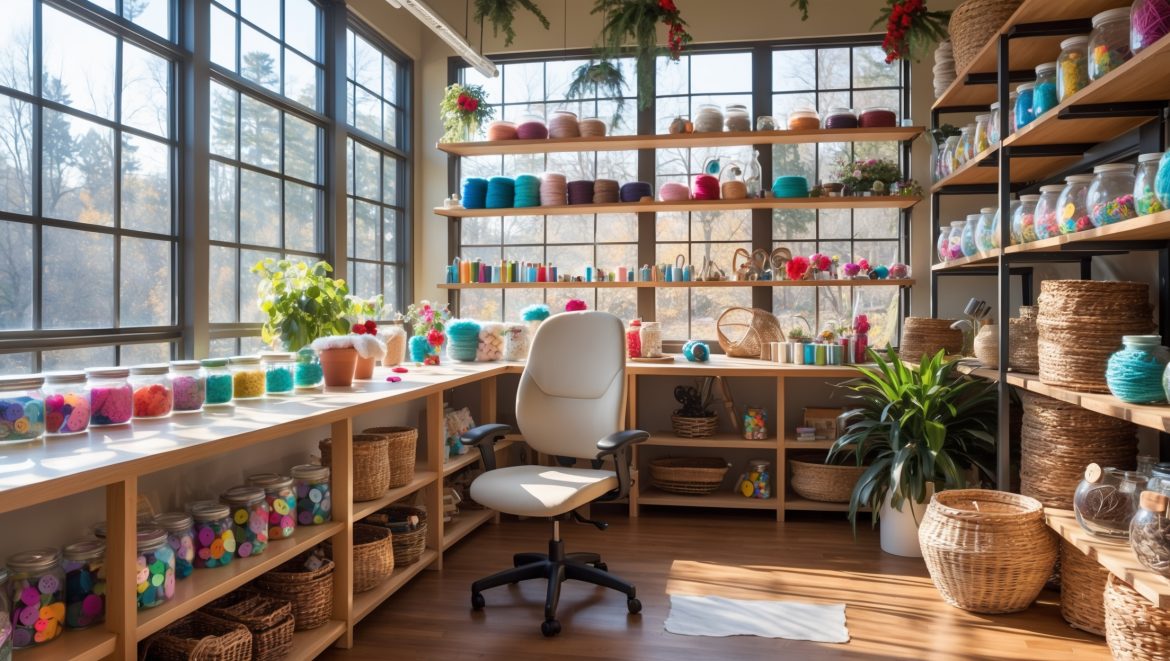
If you’re passionate about DIY, crafts, and creative living, your craft studio is more than just a workspace—it’s the heart of your inspiration and productivity. But even the most thoughtfully designed studio needs regular care to stay safe, efficient, and invigorating. That’s where a seasonal maintenance checklist comes in. Unlike general cleaning routines or sporadic reorganizations, a structured seasonal approach helps you anticipate the unique challenges each time of year brings. From fluctuating temperatures and humidity to changing light conditions and dust, every season impacts your supplies, equipment, and comfort in subtle (and sometimes not-so-subtle) ways.
Neglecting seasonal upkeep can lead to warped supplies, malfunctioning tools, lingering allergens, or even safety hazards. On the flip side, a proactive maintenance ritual keeps your creative flow uninterrupted, protects your investments, and ensures you’re always ready to dive into your next project. Whether you’re a weekend crafter or running a full-fledged handmade business, this comprehensive, season-by-season checklist will help you keep your DIY craft studio in peak condition—so you can focus on what you love: making, experimenting, and creating.
Spring: Renew and Refresh
1. Deep Clean and Declutter
- Surface Cleaning: Dust and wipe all work surfaces, shelves, and storage units. Pay special attention to corners and behind heavy equipment, where dust can accumulate over winter.
- Window Washing: Clean windows inside and out to maximize natural light as days lengthen. Remove any residue that may have built up from condensation or winter weather.
- Declutter Supplies: Sort through craft supplies, tools, and materials. Donate, recycle, or discard anything you haven’t used in the past year.
2. Inspect for Moisture and Mold
- Check for Leaks: Examine ceilings, windows, and floors for any signs of water intrusion from melting snow or spring rains.
- Address Mold: If you spot any mold, clean with appropriate products and increase ventilation. Consider using a dehumidifier if your studio is prone to dampness.
3. Update Your Organization System
- Review Storage: Reassess your storage bins, racks, and organizers. Are supplies easy to find and access? Reorganize for efficiency and visibility.
- Label Everything: As you refresh your organization, update or add labels to bins, drawers, and containers.
4. Prepare for Warmer Weather
- Check Ventilation: Clean or replace air filters in any HVAC or air purification systems. Open windows for natural ventilation when possible.
- Tune Up Fans: Dust and test ceiling or portable fans to ensure they’re ready for higher temperatures.
Summer: Stay Cool, Safe, and Inspired
1. Manage Heat and Humidity
- Monitor Temperature: Use a digital thermometer and hygrometer to track studio climate. Prolonged high heat can warp paper, adhesives, and some paints.
- Use Dehumidifiers or AC: If humidity is high, run a dehumidifier to prevent mold and protect sensitive supplies. Air conditioning also helps maintain a stable environment.
2. Pest Prevention
- Seal Entry Points: Inspect baseboards, windows, and doors for gaps. Seal any cracks to keep out insects and rodents, which are more active in summer.
- Store Food Properly: If you keep snacks or drinks in your studio, use sealed containers and clean up crumbs or spills promptly.
3. Sunlight and UV Protection
- Shield Sensitive Supplies: Store paints, fabrics, and papers away from direct sunlight to prevent fading and deterioration.
- Install UV-Filtering Film: Consider applying UV-filtering film to windows to protect your materials while maintaining bright, natural light.
4. Fire Safety Check
- Inspect Electrical Cords: High temperatures can exacerbate wear on cords and plugs. Replace or repair any frayed or damaged wires.
- Test Smoke Detectors: Replace batteries and test all alarms. Ensure fire extinguishers are accessible and up to date.
Autumn: Prepare for Cozy Creativity
1. Organize for Seasonal Projects
- Rotate Supplies: Bring autumn and winter project materials (e.g., yarns, holiday décor supplies) to the forefront. Store summer-specific items for later.
- Inventory Restock: Take stock of consumables (adhesives, paper, paints) and order in advance for upcoming holiday crafting rushes.
2. Inspect for Drafts and Insulation Needs
- Seal Drafts: Use weatherstripping or caulk to seal windows and doors. Address any insulation issues to maintain comfort and energy efficiency.
- Check for Pests: As temperatures drop, rodents may seek shelter. Look for signs of entry and set traps or deterrents as needed.
3. Lighting Adjustments
- Replace Bulbs: As days shorten, ensure all task and overhead lighting is bright and working. Clean fixtures for maximum luminosity.
- Evaluate Color Temperature: Consider switching to bulbs that mimic natural daylight to combat the gloom of shorter days and boost mood.
4. Safety for Heating Equipment
- Check Space Heaters: If using portable heaters, inspect for frayed cords and clean dust from vents. Never leave heaters unattended.
- Clear Flammable Materials: Keep paper, fabric, and solvents away from any heat source.
Winter: Protect and Preserve
1. Prevent Freezing and Moisture Damage
- Monitor Temperature: Ensure your studio stays above freezing. Use insulated curtains or window coverings to retain heat.
- Check for Condensation: Wipe windows and cold surfaces regularly to prevent moisture buildup, which can damage supplies and foster mold.
2. Electrical Safety
- Avoid Overloading Circuits: With increased use of lights and heaters, be mindful not to overload outlets. Use surge protectors where possible.
- Test Backups: If you use backup power for essential tools, test batteries or generators in advance.
3. Focus on Comfort
- Check Seating and Ergonomics: As you spend more time indoors, ensure chairs, mats, and work surfaces are comfortable and supportive.
- Keep Warm Accessories Handy: Stock up on cozy throws, fingerless gloves, and a hot drink station to make winter crafting inviting.
4. Reflect and Plan
- Review the Year: Take time to assess what worked well in your studio and what needs improvement. List projects completed and set goals for the upcoming year.
- Plan Major Upgrades: Winter is a great time to research and plan larger updates or reorganization for spring.
Year-Round Essentials: Tasks for Every Season
1. Tool and Equipment Maintenance
- Inspect and Clean: Wipe down and oil tools as needed. Sharpen blades and replace worn parts promptly.
- Test Electrical Equipment: Check cords, switches, and moving parts for safe operation.
2. Supply Inventory Management
- Track Usage: Keep a running inventory of essential supplies. Note expiration dates for glues, paints, and specialty materials.
- Safe Storage: Store chemicals and flammable materials in designated, ventilated areas, away from heat sources and children.
3. Safety and Emergency Planning
- Update First Aid Kit: Restock bandages, antiseptics, and other essentials every season.
- Review Emergency Exits: Ensure paths are clear and that everyone knows what to do in an emergency.
- Maintain Emergency Contacts: Post important phone numbers visibly in your studio.
Printable Seasonal Maintenance Checklist
To make your studio care routine even easier, consider creating a printable checklist based on the sections above. Laminate it and use a dry-erase marker to tick off tasks each season. Keep it pinned on your studio wall as a visual reminder.
Conclusion: Protecting Your Creative Sanctuary
Seasonal maintenance is about more than keeping your DIY craft studio tidy—it’s about safeguarding your creative sanctuary, protecting your valuable investments, and ensuring your workspace always inspires rather than hinders you. By following a structured, season-by-season approach, you’ll minimize disruptions, prevent costly repairs, and maintain an environment that supports your best work. Over time, these simple habits will become second nature, freeing up more energy for your creativity and less for troubleshooting preventable problems.
Remember, your craft studio is a reflection of your creative journey. Caring for it with the same attention and passion you bring to your projects will pay dividends in inspiration, productivity, and peace of mind. So print out your checklist, schedule your seasonal tune-ups, and enjoy a studio that works as hard for you as you do for your art. Happy crafting—year-round!


Do you have any suggestions for dealing with fluctuating humidity levels in a basement craft studio during the summer? I noticed my paper stock sometimes warps, but I’m not sure what’s the best preventative step.
Fluctuating humidity is a common challenge in basement studios, especially for paper supplies. Using a dehumidifier during the summer can help regulate moisture and protect your paper stock. Storing paper in airtight containers or resealable plastic bins adds another layer of defense. Also, keep your craft supplies off the floor to reduce exposure to dampness.
I noticed the checklist suggests donating or recycling unused supplies every year. Is there a good way to keep track of what I actually use so I don’t accidentally get rid of something I might need later?
A practical way to track your craft supplies is to label bins or shelves with the date you last used the items inside. You can also keep a simple inventory list—either on paper or digitally—marking each time you use a specific supply. This helps you identify which materials are truly unused before deciding what to donate or recycle.
If I run my craft studio out of my home, are there any specific seasonal safety checks I should be doing besides the standard cleaning and decluttering?
Absolutely, in addition to cleaning and decluttering, check your smoke detectors and fire extinguishers each season, especially if you use heat tools or flammable supplies. Make sure electrical outlets and cords are in good condition, and consider inspecting for moisture or mold, especially in basements or garages. Good ventilation is key if you’re using paints or adhesives, so check that windows or fans are working properly.
Can you elaborate on how to balance deep cleaning and decluttering without accidentally discarding supplies that might only be used seasonally or for specialized projects?
When deep cleaning and decluttering, it helps to set aside a dedicated storage area or labeled bins for supplies used only seasonally or for special projects. Review items before discarding and ask if you have a planned use or specific timeframe in mind. This way, you keep your space organized without losing materials you’ll need in the future.
What would you recommend as the best way to deal with dust accumulation behind heavy equipment if moving things isn’t easy? Is there a tool or method you find works well for tight spots?
For dust behind heavy equipment that’s hard to move, a long-handled duster or a flexible vacuum attachment works well. Telescoping dusters can reach tight spaces, and some vacuum attachments are designed to fit into narrow gaps. If possible, use a crevice tool on your vacuum for those really tricky spots.
Do you have any advice on how to manage temperature and humidity in a basement craft studio, especially during the humid summer months mentioned in the checklist?
Managing temperature and humidity in a basement craft studio is crucial for both comfort and protecting your materials. Consider using a dehumidifier to keep humidity in check, especially during summer. Adding fans or a portable air conditioner can help regulate temperature. Also, store sensitive materials in airtight containers to prevent moisture damage.
I noticed the checklist recommends checking for water leaks as the seasons change. Are there any particular signs or problem areas that crafters often overlook when doing this inspection?
Some areas crafters often overlook are under sinks, around windows, and behind storage shelves where water stains or musty smells can indicate leaks. Also, check ceilings for discoloration and inspect corners where walls meet the floor, as small leaks can go unnoticed there. Don’t forget to examine around your water heater or utility sinks if you have them in your studio.
I usually try to declutter during spring, but I struggle to know what to keep or toss. Any tips on deciding which craft supplies are truly worth hanging onto versus donating?
When sorting craft supplies, keep items you’ve used in the past year, basic tools, and materials for your favorite projects. If something is damaged, duplicated, or you can’t remember the last time you used it, consider donating it. Ask yourself if a supply truly inspires you or matches your future project plans before deciding to keep it.
You mention adjusting for changing light conditions with the seasons. Do you have suggestions for affordable ways to boost studio lighting in the winter when natural light is limited?
To improve your studio lighting during winter, try using daylight-balanced LED bulbs, which provide bright, natural light at a low cost. Clip-on lamps or portable desk lamps can be positioned where you need extra brightness. Also, consider using light reflector boards or white foam boards to bounce available light around your workspace.
For someone on a tight budget, what are the most important seasonal maintenance steps that you shouldn’t skip, even if you can’t do the full checklist every time?
If you’re on a tight budget, focus on decluttering your workspace, checking for moisture or mold, and ensuring good ventilation each season. These basics help protect your supplies and keep your studio functional. Regularly wiping down surfaces and inspecting for pests are also key steps that require little to no cost.
How often should I be inspecting my tools for malfunctioning issues, especially as the seasons change? Is there a best practice for checking electronic tools after winter?
It’s a good idea to inspect your tools at the start of each new season. For electronic tools, especially after winter, let them reach room temperature before plugging them in. Check for frayed cords, rust, or moisture, and test each function to make sure everything works safely before use.
You suggest cleaning behind heavy equipment as part of the spring checklist. Do you have any tips for safely moving larger, awkward tools without damaging floors or injuring yourself?
To move large or awkward tools safely, clear the area first and get help if needed. Use furniture sliders or thick blankets under the equipment to protect your floors and make sliding easier. Always lift with your legs, not your back, and avoid twisting. If a tool is especially heavy, consider using a dolly or hand truck.