
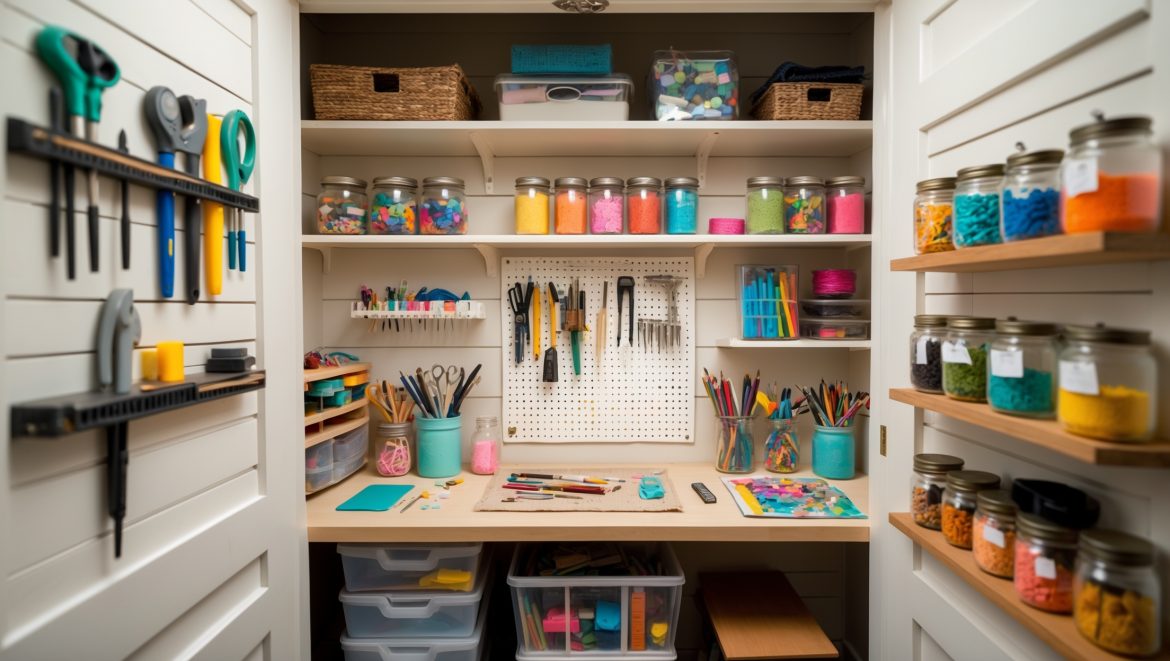
Are you passionate about crafting but find yourself limited by space? Many creative enthusiasts dream of a dedicated craft area but are held back by the lack of an extra room. The good news is that you don’t need a sprawling studio to unleash your creativity. With a bit of ingenuity, even the most overlooked corners of your home—like an unused closet—can be transformed into a highly functional DIY craft nook. This approach not only maximizes your living space but also carves out a dedicated zone for your projects, helping you keep your creative supplies organized and your inspiration flowing.
In this comprehensive guide, we’ll walk you step-by-step through the process of reclaiming a forgotten closet and turning it into a practical, inspiring craft nook. We’ll cover essential planning, smart storage solutions, a detailed cost breakdown, necessary tools and materials, and safety considerations. Whether you’re a beginner or an experienced crafter, this project is an excellent way to create a tailor-made workspace that fits your needs—and your budget. Let’s get started and unlock the creative potential hiding behind your closet door!
Why Choose a Closet for Your DIY Craft Nook?
Closets are often underutilized, filled with forgotten items or simply left empty. Repurposing a closet offers several unique advantages:
- Dedicated Space: Establishes a clear boundary for your crafting activities, minimizing mess in shared living areas.
- Customizable: Closets come in various shapes and sizes, allowing you to design a nook tailored to your specific projects and storage needs.
- Concealable: When not in use, simply close the door to tidy up instantly—perfect for maintaining a clutter-free home.
- Cost-Effective: Utilizing existing space eliminates the need for costly renovations or additions.
Step 1: Assessing and Preparing Your Closet
Evaluate the Space
Begin by thoroughly assessing the closet you wish to transform. Measure its width, depth, and height. Take note of any built-in shelves, hanging rods, electrical outlets, lighting fixtures, and ventilation.
- Is it a reach-in or walk-in closet?
- Does it have a door that can close, or is it an open alcove?
- Are there any structural elements (like HVAC ducts or plumbing) that you need to work around?
Clear Out and Clean
Remove everything from the closet. This includes clothes, boxes, and any old shelving that won’t serve your new crafting purpose. Give the space a thorough cleaning—dust, vacuum, and wipe down all surfaces. If the walls are dingy, consider giving them a fresh coat of paint in a light, inspiring color to brighten the nook.
Step 2: Planning Your Craft Nook Layout
Define Your Crafting Needs
What type of crafts do you do most often? Your layout should reflect your primary activities. For example, if you sew, you’ll need space for a sewing machine and fabric storage. If you paint, a sturdy work surface and accessible brush storage are essential. Make a list of your “must-haves” and “nice-to-haves” for the nook.
- Work surface size and height
- Tool and supply storage (open shelves, closed cabinets, pegboards)
- Lighting needs
- Power access for tools or electronics
- Ergonomic seating
Sketch Your Layout
Using graph paper or a digital tool, sketch the closet’s dimensions and your proposed layout. Mark where you’ll place shelves, a desk or workbench, lighting fixtures, and organizers. Keep in mind vertical storage—using wall space is key in small nooks.
Step 3: Budgeting and Cost Breakdown
Transforming a closet into a craft nook doesn’t have to break the bank. Here’s a sample budget for a modest 4’x2′ reach-in closet conversion:
- Paint and minor repairs: $30
- Lighting fixture/LED strips: $25–$60
- Compact desk/work surface: $40–$120 (DIY or prefab)
- Shelving units: $30–$80
- Pegboard and hooks: $20–$40
- Stackable bins/jars: $15–$35
- Chair or stool: $30–$70
- Power strip/cord management: $10–$20
- Total estimated cost: $200–$450
Costs can be lowered by upcycling furniture, shopping secondhand, or tackling more DIY projects (like building your own desk or shelves from plywood).
Step 4: Essential Tools and Materials
- Measuring tape and level
- Electric drill and screwdriver
- Stud finder (for mounting shelves securely)
- Wall anchors and screws
- Pegboard and mounting hardware
- Paint, roller/brush, drop cloth
- Compact desk or DIY countertop
- Shelving material (prefab or custom-cut lumber)
- Storage bins, baskets, jars
- Adhesive LED strip lights or clamp-on lamps
- Cord management accessories (cable ties, clips)
- Comfortable chair or stool
Step 5: Installing Lighting
Good lighting is critical in a small craft space. Most closets have limited or no built-in lighting. Here’s how to address it:
- LED Strip Lights: Easy to install, low-heat, and energy-efficient. Mount under shelves or along the ceiling.
- Clip-on Lamps: Attach to shelves or desk edges for targeted illumination.
- Battery-Powered Puck Lights: Ideal if wiring is not available; mount with adhesive.
- Don’t forget safety: Use only UL-listed fixtures and never overload outlets.
Step 6: Building and Installing Storage Solutions
Maximize Vertical Space
Install shelves above your work surface to store infrequently used items. Adjustable shelving lets you change the configuration as your needs evolve.
Pegboards and Tool Racks
Pegboards are perfect for hanging scissors, rulers, thread spools, brushes, and other tools. Use a combination of hooks, baskets, and magnetic strips to customize for your supplies.
Under-Desk Storage
Use rolling carts or stackable drawers under your desk to keep essentials within reach but off your work surface.
Small Parts Organization
Clear jars, divided boxes, or modular bins are excellent for beads, buttons, fasteners, and other small items. Label everything for quick access.
Step 7: Assembling Your Work Surface
If your closet is deep enough, install a desk or shallow table. For very small closets, a wall-mounted folding desk or a custom-cut countertop on shelf brackets works wonders. Ensure the surface is sturdy and the right height for your primary activity (typically 28–30 inches for sitting, 36 inches for standing work).
Step 8: Ergonomics and Comfort
- Choose a chair or stool that fits under your desk and provides adequate support.
- Add a small anti-fatigue mat if you’ll stand to work.
- Install a small fan if your closet tends to get stuffy, but ensure proper air circulation.
- Consider a footrest or cushion for extended sessions.
Step 9: Safety and Electrical Considerations
- Do not overload outlets—use a surge-protected power strip.
- Keep cords tidy and out of walkways to prevent tripping.
- Store flammable items (like solvents or spray paint) elsewhere if your closet lacks ventilation.
- Install a small smoke detector if you use electrical tools or hot glue guns.
Step 10: Personalizing and Decorating Your Craft Nook
Add personal touches to make the space inviting and inspiring. Hang a pinboard for ideas, display your favorite finished projects, or use decorative containers for supplies. Choose a color scheme that sparks creativity—soft pastels for calm, bright hues for energy, or neutrals for focus.
Case Study: A Real-Life Closet Craft Nook Makeover
Let’s look at how a typical reach-in closet was transformed on a $300 budget:
- Before: A 4’x2′ closet with a single shelf and clothing rod, filled with boxes and old coats.
- After:
- Walls painted soft mint green to brighten the space.
- Rod removed; two adjustable white shelves installed for supplies.
- Pegboard wall added with hooks for scissors, tape, and rulers.
- Salvaged kitchen countertop cut to size for a sturdy work surface.
- LED strip lights mounted under shelves for even illumination.
- Stackable bins and glass jars organized by project type.
- Compact rolling cart under the desk for ongoing projects.
- Small folding stool tucks away when not in use.
The result: a cheerful, efficient nook that makes crafting easy and cleanup a breeze!
Maintenance Best Practices
- Schedule monthly decluttering sessions to keep supplies in check.
- Wipe down surfaces and shelves regularly to avoid dust buildup.
- Periodically check electrical cords and lighting for wear or damage.
- Rotate supplies seasonally to ensure everything is fresh and usable.
- Refine your storage as your crafting interests change—your nook should evolve with you!
Conclusion: Unlocking Creativity in Small Spaces
Transforming an unused closet into a functional DIY craft nook is a smart, satisfying project for any creative enthusiast. By reclaiming forgotten space, you gain a dedicated area to pursue your hobbies, keep your supplies organized, and express your personality. With thoughtful planning, budget-friendly solutions, and a focus on ergonomics and safety, you can create a workspace that rivals any full-sized studio—right behind a closet door.
This project is not just about maximizing square footage; it’s about investing in your creative journey. An efficient, inspiring craft nook can boost your productivity and make every project more enjoyable. Plus, its compact nature encourages tidiness, intentionality, and regular refreshes as your interests grow. Whether you’re a seasoned maker or a curious beginner, your new craft nook is sure to become a favorite sanctuary for imagination and making.
Ready to start? Open that closet door, envision the possibilities, and let your transformation begin. The next masterpiece might be just a few feet—and a little DIY magic—away!


Do you have any tips for adding extra lighting inside a closet for a craft nook, especially if there isn’t a nearby electrical outlet? I’d like to avoid running extension cords if possible.
Battery-powered LED puck lights or light strips are a great solution for closets without outlets. They’re easy to install with adhesive backing and provide bright, focused light for your craft projects. Many come with remote controls or motion sensors for added convenience, so you won’t need to worry about hardwiring or using extension cords.