Introduction: Elevate Your Jewelry-Making with a Dedicated DIY Craft Studio
Jewelry making is a rewarding craft, offering endless possibilities for creativity, personal expression, and even side income. However, working from a cluttered dining table or makeshift corner often leads to lost tools, spilled beads, and unfinished projects. Establishing a dedicated DIY craft studio for jewelry making can transform both your creative process and finished results. Whether you’re a hobbyist or aspiring entrepreneur, a well-designed space will improve workflow, boost safety, and keep your tools—and inspiration—within easy reach. This guide delivers a practical, step-by-step approach to setting up a jewelry-making studio at home. You’ll discover essential tools and equipment, clever storage solutions, organization hacks, and crucial safety tips tailored to jewelry crafters. Ready to create a workspace that sparks joy and productivity? Let’s dive in and build your dream jewelry studio!
Choosing the Right Space for Your Jewelry Craft Studio
Evaluating Potential Studio Locations
Before you start moving in your bead boxes, it’s important to select a spot that meets your unique jewelry-making needs. Consider these factors:
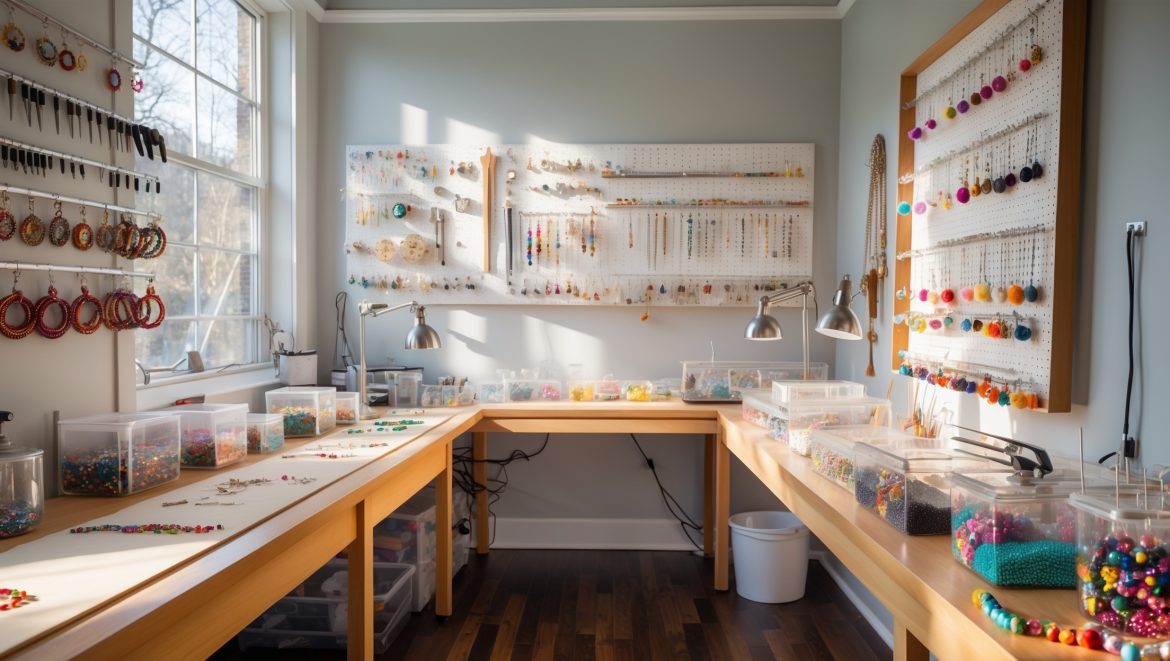
- Lighting: Natural daylight is ideal for color matching and detailed work. Choose a room with large windows if possible. If not, plan to supplement with task lighting.
- Ventilation: Proper airflow is important, especially if you’re soldering or using adhesives. Avoid small, unventilated spaces like closets unless you add a fan or window access.
- Noise and Distractions: Jewelry making requires concentration. Opt for a spot away from household noise and high-traffic areas.
- Power Outlets: You’ll need outlets for lamps, rotary tools, and possibly a soldering iron. Ensure easy access or plan for extension cords.
- Surface Durability: Jewelry work can scratch or dent delicate furniture. Choose a sturdy worktable and consider floor protection if working with metal or chemicals.
Studio Size and Layout Considerations
Jewelry making doesn’t require a massive room, but it does benefit from efficient layout. A space as small as 6×8 feet can suffice if planned well. Prioritize:
- Enough surface area for tools and materials
- Clear zones for assembly, finishing, and storage
- Room to move safely and access supplies without crowding
Essential Tools and Equipment for Jewelry Makers
Basic Hand Tools
Your tool kit will expand over time, but these are the must-haves for beginners and intermediate crafters:
- Round Nose Pliers: For making loops and curves in wire
- Chain Nose Pliers: Gripping, bending, and opening jump rings
- Flat Nose Pliers: Holding and shaping wire and metal
- Wire Cutters: For cleanly snipping wire, headpins, and beading cord
- Crimping Tool: Securing crimp beads and tubes
- Jeweler’s Saw: Cutting metal sheets or intricate designs
- Files and Sanding Sticks: Smoothing rough edges and shaping metal
- Bead Reamer: Enlarging and smoothing bead holes safely
Specialty Tools (Optional But Useful)
- Rotary Tool (Dremel): For drilling, polishing, and engraving
- Soldering Kit: Includes soldering iron, torch, and heat-resistant mat for metalwork
- Mallet and Bench Block: Flattening and texturing metal
- Mandrels: Shaping rings and bracelets to precise sizes
- Magnifying Lamp: For detailed work and eye strain prevention
Workspace Furniture and Fixtures
- Sturdy Workbench: Preferably with a solid top and ample legroom
- Comfortable, Adjustable Chair: Ergonomic support is essential for long projects
- Task Lighting: Adjustable LED desk lamps, ideally with color temperature control
- Wall-Mounted Pegboard or Magnetic Strips: Keep tools visible and within easy reach
- Anti-Fatigue Mat: If standing for extended periods
Smart Storage Solutions for Jewelry Supplies and Finished Pieces
Organizing Beads, Findings, and Wire
Keeping small supplies organized is crucial to prevent waste and frustration. Consider these storage ideas:
- Clear Stackable Bins: Store beads by color, size, or type for instant visibility
- Pill Organizers or Tackle Boxes: Perfect for tiny findings, clasps, and spacers
- Drawer Dividers: Prevent wire spools and stringing material from tangling
- Wall-Mounted Racks: Hang spools or tools to free up workspace
- Magnetic Strips or Trays: Secure loose pins, needles, and tiny metal tools
Securing and Displaying Finished Jewelry
- Velvet-Lined Trays: Prevent scratches and keep finished pieces sorted
- Jewelry Trees or Stands: Display necklaces and bracelets without tangling
- Clear Drawer Units: Store finished inventory dust-free but visible
- Wall Hooks: Hang frequently worn pieces or works in progress
Labeling and Inventory Management
- Label bins and drawers with contents and purchase dates
- Use spreadsheet or inventory apps to track supplies and sales
- Keep a restock list for essential items to avoid project delays
Studio Organization Hacks for Maximum Productivity
Workflow Zoning
Divide your studio into zones for each major activity:
- Design Zone: Sketchbook, inspiration board, color swatches
- Assembly Zone: Main workbench, tools, and most-used supplies
- Finishing Zone: Polishing, cleaning, packaging materials
Daily Tidy Routine
Spend 10 minutes at the end of each session to:
- Return tools to their designated spots
- Sweep up metal filings and bead spills
- Cover unfinished projects to prevent dust
Vertical and Under-Bench Storage
- Install shelves above your bench for seldom-used items
- Use rolling carts or drawer units beneath the worktable for bulk supplies
Safety Tips for Jewelry-Making Studios
Chemical and Tool Safety
- Ventilate: Always work near an open window or with a small fan when using adhesives, flux, or soldering chemicals
- PPE: Wear safety glasses when cutting or soldering, and gloves when handling chemicals
- Fire Safety: Keep a small fire extinguisher rated for electrical and chemical fires nearby
- First Aid Kit: Stock with bandages, burn cream, and eye wash
Electrical Safety
- Use surge protectors for all power tools and lamps
- Keep cords organized and off the floor to prevent tripping
- Unplug soldering irons and heat tools when not in use
Ergonomics and Eye Care
- Adjust chair and bench height to keep arms at a comfortable angle
- Use a magnifying lamp for detail work to reduce eye strain
- Take regular breaks to stretch and rest your hands and eyes
Budget Breakdown: Setting Up Your Jewelry Studio for Less
Essential Start-Up Costs
- Basic Tool Kit: $60–$150 depending on quality and brand
- Workbench/Table: $80–$300 (new or secondhand)
- Lighting: $30–$100 for quality task lamps
- Storage Solutions: $40–$120 (bins, racks, organizers)
- Chair: $50–$150 (ergonomic)
Optional Upgrades
- Rotary Tool: $50–$120
- Soldering Kit: $40–$200
- Magnifying Lamp: $30–$80
- Specialty Storage: $20–$60 per unit
Saving Money on Supplies
- Buy used furniture and tools where possible
- Repurpose household items (muffin tins for bead sorting, spice racks for jars)
- Shop sales and clearance for storage bins and organizers
Maintaining Your Jewelry Studio: Long-Term Tips
Regular Cleaning
- Wipe down surfaces weekly to remove dust and metal debris
- Vacuum or sweep floors to prevent bead loss and tripping hazards
- Check tool condition monthly—clean, sharpen, and oil as needed
Supply Restocking and Inventory Control
- Set a calendar reminder to audit supplies every quarter
- Rotate older beads and findings to the front
- Dispose of expired adhesives and chemicals safely
Tool Maintenance
- Store pliers and cutters in dry areas to avoid rust
- Sharpen blades and files as needed
- Replace worn or unsafe tools promptly
Inspiring Your Creativity: Personalizing Your Jewelry Studio
Decor and Inspiration Boards
- Add a corkboard or magnetic board for sketches, color palettes, and inspirational images
- Display favorite finished pieces or works-in-progress for motivation
Music and Ambiance
- Set up a small speaker for music or podcasts
- Diffuse calming essential oils if desired (away from chemicals)
Showcasing Your Work
- Install shelves or shadow boxes for your proudest designs
- Rotate displays with the seasons or as you complete new projects
Conclusion: Your Creative Haven Awaits
Setting up a dedicated jewelry-making studio at home is more than a practical improvement—it’s an investment in your creativity and well-being. With the right space, tools, organization, and safety measures, you’ll find yourself more inspired and productive than ever. No more searching for missing beads or working hunched over cramped surfaces—your new studio puts everything you need at your fingertips. As you settle in, you’ll notice your skills growing, your designs becoming more ambitious, and your enjoyment of the craft deepening. Remember, your studio is a living space: adapt it as your interests evolve, add new equipment as needed, and always prioritize comfort and safety. Whether you’re making gifts, selling online, or simply unwinding after a long day, your jewelry craft studio will become a cherished retreat. So gather your tools, organize your supplies, and start creating—your next masterpiece is just a sparkle away!


If my only available space is a corner of my living room, what are some creative ways to minimize distractions and separate my jewelry-making area from the rest of the household?
You can create a sense of separation in your living room by using a folding screen, a bookcase, or even a curtain to visually divide your workspace. Noise-canceling headphones or a small white noise machine can help minimize distractions. Keep your supplies organized in portable bins or drawers, so your jewelry-making area feels distinct and easy to tidy up when not in use.
Could you provide suggestions for safe ventilation options if my chosen studio area doesn’t have a window, especially for when I’m soldering or working with adhesives?
If your studio lacks a window, consider using a portable fume extractor or a soldering fume hood with a HEPA and activated carbon filter to capture harmful fumes. You can also install a ducted exhaust fan that vents directly outside through a wall or ceiling. Always work in well-ventilated conditions, even with these solutions, and wear a mask rated for chemical fumes for added protection.
For someone on a college student budget, what are the absolute essential tools you would prioritize first when setting up a jewelry-making studio at home?
If you’re on a budget, start with just a few basics: a set of pliers (round-nose, flat-nose, and wire cutters), a bead mat or towel to keep things from rolling away, jewelry wire or cord, and some basic findings like jump rings and clasps. These essentials will let you make a wide range of jewelry without a big investment.
When picking a worktable for jewelry making, what features or materials hold up best to sharp tools and possible spills? Any brands or styles you’ve found particularly durable for metal and bead work?
Solid hardwood tables like maple or beech are highly durable against sharp tools and accidental spills, and butcher block tops are especially popular. If you prefer metalwork, consider a steel-topped or stainless steel table for extra resilience. Brands like Seville Classics and IKEA’s sturdy workbenches have been reliable for many crafters. Make sure the surface is smooth, easy to clean, and stable for detail work.
Once the space is chosen and the essentials are set up, what are some organization hacks for keeping beads and tiny findings from getting mixed up or lost during projects?
To keep beads and small findings organized, try using clear compartmentalized containers or pill organizers so each type has its own space. Magnetic trays are useful for keeping metal pieces in place, while small resealable bags can keep specific project materials together. Labeling each section helps you quickly find what you need and prevents mix-ups.