Introduction: Why Every Craft Studio Needs a DIY Paint Booth
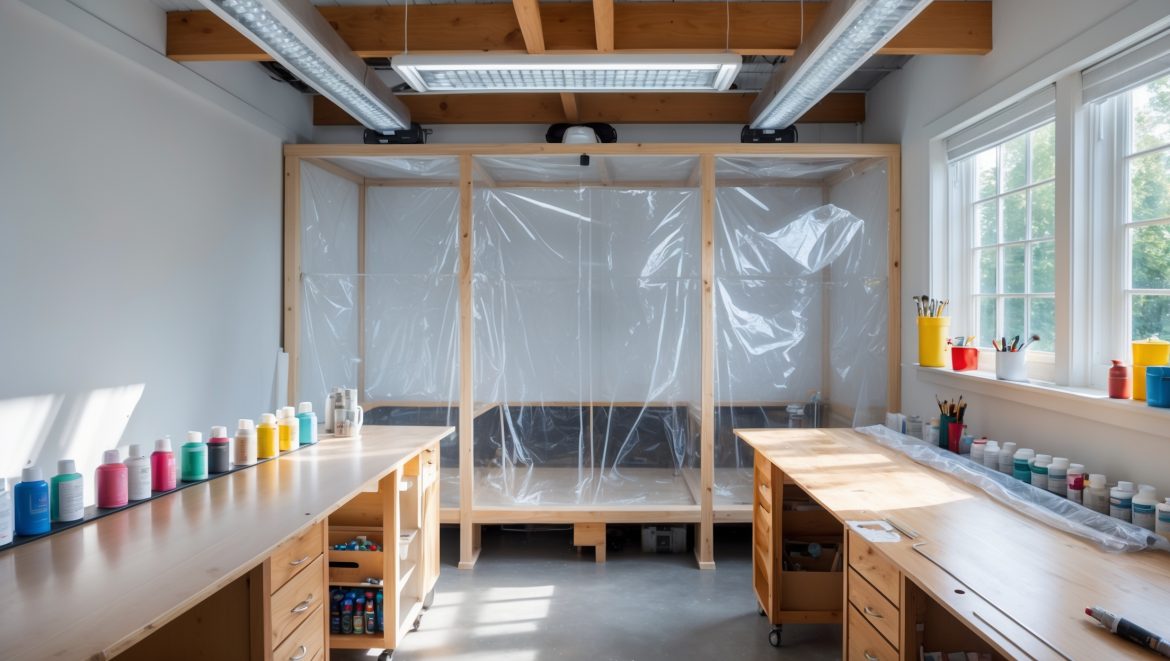
Whether you’re an avid crafter working with acrylics, enamels, spray paints, or resin, a dedicated paint booth is a game-changer for your creative process. It’s not just about keeping your studio clean—although that’s a huge perk—but about ensuring your health and safety. Paint fumes, overspray, and airborne particulates can quickly turn a creative haven into a hazardous environment. A well-designed DIY paint booth keeps your air clean, your projects dust-free, and your workspace organized, all while letting your creativity flourish. This comprehensive guide walks you through building a safe, efficient paint booth tailored to your craft studio. We’ll cover material selection, ventilation essentials, safe electrical setup, filtration methods, and workflow strategies—so you can tackle painting projects confidently, without risking your health or your hard work. No more makeshift cardboard boxes or relying on the weather outside. Let’s create a professional, permanent solution that fits your space, your budget, and your needs.
Planning Your DIY Paint Booth: Space, Scale, and Safety
Assessing Your Workspace
Before gathering materials, evaluate your available space. The ideal paint booth is large enough for your largest projects, but not so big that it dominates your studio. Consider:
- Location: Choose a spot with proximity to a window or exterior wall for easy ventilation. Avoid areas near open flames or heat sources.
- Size: For most craft studios, a booth measuring 3–4 feet wide, 2–3 feet deep, and 3–4 feet high is sufficient for small furniture, canvases, or models. Scale up if you work on larger pieces.
- Power Access: Ensure safe access to grounded outlets for lighting and ventilation equipment, but keep cords clear of wet areas.
Safety First: Key Requirements
- Fire Safety: Use only non-flammable materials for the frame and avoid flammable plastic sheeting. Keep a fire extinguisher rated for paint chemicals within reach.
- Ventilation: Design for strong airflow to remove fumes and particulates. Never spray-paint indoors without proper exhaust.
- PPE: Stock up on NIOSH-approved respirators, nitrile gloves, and eye protection. Make PPE use a non-negotiable habit.
Choosing Materials: Frame, Enclosure, and Filtration
Frame Options
Your frame needs to be sturdy, lightweight, and easy to assemble or disassemble for cleaning. Common choices:
- 1×2 or 2×2 Pine Lumber: Affordable, easy to cut, and strong enough for most small- to medium-sized booths.
- PVC Pipe: Lightweight, non-reactive, and simple to connect with slip fittings. Ideal for temporary or portable booths.
- Metal Conduit: For permanent, heavy-duty setups. More challenging to work with but extremely durable.
Enclosure Materials
- Clear Polycarbonate Sheets: Rigid, non-flammable, easy to clean. Best for permanent installations.
- Flame-Retardant Plastic Sheeting: Flexible, affordable, and available at hardware stores. Verify it’s rated for fire safety (ASTM E84 or similar).
- Canvas Drop Cloths: For a reusable, eco-friendly enclosure. Treat with fire retardant spray for added protection.
Secure the enclosure to the frame with strong clips, Velcro straps, or custom fasteners for easy replacement and cleaning.
Lighting Solutions
- LED Strip Lights: Energy efficient, low heat output, and easy to mount inside the booth for shadow-free illumination.
- Sealed Fluorescent Fixtures: For higher brightness, use fixtures rated for damp locations to avoid fire risk.
Filtration and Ventilation Materials
- Box Fan or Inline Duct Fan: Minimum 400 CFM for small booths; upsize for larger spaces. Choose models designed for chemical resistance and continuous use.
- Furnace or Paint Booth Filter: MERV 8–13 filters capture paint particulates. Change regularly—don’t skimp here.
- Ducting: Rigid or flexible aluminum ducting directs exhaust outside. Avoid plastic dryer duct, which can melt or catch fire.
- Vent Flap or Louver: Install on the exterior to prevent backdrafts and pest entry.
Step-by-Step DIY Paint Booth Construction
Step 1: Design and Measure
Sketch your booth layout. List all materials and tools required. Standard dimensions for a desktop booth are 36″ wide x 30″ high x 24″ deep, but adapt to your needs. Mark out the footprint in your studio to confirm fit and workflow access.
Step 2: Build the Frame
- Cut frame pieces to size, pre-drill holes to prevent splitting.
- Assemble the base and uprights using screws or PVC connectors. Reinforce joints for stability.
- Add cross-bracing to prevent wobble, especially if you’ll move the booth.
Step 3: Attach the Enclosure
- Stretch your enclosure material over the frame, securing tightly to minimize gaps.
- Leave one side (front or top) with a flap or Velcro closure for easy access.
- Add a clear polycarbonate window if you want to watch progress with the booth closed.
Step 4: Install Lighting
- Mount LED strips or fixtures along the booth ceiling or sides, keeping wiring outside the airflow path.
- Seal any penetrations with fire-resistant caulk to prevent paint buildup.
Step 5: Set Up Ventilation and Filtration
- Cut an opening in the back or roof panel for your exhaust fan. Size the hole to fit snugly.
- Secure the filter over the intake side of the fan using a filter bracket or tape.
- Attach ducting to the exhaust side, running it directly to a window or wall vent. Minimize bends for maximum airflow.
- Seal all joints with foil HVAC tape to prevent leaks.
- Install a vent flap outside to prevent drafts and pests.
Step 6: Final Safety Checks
- Test all electrical connections for safety. Use GFCI outlets where possible.
- Check for air leaks and ensure all enclosure seams are tight.
- Label the booth with a “No Open Flames” warning.
Efficient Workflow: Using Your Paint Booth Like a Pro
Prepping Projects for Painting
- Clean all items thoroughly before painting—dust and oil compromise results.
- Set up a turntable or lazy Susan inside the booth for even spray coverage.
- Use disposable liners, cardboard, or silicone mats to catch overspray and simplify cleaning.
Best Practices During Painting
- Always wear a respirator and gloves, even for brush painting with strong solvents.
- Start the fan several minutes before painting to establish airflow.
- Keep booth doors/flaps closed during spraying to contain overspray and fumes.
- Allow items to flash-dry inside the booth before handling.
Post-Painting Cleanup and Maintenance
- Wipe down booth surfaces after each session to prevent buildup.
- Change filters regularly (every 10–20 hours of use or sooner if clogged).
- Inspect fan motors for dust buildup and clean with compressed air as needed.
Advanced Upgrades for Serious Crafters
Automated Fan and Lighting Controls
Install a timer switch or smart plug to automate fan and lighting operation. This prevents accidentally leaving equipment running and saves energy.
Explosion-Proof Fans and Switches
If you work with highly flammable solvents or paints, upgrade to explosion-proof exhaust fans and sealed switches. This is especially important for professional or high-volume setups.
Temperature and Humidity Control
- Use a small heater or dehumidifier outside the booth to optimize paint drying conditions. Never place heating elements inside the booth!
- Monitor with a digital hygrometer/thermometer for consistent results.
Soundproofing for Shared Spaces
Add acoustic foam or cork board to the exterior booth walls to dampen fan noise, especially in apartments or shared studios.
Common Paint Booth Pitfalls—and How to Avoid Them
- Insufficient Ventilation: Fumes linger, causing health risks. Always size your fan for at least six air changes per minute.
- Poor Filter Maintenance: Clogged filters reduce airflow and allow particles to settle on your project.
- Using Flammable Plastic: Never use standard plastic sheeting—always verify flame-retardant ratings.
- Ignoring Electrical Safety: Avoid extension cords and keep all wiring outside the booth’s airflow and spray zone.
- Blocking Airflow: Don’t stack supplies or finished items near vents or filters.
Essential Maintenance Checklist
- Inspect enclosure seams and replace worn materials every 6–12 months.
- Test fan operation before every session.
- Replace filters as soon as you notice decreased airflow or visible clogging.
- Clean lighting fixtures to prevent dust buildup and fire risk.
- Check ducting for leaks, crimps, or blockages monthly.
Conclusion: Creating a Safe, Inspiring Space for Creative Growth
Investing in a well-constructed DIY paint booth is one of the smartest upgrades you can make to your craft studio. It’s not just about keeping dust and fumes at bay; it’s about protecting your health, ensuring professional-quality results, and providing the freedom to experiment with new techniques. With the right materials and careful planning, you can build a booth that fits your space, workflow, and creative ambitions. Remember, safety is never optional—use flame-retardant materials, ensure robust ventilation, and wear PPE every time you paint. Regular maintenance is key to keeping your booth running efficiently for years to come.
As you refine your setup, consider advanced upgrades like automated controls, soundproofing, and environmental monitoring. Your paint booth should evolve alongside your skills and projects. Most importantly, enjoy the peace of mind that comes from knowing you have a dedicated, safe space to let your ideas flourish—without compromise. Set up your booth, stock your supplies, and get ready to transform your creative process with confidence and clarity.


The article mentions using only non-flammable materials for the frame. Are there specific examples of affordable materials that meet this requirement, especially for someone working with a limited budget?
For a safe and budget-friendly paint booth frame, consider using metal conduit pipes or aluminum tubing, which are both non-flammable and relatively inexpensive at most hardware stores. Another affordable option is steel angle iron. All of these materials provide sturdy support and reduce fire risks compared to wood or PVC.
How long does it typically take to build a paint booth like the one you described, assuming I’m handy but only have a few hours on weekends?
If you’re handy and working just a few hours each weekend, building a DIY paint booth like the one described usually takes about 2 to 3 weekends. The main tasks—assembling the frame, installing plastic sheeting, setting up ventilation, and sealing—can generally be split across these sessions without feeling rushed.
Once the paint booth is built, do you have tips on how to keep the booth’s filters clean or how often they should be replaced, especially for someone who paints frequently?
For frequent painters, it’s best to check your booth’s filters after every major painting session. If you notice visible buildup, reduced airflow, or lingering odors, it’s time to clean or replace them. Generally, replace intake and exhaust filters every 20–30 hours of use or sooner if you see heavy accumulation. Regular vacuuming of prefilters and keeping the area dust-free can extend their life.
For someone on a tight budget, are there any cost-effective material options for building the frame that still meet the non-flammable safety requirements you recommend?
For a budget-friendly yet safe frame, consider using metal electrical conduit (EMT), which is affordable and non-flammable. Another option is repurposed steel pipes, often available at salvage yards. Avoid wood or PVC, since they are flammable. Assembly with metal corner connectors or clamps can also help keep costs down.
You mention needing grounded outlets for lighting and ventilation—are there any particular electrical safety tips or mistakes to avoid when setting up those components in a craft studio?
Absolutely, electrical safety is crucial when setting up your paint booth. Make sure all outlets are properly grounded and never overload circuits with too many devices. Use extension cords rated for your equipment, and keep cords and outlets away from paint fumes and moisture to reduce fire risk. Installing GFCI outlets can also add a layer of protection in your craft studio.
What should I do if my only available spot is far from any windows? Are there alternative ventilation setups that still keep things safe for indoor use?
If your space is far from windows, you can still create safe ventilation by using a portable exhaust fan with flexible ducting. Direct the ducting to lead fumes outside through a door or a small opening, like a dryer vent. Make sure to use a fan rated for flammable fumes and always check for air leaks to ensure safety indoors.
I’m mostly a weekend crafter and my studio is pretty tight on space. Would a paint booth around 3 feet wide be enough if I sometimes work on small furniture, or should I plan for more room?
A 3-foot wide paint booth should be sufficient for small furniture pieces like chairs or side tables, as long as you can comfortably move around the item and have good ventilation. If you occasionally tackle larger pieces, you might want a bit more width, but for most weekend crafting projects, 3 feet works well in a tight studio.
If my craft studio only has interior walls with no close windows, what ventilation setup would you recommend that still keeps fumes under control while following safety guidelines?
In your situation, installing an exhaust fan that vents directly to the outside is key for safety. You can run ducting from your paint booth through a wall or ceiling to reach an exterior vent. Be sure to use a fan rated for flammable fumes and add a filter to capture particles before air exits your space.
How long does the average DIY build take from gathering materials to finish, and are there parts of the process where I should expect possible delays?
Building a DIY paint booth typically takes a full weekend, around 8 to 12 hours total, from gathering materials to completion. The stages most likely to cause delays are sourcing specific filters or fans and waiting for adhesives or paint to dry. Planning ahead and double-checking your material list can help avoid most slowdowns.
I saw you recommend placing the paint booth near a window or exterior wall for ventilation. If my studio only has interior walls, what are some safe options for venting fumes without making permanent changes to the building?
If your studio only has interior walls, consider using a portable ventilation system with flexible ducting that can temporarily route fumes to a door or window when in use. You might also use a window fan insert that doesn’t require permanent installation, or a filtered air purifier designed for VOCs to help reduce fumes, but always check the purifier is rated for paint solvents.
When it comes to keeping the workspace dust-free, did you run into any issues with fine particulates settling on your projects? I’d love some troubleshooting tips for improving filtration during heavy spray paint use.
Fine particulates can definitely be a challenge, especially during heavy spray sessions. Using multiple layers of high-quality furnace filters at intake and exhaust points helps a lot. Make sure to seal any gaps around the booth frame and keep the area damp-mopped before each session to minimize airborne dust. Regularly replacing filters and maintaining positive airflow also make a big difference.
For families with curious kids around, are there any extra safety features or best practices you’d suggest to make the booth and its surroundings safer?
To keep kids safe around a paint booth, consider installing a lock on the booth door and keeping all paints and chemicals stored in high or locked cabinets. Use childproof electrical covers and make sure ventilation fans are out of reach. Always supervise children near the area and post clear ‘No Entry’ signs as an added reminder.
When it comes to selecting non-flammable materials for the frame, do you have specific product suggestions or minimum fire ratings that I should look for to stay compliant with safety recommendations?
For building a safe DIY paint booth frame, consider using metal like steel or aluminum, as these materials are naturally non-flammable. If you prefer wood, choose fire-retardant-treated lumber rated at least Class A (ASTM E84 or NFPA 255 standards). Always check local fire codes, as some areas may require specific certifications or additional fire-resistant coatings for compliance.
For small home studios where space is really tight, do you have tips on minimizing overspray and fumes if my only ventilation option is a small window? I want to keep the booth effective without modifying the room permanently.
For tight spaces with just a small window, use a compact booth made from lightweight materials that you can set up and take down easily. Position a box fan at the window with a furnace filter taped to it to pull fumes outside. Seal around the window with removable weatherstripping while painting, and always wear a respirator for added safety.
If my workspace is really tight, is there a recommended minimum booth size that still provides decent overspray protection and filtration without feeling too cramped during use?
For tight workspaces, a booth size of about 4 feet wide by 3 feet deep and 6 feet high can still provide good overspray protection and filtration. This size allows you to move around most small to mid-sized projects without feeling overly cramped, but be sure to have at least a foot of clearance on each side of your workpiece for airflow and safety.