Introduction: Why a Preventive Maintenance Calendar Matters for Your Craft Studio
For every DIYer and craft enthusiast, the studio is a sanctuary—a space where creativity thrives and hands bring ideas to life. But even the best-equipped craft rooms can quickly descend into chaos or inefficiency if neglected. Tools dull, machines break down, and clutter accumulates, all of which sap productivity and joy from your projects. The solution? A structured preventive maintenance calendar tailored to your studio’s unique needs.
This guide delivers a comprehensive, actionable maintenance calendar for DIY craft studios of all sizes. Whether you wield sewing machines, power tools, or specialty equipment, regular care prevents costly downtime, extends the life of your investments, and keeps your creative flow uninterrupted. We’ll break down tasks by frequency—monthly, seasonal, and annual—so you can easily integrate upkeep into your studio routine. From deep cleaning to tool tune-ups, safety checks to workflow optimizations, this is your roadmap to a smoother, safer, and more inspiring creative journey.
How to Build Your Craft Studio Maintenance Calendar
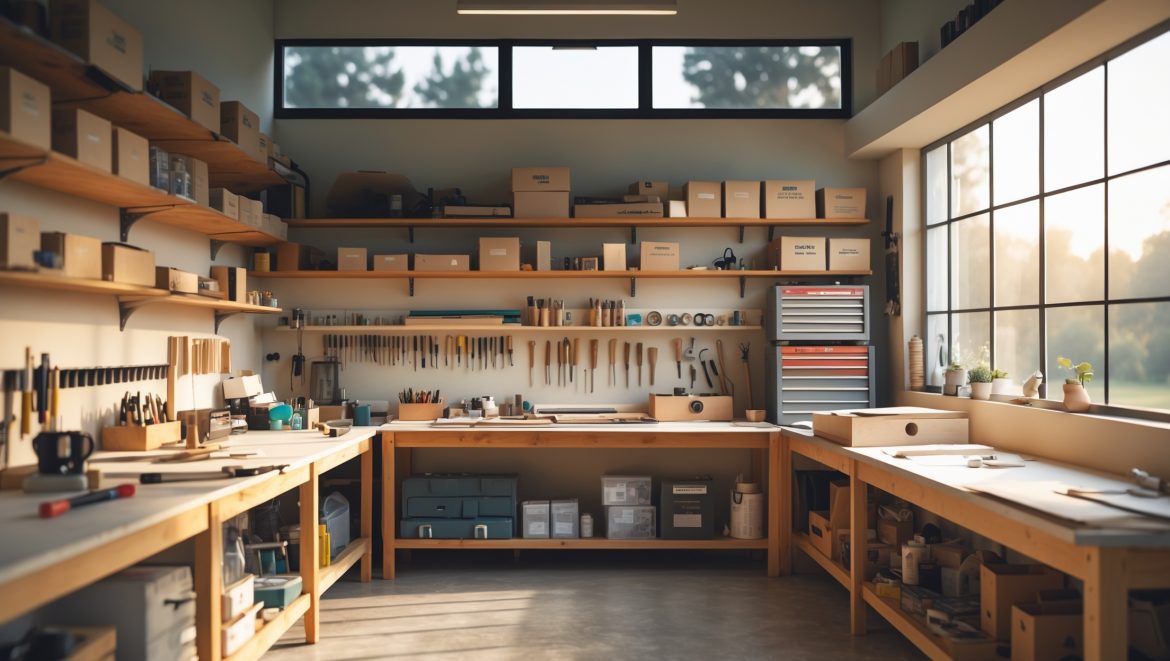
Step 1: Inventory Your Tools and Equipment
Start by listing every tool and piece of equipment you use regularly. Include:
- Hand tools (scissors, knives, pliers, rulers)
- Power tools (drills, sanders, rotary cutters, glue guns)
- Specialty machines (sewing machines, die cutters, 3D printers, heat presses)
- Studio infrastructure (workbenches, lighting, ventilation units, storage)
Document brand, model, purchase date, and any warranties. This baseline makes scheduling and tracking maintenance straightforward.
Step 2: Research Manufacturer Recommendations
Consult manuals or manufacturer websites for each item. Most provide specific maintenance intervals (e.g., “oil after 8 hours of use,” “replace filter every 3 months”). Record these alongside your inventory.
Step 3: Assess Studio Usage Patterns
Consider how often you use each tool. High-frequency tools demand more attention than rarely-used ones. If your sewing machine is running daily, monthly cleanings are a must. If your laser cutter is only used seasonally, adjust accordingly.
Step 4: Set Up a Physical or Digital Calendar
Choose one method to track your schedule:
- Wall calendar or whiteboard in your studio
- Notebook or bullet journal
- Digital app (Google Calendar, Trello, Notion)
Input each maintenance task with reminders. Color-code by frequency for quick reference.
Monthly Maintenance Tasks
1. Clean and Inspect Hand Tools
Wipe down all hand tools with a damp cloth. For sticky residues (glue, paint, resin), use appropriate solvents. Inspect for rust, loose handles, or dull blades. Sharpen or replace as needed.
2. Test Power Tools and Safety Features
Run each power tool briefly and listen for strange noises. Check safety guards, switches, and cords. Clean vents with compressed air. Address fraying cords or stuck switches immediately.
3. Vacuum and Dust Work Surfaces
Dust accumulates quickly and can hinder both safety and project quality. Use a shop vac or microfiber cloths to clean benches, shelves, and storage bins. Don’t forget vertical surfaces and tool racks.
4. Reorganize Materials and Supplies
Return stray supplies to their proper places. Check for expired adhesives, dried-out paints, or damaged materials, and dispose of them safely. Rotate older supplies to the front to avoid waste.
5. Lubricate Moving Parts
Apply machine oil to hinges, scissors, rotary cutters, and any tool with moving parts. Use appropriate lubricants for specialty machines (consult your manual).
6. Empty Trash and Recycling Bins
Full bins attract pests and create hazards. Replace liners and wipe down bin interiors monthly.
Seasonal Maintenance Tasks (Quarterly or Biannually)
1. Deep Clean Floors and Hard-to-Reach Areas
Move furniture and storage units to vacuum behind and underneath. Mop floors with the right cleaner for your surface.
2. Inspect and Replace Air Filters
Check filters in any studio air purifiers, ventilation units, or dust collection systems. Replace or clean as recommended to maintain air quality.
3. Review Tool Calibration and Alignment
Check the accuracy of cutting tools, rulers, sewing machine timing, and any device requiring precision. Recalibrate or align as needed. Mark calibration dates on your tools or in your log.
4. Check Storage for Pests and Moisture
Inspect all storage bins, drawers, and shelves for signs of pests (droppings, webbing) or moisture (mold, mildew). Use silica gel packs and pest deterrents where appropriate.
5. Test Emergency Equipment
Ensure fire extinguishers are fully charged and easily accessible. Test smoke and carbon monoxide detectors. Replace batteries and log test dates.
6. Refresh Lighting and Replace Bulbs
Good lighting is critical for safety and accuracy. Check for flickering or dim bulbs and replace them. Dust light fixtures for maximum output.
Annual Maintenance Tasks
1. Comprehensive Tool Overhaul
Disassemble key tools and machines (as directed by the manual) for deep cleaning and inspection. Replace worn parts, lubricate all bearings, and check for hidden damage.
2. Safety Audit
Walk through your studio with a critical eye. Check for blocked exits, overloaded power strips, or tripping hazards. Rearrange as needed to maintain clear, safe paths and work areas.
3. Inventory Review and Restock
Take stock of all consumables: blades, needles, adhesives, tapes, and safety gear. Discard expired or damaged items. Create a restock order to avoid running out mid-project.
4. Update Maintenance Records and Warranties
Review your maintenance log. Update warranty information and note any repairs or replacements. This documentation is invaluable if you need service or file insurance claims.
5. Plan Studio Improvements
Reflect on workflow bottlenecks, storage issues, or safety concerns that cropped up during the year. Make a list of improvements or upgrades to implement in the coming months.
Tips for Effective Maintenance Scheduling
Batch Similar Tasks
Dedicate a half-day each month to maintenance. Batching tasks reduces setup time and ensures nothing gets missed.
Set Visual Reminders
Use color-coded tags or stickers on tools to indicate last maintenance date. Wall charts or checklists keep recurring tasks top-of-mind.
Enlist Help (Where Possible)
If you share your studio with family or fellow crafters, assign tasks or rotate responsibilities. Maintenance is lighter when shared.
Printable Maintenance Calendar: Example Template
- First Week of Each Month: Clean hand tools, test power tools, vacuum surfaces, empty bins, lubricate moving parts.
- Start of Each Season: Deep clean floors, replace air filters, calibrate tools, check storage for pests, test emergency equipment, refresh lighting.
- Every January: Comprehensive tool overhaul, safety audit, inventory review, update records, plan improvements.
Customize this template to fit your toolset and schedule. Consistency is key—set calendar reminders and treat maintenance days as non-negotiable appointments with your creative future.
Common Pitfalls and How to Avoid Them
- Procrastination: Maintenance can feel less urgent than creating, but deferred care leads to breakdowns at the worst times. Schedule tasks immediately after regular studio time to build the habit.
- Skipping Documentation: Keep a simple log (digital or paper) of completed tasks and issues found. This saves time diagnosing problems and provides proof of care for warranties.
- Neglecting Rarely-Used Tools: Even tools you use once a year need cleaning, lubrication, and inspection. Don’t let them become hidden hazards.
- Forgetting Consumables: Running out of blades, glue, or safety supplies mid-project is frustrating. Build restocking into your annual review.
Conclusion: A Maintained Studio is a Creative Powerhouse
A preventive maintenance calendar is more than a chore chart—it’s an investment in your creative life. By setting aside regular time for cleaning, inspection, and tune-ups, you ensure your tools are always ready, your studio remains safe, and your workflow is smooth and enjoyable. The cost of a little routine care is dwarfed by the benefits: fewer breakdowns, less waste, and more time spent in the creative zone rather than troubleshooting avoidable problems.
Adopting a maintenance mindset also extends the lifespan of your equipment, protects your investment, and can even inspire new studio improvements. Maintenance days become an opportunity to reconnect with your tools, appreciate the space you’ve built, and set the stage for your next creative adventure. Whether you craft for fun or for business, a well-maintained studio is the foundation of your success. Start your calendar today, and let preventive care fuel your creative dreams for years to come.


I noticed you suggest documenting warranty info with each tool in the inventory. If I have a mix of old and new equipment, what’s the best way to keep all this info updated without it getting overwhelming?
To keep warranty info organized for both old and new tools, try using a simple spreadsheet or a dedicated app where each tool gets its own entry. Update details when you buy new equipment or whenever warranties expire. Setting a monthly reminder to review and update this list can help prevent it from becoming overwhelming.
Are there affordable tools or apps you recommend for reminding me about seasonal or annual maintenance tasks? I want something budget-friendly that won’t add much complexity to my routine.
You might find simple reminder apps like Google Calendar or Apple Reminders useful—they allow you to set up recurring tasks without any extra cost. If you prefer something specialized but still straightforward, apps like Todoist offer free plans where you can create maintenance checklists and get timely reminders. Both options are easy to use and budget-friendly.
In your experience, does preventive maintenance actually help avoid major repairs, or are there some tools that typically need to be replaced regardless of upkeep?
Preventive maintenance can definitely extend the life of most tools and help you catch small issues before they turn into big repairs. However, some tools—like utility knives or sandpaper—have parts that wear out naturally and will need replacement no matter how well you maintain them. Regular upkeep is still worthwhile for reducing unexpected breakdowns and saving money in the long run.
What do you recommend for troubleshooting if you notice a tool isn’t performing well, even after following the scheduled maintenance outlined in your calendar?
If a tool isn’t performing well after regular maintenance, try checking for less obvious issues like worn-out cords, loose parts, or hidden debris. Test the tool on a different outlet or material to rule out external factors. If problems persist, consult the manufacturer’s manual or consider a professional repair to prevent further damage.
My ventilation unit gets dusty quickly with all my craft projects. How often should I realistically clean or check it to keep the air quality safe for my kids?
With frequent crafting, it’s a good idea to check your ventilation unit’s filters and vents every month. Clean or replace filters as soon as you notice buildup, and give the exterior a quick wipe-down weekly. This routine helps maintain healthy air quality, especially when kids are around.
If my studio is really small and space is tight, do you have any tips for optimizing storage or workflow as part of regular maintenance to avoid clutter building up?
To keep clutter at bay in a small studio, consider wall-mounted racks or pegboards for tools, and use labeled bins or drawers for supplies. Regularly schedule a quick tidy-up after each project and return items to their spots. This makes maintenance easier and ensures your workflow stays smooth even in a tight space.
How detailed should the tool inventory be for someone who has a lot of similar items, like multiple pairs of scissors or several different types of glue guns? Should each be tracked separately?
If you have several similar items, it’s best to track each one separately in your inventory. Note details like size, brand, and condition for each pair of scissors or glue gun. This helps you keep maintenance schedules accurate and ensures you know exactly what you have on hand.
I’m wondering about keeping my sewing machine running smoothly. Are there certain signs I should look for to tell when it needs maintenance if I use it both heavily and sporadically throughout the year?
Watch for signs like unusual noises, skipped stitches, thread bunching, or difficulty feeding fabric—these often mean your sewing machine needs maintenance. Even with varied use, regular cleaning, oiling, and checking for lint build-up can prevent bigger issues. If adjustments don’t help, it might be time for a professional tune-up.
Could you give examples of seasonal tasks that might be overlooked in a typical craft studio, especially for those of us who mostly focus on day-to-day tool cleaning?
Some seasonal tasks that often get missed include checking and replacing air filters in ventilation systems, inspecting for humidity or moisture issues that could affect materials, lubricating sewing machine parts, tightening screws on equipment, and testing backup lighting or batteries. Scheduling these along with regular cleaning helps prevent bigger problems down the line.
What would you suggest as a good starting point if your craft studio is already pretty cluttered and overdue for maintenance—should you tackle tool tune-ups first, or focus on decluttering and cleaning the studio space?
Start by decluttering and cleaning your studio space before moving on to tool tune-ups. A tidy area makes it easier to access and service your tools, and you’ll spot any items you no longer use. Once your workspace is organized, you can move through tool maintenance more efficiently.
My studio tends to get cluttered which sometimes leads to skipping maintenance altogether. Do you have tips for integrating cleaning and tool tune-ups into a workflow so it doesn’t feel overwhelming?
Try breaking maintenance into small, regular tasks rather than setting aside large blocks of time. For example, dedicate the last ten minutes of each work session to tidying and checking one or two tools. Keeping a visible checklist can help you stay on track and prevent things from piling up.
When you mention deep cleaning and workflow optimizations, what are some examples of annual tasks that really make a difference in a busy studio?
Annual deep cleaning in a busy studio can include thoroughly dusting and lubricating power tool motors, cleaning air filters, and emptying dust collection systems. For workflow optimization, reorganizing workstations, auditing tool storage for efficiency, and updating inventory of frequently used materials can really streamline daily tasks and reduce downtime.
How do you handle maintenance for older tools where manuals or manufacturer guidance might no longer be available? Any general tips for keeping vintage or discontinued equipment running smoothly?
For older or vintage tools without manuals, start by cleaning them thoroughly and lubricating moving parts with a suitable oil. Inspect for wear or damage, tightening any loose screws or bolts. Use gentle cleaners and avoid harsh chemicals. If replacement parts are needed, check specialty hardware stores or online forums where enthusiasts share tips and resources for discontinued equipment.
For someone working on a tight budget, are there particular tool tune-ups or safety checks you consider absolutely essential to prioritize, and are there maintenance tasks that can reasonably be spaced out without too much risk?
If you’re on a tight budget, prioritize cleaning tools after use, checking power cords for wear, and keeping blades and bits sharp—these steps are vital for safety and tool life. Tasks like deep lubrication or replacing non-essential parts can usually be spaced out, as long as you monitor for signs of trouble like odd noises or decreased performance.