Introduction: Why Advanced Tool Maintenance Matters for DIY Crafters
If you’ve set up a dedicated craft studio or workshop, you already know that high-quality tools are an investment in your creative process. But even the best scissors, rotary cutters, glue guns, and specialty saws can quickly lose their edge, precision, or reliability without proper care. While basic cleaning and storage provide a good start, advanced tool maintenance techniques go further—protecting your investment, saving money, and optimizing your creative results.
This in-depth guide is for crafters ready to elevate their studio upkeep. Whether you work with wood, fabric, resin, paper, or mixed media, you’ll learn how to go beyond beginner routines with expert methods for deep cleaning, lubrication, troubleshooting, and preventive care. We’ll also cover strategies for organizing maintenance schedules, choosing the right products, and identifying early warning signs of tool trouble. Let’s make your creative space a haven of efficiency, safety, and inspiration—one sharpened blade, calibrated machine, and dust-free motor at a time.
Understanding Your Tools: Materials, Mechanisms, and Maintenance Needs
Hand Tools vs. Power Tools: Different Demands
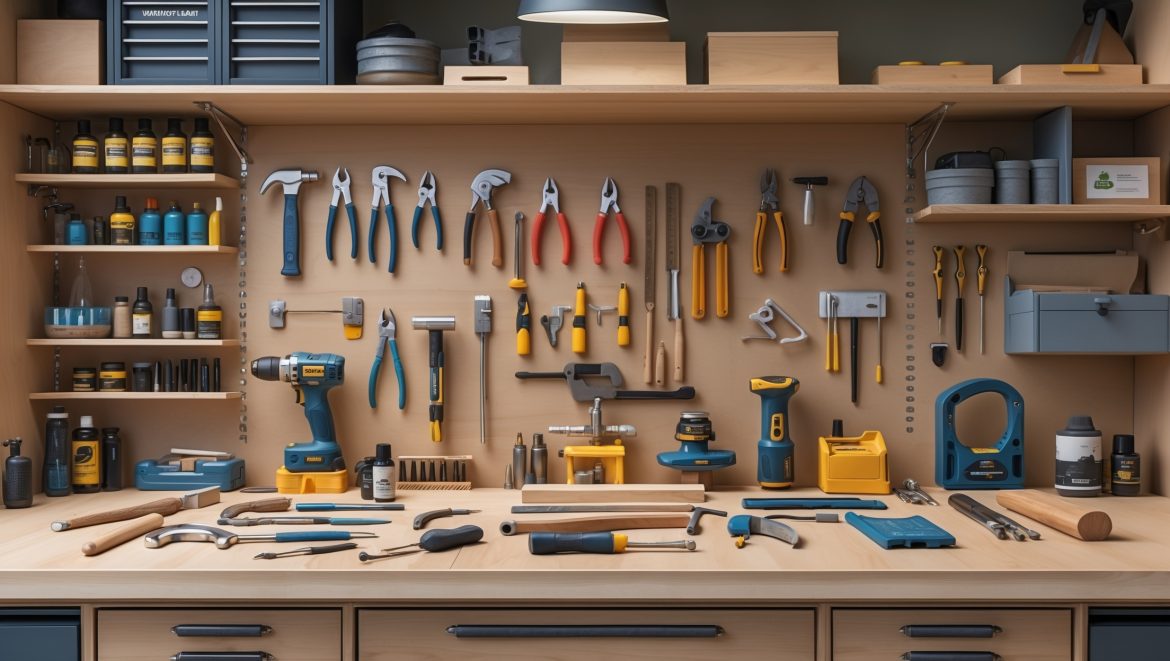
Craft studios often blend traditional hand tools with modern power equipment. Each tool type has unique maintenance requirements:
- Hand Tools (scissors, rulers, chisels, blades): Require sharpening, rust prevention, alignment, and periodic lubrication.
- Power Tools (mini-saws, rotary tools, die-cutting machines): Need deeper cleaning, regular lubrication, filter changes, and electrical checks.
Material Sensitivities
Tool construction materials—steel, aluminum, plastic, wood—react differently to moisture, heat, and chemicals. Stainless steel resists rust but still benefits from oiling; plastic housings can warp if cleaned with harsh solvents. Always consult manufacturer guidelines before using new maintenance products.
Pro-Level Cleaning: Techniques and Products for a Spotless Studio
Daily, Weekly, and Monthly Cleaning Routines
Building a layered cleaning schedule keeps tools in top shape:
- Daily: Wipe down surfaces, remove debris, and store tools in a dry area.
- Weekly: Deep-clean used tools with appropriate solvents or wipes. For example, remove glue buildup from glue gun nozzles and adhesive shears.
- Monthly: Disassemble key tools (where safe) to clean internal components, clear vents, and remove hidden dust.
Cleaning Power Tools: Step-by-Step
- Unplug the tool and remove all detachable parts.
- Use compressed air to blow dust from crevices and vents.
- Wipe surfaces with a lint-free cloth dampened with isopropyl alcohol or a specialty cleaner.
- Clean moving parts gently, avoiding excess moisture near electrical components.
Cleaning Hand Tools: Beyond the Surface
- Soak metal blades in mild detergent solution to loosen residue.
- Scrub with a soft brush for stubborn grime.
- Dry thoroughly, then apply a thin coat of mineral oil to prevent rust.
Product Recommendations
- Microfiber Cloths: For lint-free wiping.
- Specialty Tool Cleaners: Citrus-based degreasers, resin removers, or glue dissolvers.
- Compressed Air Canisters: For electronics and power tool vents.
Lubrication Mastery: Keeping Tools Running Smoothly
Choosing the Right Lubricant
Not all oils are created equal. Use:
- Light Machine Oil: For moving parts in scissors, rotary cutters, and small machines.
- Dry Lubricant (PTFE or graphite): For hinges or parts that attract dust.
- Grease: For gears in heavy-duty or specialty equipment.
Application Tips
- Apply sparingly—excess lubricant attracts dust and debris.
- Use needle-tip applicators for precision.
- Wipe away any excess after application.
Timing and Frequency
- Lubricate high-use tools monthly; less-used tools every 2–3 months.
- Always lubricate after deep cleaning or exposure to moisture.
Advanced Blade and Bit Care: Sharpening, Alignment, and Replacement
Hand Tool Sharpening
- Scissors and Shears: Use a sharpening stone or ceramic rod. Maintain the original bevel angle to preserve cutting performance.
- Rotary Cutters: Replace blades regularly; clean and oil the mechanism when changing blades.
Power Tool Bits and Blades
- Inspect for nicks and dullness after every major project.
- Use diamond hones or specialty sharpening jigs where appropriate.
- Replace blades or bits showing signs of warping, excessive wear, or visible cracks.
Calibration and Alignment
- Check alignment of cutting guides, fences, or rulers monthly.
- Consult your tool manual for calibration procedures, especially for die-cutters and specialty saws.
Troubleshooting Common Tool Problems: Diagnosing and Fixing Issues
Symptoms and Solutions
- Sticking or Squeaking: Indicates lack of lubrication or dirt buildup. Clean and oil the affected area.
- Poor Performance: Dull blades, clogged vents, or low battery. Sharpen, clean, or replace as needed.
- Unusual Vibrations: Loose screws, worn bearings, or misalignment. Tighten hardware and inspect moving parts.
- Frequent Jams: Debris in moving parts or dull blades. Disassemble, clean thoroughly, and sharpen or replace components.
When to Seek Professional Help
- Electrical faults, sparking, or burning odors.
- Cracked housings or exposed wiring.
- Major calibration required for precision machines.
Organizing a Tool Maintenance Station in Your Craft Studio
Essential Supplies
- Labeled containers for oils, lubricants, and cleaners.
- Dedicated drawers for sharpening stones, brushes, and specialty tools.
- Magnetic trays for small screws and detachable parts.
Workflow Optimization
- Set up a maintenance calendar and logbook for tracking tasks.
- Keep frequently used maintenance supplies within arm’s reach of your main workspace.
- Designate a ventilated area for tasks involving fumes or dust.
Safety Considerations
- Store flammable products in a metal cabinet.
- Wear gloves and eye protection during cleaning and lubrication.
- Dispose of oily rags in a sealed container to prevent fire risk.
Preventive Maintenance: Scheduling and Record-Keeping
Building a Maintenance Calendar
- Use digital reminders or a wall chart to track daily, weekly, and monthly tasks.
- Include tool serial numbers, purchase dates, and warranty expiration in your records.
Tracking Wear and Replacement Cycles
- Document blade and bit changes for each tool.
- Note recurring issues to identify tools that may require professional servicing.
Sample Maintenance Log Entry
- Date: 2024-07-15
- Tool: Cordless rotary tool
- Action: Cleaned vents, lubricated bearings, replaced cutting bit
- Notes: Runs quieter, improved cutting speed
Environmental Factors: Protecting Tools from Humidity, Temperature, and Dust
Humidity Control
- Use silica gel packs or dehumidifiers in storage cabinets to prevent rust.
- Store tools off concrete floors to avoid moisture transfer.
Temperature Stability
- Avoid storing tools in areas subject to extreme cold or heat, which can cause metal fatigue or plastic warping.
- Insulate studio spaces if possible, especially in garages or sheds.
Dust Management
- Install HEPA-filtered air purifiers or use portable dust extractors during sanding, cutting, or grinding.
- Store tools in closed cabinets or cases to reduce exposure.
Tool Storage Innovations: Beyond Basic Organization
Climate-Controlled Cabinets
Invest in small, climate-controlled cabinets for high-value or rare tools. These units regulate humidity and temperature, further extending tool longevity.
Modular Storage Systems
- Stackable bins with built-in desiccant packs for metal tools.
- Magnetic strips for quick access to frequently used items.
- Custom foam inserts in drawers to protect sharp edges and delicate parts.
Mobile Maintenance Carts
Equip a rolling cart with cleaning, lubrication, and sharpening supplies so you can bring your maintenance station to any part of your studio.
Common Advanced Maintenance Mistakes (and How to Avoid Them)
- Over-Oiling: Using too much lubricant attracts dust and can harm tool mechanisms. Always wipe away excess.
- Wrong Cleaner: Harsh chemicals may damage plastics or painted surfaces. Test on an inconspicuous area first.
- Neglecting Calibration: Even high-quality tools lose accuracy over time. Schedule regular alignment checks.
- Improper Storage: Tossing tools into drawers without protection leads to nicks and dull edges. Use protective sheaths or compartmentalized storage.
Upgrading Your Maintenance Skills: Resources and Learning
Online Courses and Tutorials
- Manufacturer websites often provide maintenance videos for specific tools.
- Platforms like YouTube and Skillshare feature advanced tool care demonstrations.
Books and Manuals
- “The Complete Guide to Sharpening” by Leonard Lee (for blades and edges)
- Manufacturer manuals for tool-specific maintenance and troubleshooting
Joining Craft Communities
- Online forums and social media groups offer peer advice on tool upkeep.
- Local maker spaces often host hands-on workshops for equipment care.
Conclusion: Crafting a Legacy of Well-Maintained Tools
Advanced tool maintenance goes far beyond occasional cleaning or blade replacement. By mastering deep-cleaning routines, precise lubrication, and smart troubleshooting, you’ll not only extend the life of your craft studio tools but also ensure that every cut, stitch, or sculpted detail meets your highest standard. A well-maintained tool kit means fewer interruptions, less frustration, and more time spent in the creative flow that makes DIY projects so rewarding.
Think of your studio as a living ecosystem—every tool, storage system, and maintenance habit contributes to the overall health of your workspace. By investing a little extra time each month in advanced upkeep, you protect your creative investments, improve project outcomes, and foster a sense of pride in your craft. Don’t hesitate to document your routines, experiment with new methods, and connect with fellow makers to share insights. As you refine your maintenance skills, your studio will become not just a place to make things, but a testament to your care, expertise, and passion for creative living.


If someone is just upgrading from basic cleaning routines to more advanced preventive maintenance, what would you suggest as the most budget-friendly yet effective first steps for a small craft studio?
For a small craft studio, start by establishing a regular lubrication schedule for your essential tools, as this prevents rust and wear without much expense. Also, invest in proper tool storage like pegboards or lined drawers to avoid unnecessary damage. Both steps are low-cost but make a noticeable difference in tool longevity.
For someone on a budget, which specialized maintenance products are worth investing in, and are there any affordable alternatives for things like lubricants or rust prevention?
If you’re watching your budget, consider investing in a good quality multi-purpose lubricant and a rust eraser—they offer a lot of value and versatility. For affordable alternatives, light machine oil or even mineral oil can work as lubricants, and baking soda paste or fine steel wool can help with rust prevention. Just be sure to test on a small area first to avoid damaging your tools.
Could you share more about organizing maintenance schedules, especially if you have a wide mix of hand and power tools? I find it tricky to keep up with everything and would love some practical examples.
To manage a mix of hand and power tools, try grouping tools by type or maintenance frequency, then create a calendar or spreadsheet with columns for tool name, last serviced date, and next service due. Set reminders for monthly checks on often-used hand tools, and schedule quarterly or semi-annual checkups for power tools. Using color-coded labels or bins can also help you track which tools need attention soon.
How often should I be scheduling preventive maintenance like lubrication or filter changes for my rotary tools to keep them running at peak performance in a busy craft studio?
For rotary tools in a busy craft studio, it’s wise to lubricate moving parts every 40 to 50 hours of use or once a month, whichever comes first. Replace or clean filters just as often, especially if there’s a lot of dust. Always check your manufacturer’s specific recommendations, as some tools may need more frequent attention.
If I accidentally used a harsh cleaner on a plastic tool handle and now it feels warped, is there anything I can do to fix it or at least prevent further damage?
If the plastic handle feels warped after using a harsh cleaner, unfortunately, it can be tough to fully restore its original shape. You can try gently reshaping it by heating it with warm (not hot) water and carefully molding it back, but do this cautiously to avoid more damage. Going forward, clean plastic handles with mild soap and water to prevent further issues.
If I’m on a tight budget, which advanced maintenance technique would you suggest prioritizing to get the longest lifespan out of my most-used craft tools?
If you’re working with a limited budget, focus on regular cleaning and precision lubrication of your most-used tools. These techniques prevent rust and wear, keeping tools in top condition for much longer. Consistent maintenance like this is cost-effective and extends your tools’ lifespan significantly without the need for expensive materials or equipment.
If I am on a budget and can only invest in a couple of advanced maintenance products for my studio, which ones offer the most value for keeping both hand and power tools in top condition?
If you’re prioritizing value, a quality rust inhibitor or protectant spray and a diamond sharpening stone would be excellent choices. The rust inhibitor will help preserve both hand and power tools, while the sharpening stone keeps cutting edges performing at their best. These two products can significantly extend your tools’ lifespan without a big investment.
I noticed you mentioned organizing maintenance schedules. Do you have any templates or methods for tracking tool upkeep, especially for crafters with a mix of hand and power tools?
One effective method is to create a simple spreadsheet where you list each tool, note its type (hand or power), last maintenance date, and next scheduled upkeep. You can add columns for specific tasks like cleaning, oiling, or blade sharpening. Some crafters also use calendar apps with reminders for regular maintenance intervals.
You mentioned avoiding harsh solvents on plastic tool housings—what’s a safe cleaning solution for removing sticky residue or oil build-up from those without causing damage?
For cleaning sticky residue or oil build-up on plastic tool housings, use a mild dish soap diluted in warm water. Apply the solution with a soft cloth or sponge, gently rubbing the area. If extra cleaning power is needed, a small amount of isopropyl alcohol (70%) can be used, but test it on a hidden spot first to ensure it doesn’t harm the plastic.
If I work with a mix of wood and resin projects, how can I safely deep clean my tools without risking cross-contamination between materials?
To prevent cross-contamination between wood and resin, thoroughly clean tools using a two-step process: first, wipe away residue with a disposable cloth, then wash tools with isopropyl alcohol to break down resin. For stubborn buildup, use a dedicated brush for resin and another for wood. Always dry tools fully before switching between materials, and consider labeling tools if you often use separate sets.
What are some ways to spot early signs of tool trouble before it becomes a big issue? I work a lot with both steel and plastic tools, and I’m not sure what warning signs I should look for with each material.
For steel tools, watch for signs like rust spots, pitting, dull edges, and slight bends or warping. Listen for squeaks or grinding noises during use. For plastic tools, check for discoloration, small cracks, brittleness, or areas that feel unusually soft or sticky. Regularly inspecting joints, handles, and working surfaces can help you catch these issues early.
You mentioned calibrating machines as part of maintenance. How do I know when my die-cutting machine or rotary cutter actually needs recalibration, and what signs should I watch for before it affects my projects?
For die-cutting machines, watch for uneven or incomplete cuts, shifting patterns, or increased resistance during operation—these are signs recalibration is needed. With rotary cutters, if your cuts start to veer off, feel uneven, or the blade doesn’t glide smoothly even after cleaning or blade replacement, recalibration may help. Keeping an eye on these changes can prevent issues before they impact your projects.
Could you give some examples of safe lubricants or oils for maintaining craft tools, especially since materials like plastic and steel react so differently to certain products? I don’t want to accidentally damage my tools with the wrong thing.
For steel tools, light machine oil or mineral oil is a safe choice—both help prevent rust without causing damage. For tools with plastic parts, silicone-based lubricants are ideal since they won’t degrade plastic. Always avoid petroleum-based oils on plastic, as they can cause brittleness over time. If in doubt, spot-test a small area or consult your tool’s manufacturer for recommendations.
How often would you suggest performing deep cleaning or electrical checks on smaller power tools like die-cutting machines if they’re only used a few times a month in a craft studio?
For smaller power tools like die-cutting machines that see light use a few times a month, deep cleaning and electrical checks every six months is usually sufficient. Regularly remove dust and debris after each use, but schedule a more thorough inspection and maintenance twice a year to keep the tools running safely and smoothly.
I noticed you mentioned that tool materials react differently to maintenance products. Is there a safe, all-purpose cleaner or lubricant that works across steel, plastic, and wood tools, or do I really need to buy separate products for each?
It’s best to use products suited to each material, since a cleaner that’s safe for steel could damage wood or plastic. While some mild soap and water solutions are generally safe for most surfaces, specialty products help prevent long-term wear or damage. If you want to use just one product, pick a gentle, pH-neutral cleaner and always test it on a small, inconspicuous area first.
For tools made from both metal and plastic, what’s the safest way to clean and maintain each part without causing damage, especially if the manufacturer guidelines are not clear?
For tools with both metal and plastic parts, use a mild soap and water solution with a soft cloth or sponge to clean both surfaces, taking care not to soak any electrical components if present. Dry thoroughly to prevent rust. For metal parts, a light machine oil can prevent corrosion; for plastic, avoid harsh chemicals or abrasives that could scratch or degrade the material.
You mentioned checking manufacturer guidelines before trying new cleaning products, but what would you recommend if the manual is missing or hard to find? Are there any safe go-to products for mixed-material tools?
If you can’t find the manufacturer guidelines, start with mild options like warm water and a small amount of gentle dish soap, using a soft cloth or brush. Avoid harsh chemicals and abrasive pads, as they’re more likely to damage mixed-material tools. For stubborn residue, rubbing alcohol can be used sparingly on metal parts, but always test a small area first.
I’m on a tight budget and want to maximize the life of my craft tools. Can you suggest affordable products or homemade solutions for deep cleaning and rust prevention, especially for tools that see daily use?
You can use white vinegar for soaking rusty or dirty metal tools—just rinse and dry thoroughly after. Baking soda paste works well for scrubbing off grime. To prevent rust, wipe tools dry after use and apply a light coat of mineral oil or even cooking oil. Old toothbrushes are great for getting into crevices without damaging your tools.
If a tool’s manual doesn’t provide much detail about care, especially for less common items like resin mixers, what’s a good rule of thumb for preventive maintenance? Should I default to general advice for similar materials?
When a tool’s manual is lacking, it’s smart to use general care principles for items made of similar materials. For resin mixers, regularly clean off any residue right after use, check for stuck parts or cracks, and store them dry to avoid corrosion or mold. Observing how the tool operates over time can also help you spot early signs of wear.